Qualcomm Robotics RB5 - Smart Camera
Introduction
This demo demonstrates how the Qualcomm RB5/RB6 can be used in AI-capable smart camera devices. It shows how to capture and perform inference, overlay high-quality content, and record only when an intruder is detected using deep learning detection.
Some of the key components it uses:
- QtOverlay - Enables overlaying high-quality interactive and animated QML-based UIs on top of video streams, leveraging GPU acceleration for smooth performance.
- MPEG Inband Metadata - Enables transmitting metadata via a separate stream using MPEG transport protocols.
- GstPrerecord - Allows you to perform video buffering and capture those moments that happen before an event occurs. This is useful for surveillance and monitoring applications where you want to record footage leading up to an incident, not just from when the recording starts.
- GstD - Gives control over multiple GStreamer pipelines from media server applications, boosting the power of GStreamer.
Getting the Demo Code
The source code for this demo is available on demand and the evaluation version of the RidgeRun projects involved during its development.
If you want access, please contact us at here.
Important: The demo was developed and is only available for the Qualcomm RB5 and Linux Ubuntu 20.04.
Dependencies
In order to accomplish the desired behaviour, we use some of our products with out-of-the-box functionalities that significantly reduce development time. For this demo, we will be using:
- QtOverlay - for the overlay.
- MPEG Inband Metadata - for metadata.
- GstPrerecord - for video buffering.
- GstD - for the media server.
- Inference Plug-in for GStreamer - for the inference part.
All the aforementioned products are in the demo source code as evaluation binaries. Please contact us at here.
Moreover, you need to prepare the setup for the inference here: Running Detection.
Demo
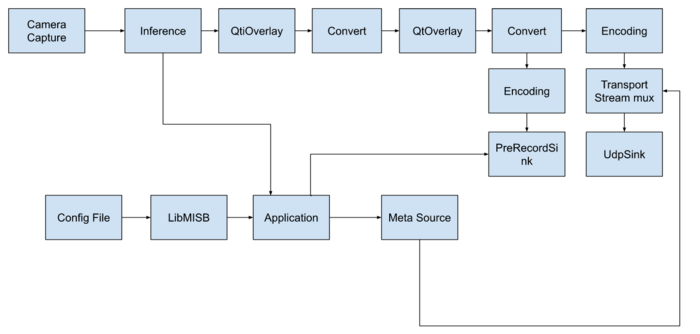
The following image summarises the overall functionality.

The demonstration is shown in the following video:
Run the demo
Once you get the code, you should see the following files:
├── gstreamer
│   └── meson.build
├── meson.build
├── pre-install.sh
├── README.md
├── smart-camera
│   ├── meson.build
│   ├── overlay
│   │   ├── disabled.png
│   │   ├── enabled.png
│   │   ├── main_security.qml
│   │   ├── main_security.qmlc
│   │   ├── preview.png
│   │   └── recording.png
│   ├── pipelineentity.c
│   ├── pipelineentity.h
│   └── smart_camera.c
└── subprojects
    ├── gstd-1.x.wrap
    ├── gstmetadata.wrap
    ├── gstprerecord.wrap
    ├── gstptzr.wrap
    ├── gstqtoverlay.wrap
    ├── gstrtspsink.wrap
    ├── libmisb.wrap
    └── packagefiles
        ├── gst-metadata-1.6.4-rb5-ubuntu-20.04.tar.gz
        ├── gstprerecord-1.6-rb5-ubuntu-20.04.tar.gz
        ├── gstptzr-0.7-rb5-ubuntu-20.04.tar.gz
        ├── gstqtoverlay-0.7-rb5-ubuntu-20.04.tar.gz
        ├── gstrtspsink-0.12.1-rb5-ubuntu-20.04.tar.gz
        └── libmisb-0.1.0-rb5-ubuntu-20.04.tar.gz
It requires the installation of the plug-ins in your system. For installing, please:
1. Run the pre-install script:
bash pre-install.sh
2. Build, compile and install the project:
meson builddir --prefix=/usr
ninja -C builddir
ninja -C builddir install
3. Run the project
smart_camera -q ./smart-camera/overlay/main_security.qml
Application Parameters
For a flexible configuration, we exposed the following arguments which can be used to tune the application. This includes:
| Option | Type | Description |
|---|---|---|
| --help | Shows the help message | |
| -q, --qmlfile | string | Path to the .qml file with the overlay description |
| -c, --configfile | string | Path to the configuration file of the MLE SNPE. By default: /data/misc/camera/mle_snpe.config |
| -p, --prerec-time | int | Time to be buffered before an intruder enters the scene. By default: 60000ms (1 minute) |
| -u, --udp-port | int | UDP port to send the packets for a live remote view of the camera. Range: 0 - 65535. Default: 1234. |
For example:
smart_camera -q ./smart-camera/overlay/main_security.qml -p 30000 -u 3000
lleon: Complete (please remove this box when addressed) |
How to Use
In this case, we assume you are on a Qualcomm RB5 Development Kit. In this case, the recordings are generated only if a person is detected in front of the camera. You can pose in front, and a recording will be generated for at least 120 seconds (60 seconds before the detection and 60 seconds after the detection). The times can be extended using the application's parameters in the same path where the command was launched.
How to Open the Recordings
You can open the files using VLC video player.


