NVIDIA Jetson Orin - Serial Console
Micro USB
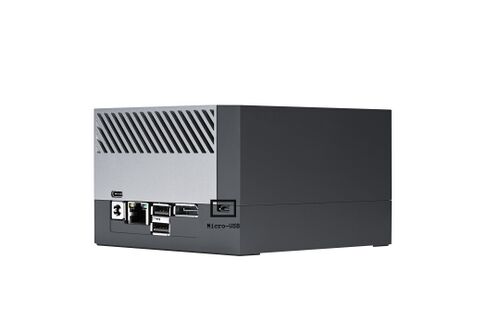
To use the micro USB port to access serial control connect the cable to the port shown in the following image.

Connecting this port to a PC running Ubuntu using a micro-USB cable will register four serial ports in the PC. They will be assigned devices /dev/ttyACM0, /dev/ttyACM1, /dev/ttyACM2 and /dev/ttyACM3, assuming no other /dev/ttyACMn existed before the connection. This will only work if the board is connected to the power supply but will work even if it is not powered up.
The debug port will be the one in the last position, usually /dev/ttyACM0.
To connect to the debug port on the Developer Kit, any serial console interface can be used.
Using minicom
To use minicom for accessing the debug port, make sure you have installed minicom on your PC:
apt install minicom
and then open minicom on your PC with the corresponding parameters:
minicom -D /dev/ttyACM0 -8 -b 115200
If you have trouble accessing the /dev/ttyACM0 device, it may be related to the ownership of the serial port device. It is usually owned by root, but available to the dialout group:
$ ls -al /dev/ttyACM*
crw-rw---- 1 root dialout 188, 0 Oct 31 15:56 /dev/ttyACM0
crw-rw---- 1 root dialout 188, 1 Oct 31 15:56 /dev/ttyACM1
crw-rw---- 1 root dialout 188, 2 Oct 31 15:56 /dev/ttyACM2
crw-rw---- 1 root dialout 188, 3 Oct 31 15:57 /dev/ttyACM3
You can either run the minicom command as the super-user (not recommended for long-term use) or add your user to the dialout group:
sudo addgrp $USER dialout
You may need to log-out and log back in for the group change to be applied.
When you have the setup ready and you have connected to the corresponding serial port, you'll be able to watch the full output of the startup process from the early stages, including the bootloader debug:
[0000.086] I> MB1 (prd-version: 1.0.0.0-t194-41334769-a3872862)
[0000.091] I> Boot-mode: L0 coldboot
[0000.094] I> chip revision : A02
[0000.097] I> Bootrom patch version : 7 (correctly patched)
[0000.102] I> ATE fuse revision : 0x200
[0000.106] I> Ram repair fuse : 0x0
[0000.109] I> Ram Code : 0x0
[0000.111] I> rst_source : 0x0
[0000.114] I> rst_level : 0x0
[0000.118] I> Boot-device: eMMC
...
USB-C
To use the USB type C port to access serial control connect the cable to the port shown in the following image

Connecting this port to a PC running Ubuntu using a USB-C cable will register one serial port in the PC. They will be assigned the device /dev/ttyACM0, assuming no other /dev/ttyACMn existed before the connection. This will only work if the board is connected to the power supply but will work even if it is not powered up.
To connect to the debug port on the Developer Kit, any serial console interface can be used.
Using minicom
You can use minicom for accessing just like you use in the Micro-USB access. See the Micro-USB step to see how to use the minicom.


