NVIDIA Jetson Orin - Flashing commands for emulation
The Jetson AGX Orin Developer Kit allows you to emulate all the Orin modules by using a simple command line script that flashes the desired configuration into the Orin. It will allow you to emulate the hardware specifications as well as the performance you would get in the selected configuration. There are six available possible configurations that the NVIDIA Jetson AGX Orin can run. There is the original configuration which is the Jetson AGX Orin of 64 GB, and then the other five configurations are for the platforms that you can emulate on the Jetson AGX Orin of 64 GB. These configurations are:
1. Jetson AGX Orin 32GB.
2. Jetson Orin NX 16GB.
3. Jetson Orin NX 8GB.
4. Jetson Orin Nano 8GB.
5. Jetson Orin Nano 4GB.
There are flashing scripts that come with the installation of NVIDIA JetPack 5.0.2 that you can use to flash the board with the configuration of your choice. Follow the instructions below to flash the board from the command line. The instructions in the article assume that you have already downloaded and installed NVIDIA JetPack. If that is not the case, refer to Installing Jetpack.
Flashing the board
1. If your target module is the Jetson Orin Nano, refer to the section Add support for NVIDIA Jetson Orin Nano, otherwise, you can skip this step.
2. Go to the NVIDIA SDK installation folder:
cd $HOME/nvidia/nvidia_sdk/JetPack_5.0.2_DP_Linux_JETSON_AGX_ORIN_TARGETS/Linux_for_Tegra
In there you will have the flashing scripts for the emulation of the NVIDIA Jetson AGX Orin 32 GB, NVIDIA Jetson AGX Orin NX 16 GB, NVIDIA Jetson AGX Orin NX 8 GB and Nano (if you followed step #1). This applies to the current version of NVIDIA JetPack, for later versions other configurations will be included.
3. Put the board on recovery mode following the instructions in Recovery Mode and make sure that the PC recognizes the board. To verify the board is recognized, you can run the following command on your host computer:
lsusb
If the Orin is in recovery mode, you should see a line similar to the following among the command output:
Bus 001 Device 011: ID 0955:7023 NVidia Corp
4. Select a configuration and chose the appropriate flashing command from the table below.
| Jetson Orin Module | Flashing Command |
|---|---|
| Jetson AGX Orin 64GB | sudo ./flash.sh jetson-agx-orin-devkit mmcblk0p1 |
| Jetson AGX Orin 32GB | sudo ./flash.sh jetson-agx-orin-devkit-as-jao-32gb mmcblk0p |
| Jetson Orin NX 16GB | sudo ./flash.sh jetson-agx-orin-devkit-as-nx16gb mmcblk0p1 |
| Jetson Orin NX 8GB | sudo ./flash.sh jetson-agx-orin-devkit-as-nx8gb mmcblk0p1 |
| Jetson Orin Nano 8GB | sudo ./flash.sh jetson-agx-orin-devkit-as-nano8gb mmcblk0p1 |
| Jetson Orin Nano 4GB | sudo ./flash.sh jetson-agx-orin-devkit-as-nano4gb mmcblk0p1 |
5. After the flashing is finished, the board will boot up automatically and you can setup the initial configuration. To install the remaining NVIDIA Jetson packages, run the following command on the board:
sudo apt update
sudo apt install nvidia-jetpack
6. To make sure the board is actually emulating the selected configuration. You can run the following command:
sudo jetson_clocks
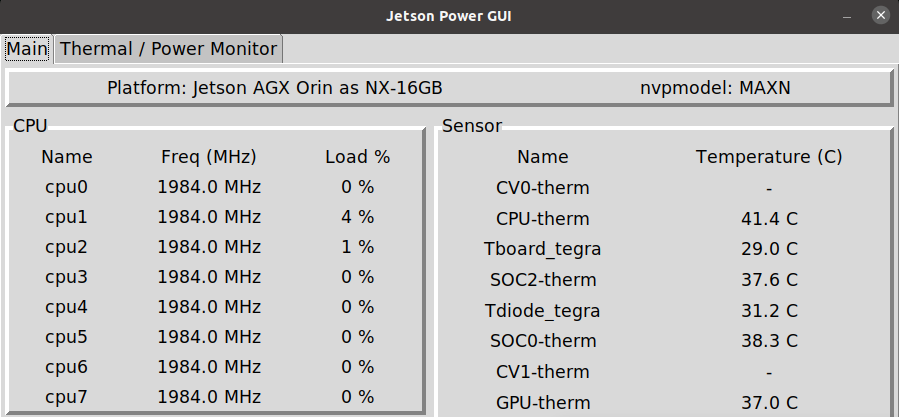
At the top, the platform being run is listed. For instance, if you chose to emulate the NVIDIA Jetson Orin NX 16 GB, the platform should say "Jetson AGX Orin as NX-16GB". If you decided not to emulate any platform, but to run the original configuration, the platform listed should be "Jetson AGX Orin". As an example, Figure 1 was captured while emulating the Jetson Orin NX.

Add support for NVIDIA Jetson Orin Nano
If you need to add support to emulate the NVIDIA Jetson Orin Nano follow the instructions below. Otherwise, you may skip this section.
1. ![]() Download the orin-nano-overlay-351.tbz2 tarball. We will refer to the download path as NANO_OVERLAY_PATH.
Download the orin-nano-overlay-351.tbz2 tarball. We will refer to the download path as NANO_OVERLAY_PATH.
2. Extract Orin Nano Emulation Overlay tarball
cd $HOME/nvidia/nvidia_sdk/JetPack_5.0.2_DP_Linux_JETSON_AGX_ORIN_TARGETS
sudo tar -xpf $NANO_OVERLAY_PATH/Orin_Nano_Overlay_35.1.tbz2
When you download the files, you should see a file structure like the following:
Orin_Nano_Overlay_35.1
└── Linux_for_Tegra
    ├── bootloader
    │   ├── bpmp_t234-TA990SA-A1_prod.bin
    │   ├── bpmp_t234-TE990M-A1_prod.bin
    │   ├── t186ref
    │   │   ├── BCT
    │   │   │   ├── tegra234-p3701-0000-p3737-0000-TE970M-8gb-sdram.dts
    │   │   │   └── tegra234-p3701-0000-p3737-0000-TE970M-wb0sdram.dts
    │   │   ├── tegra234-bpmp-3701-0000-as-3767-0003-3737-0000.dtb
    │   │   └── tegra234-bpmp-3701-0000-as-3767-0004-3737-0000.dtb
    │   └── tegra234-p3701-p3737-8GB-lpddr5-665MHz-f2-sdram.dtsi
    ├── jetson-agx-orin-devkit-as-nano4gb.conf -> p3737-0000+p3701-0000-as-p3767-0004.conf
    ├── jetson-agx-orin-devkit-as-nano8gb.conf -> p3737-0000+p3701-0000-as-p3767-0003.conf
    ├── kernel
    │   └── dtb
    │       ├── tegra234-p3701-0000-as-p3767-0003-p3737-0000.dtb
    │       └── tegra234-p3701-0000-as-p3767-0004-p3737-0000.dtb
    ├── p3737-0000+p3701-0000-as-p3767-0003.conf
    ├── p3737-0000+p3701-0000-as-p3767-0004.conf
    └── rootfs
        └── etc
            ├── nvpmodel
            │   ├── nvpmodel_p3767_0003.conf
            │   └── nvpmodel_p3767_0004.conf
            └── systemd
                └── nvpower.sh

10 directories, 16 files
These are the needed files to flash the Jetson AGX Orin as the Jetson Orin Nano. Finally, you can go back to Flashing the board and follow the remaining steps.


