V4L2 FPGA - Getting the Code - Building and Installation Guide
| V4L2 FPGA |
|---|
 |
| Introduction |
| Getting the Code |
| Examples |
| GStreamer Pipelines |
| Supported Platforms |
| Contact Us |
Getting the Code
V4L2 FPGA is a RidgeRun's professional product under development. Contact support@ridgerun.com with any questions about release dates.
Supported Platforms
- NVIDIA®Jetson Xavier™
- i.MX 8
- Zynq 7000-based SoC
- Zynq MP-SoC-based systems
Building the project
The V4L2 FPGA project is divided into two building stages for supported platforms.
- FPGA firmware: stage to build the binary for the FPGA on the platform. This stage is only performed on the development machine (PC) and it requires the Vivado HLS component preinstalled.
- V4L2 driver: stage to build the V4L2 driver for the required platform. It might build natively on the platform, Petalinux, or using Yocto distro.
The instructions will be highlighted:
Light Blue for development machine instruction
Light Green for target machine instruction
FPGA Firmware
Dependencies
- Vivado HLx 2018.2
- Vivado HLS >= 2018.2
These tools are located at https://www.xilinx.com/support/download.html and you can follow these installation instructions.
Build
This building method is applicable to all supported platforms.
The dependencies are met to follow these instructions:
1. Add Vivado executables to your path:
PATH=$PATH:/opt/Xilinx/Vivado/2018.2/bin/
2. Move the top folder for the FPGA code
cd v4l2-pcie/src/hdl/
3. Build the FPGA accelerator. Currently the project has available three accelerators: video_generator, convolution and example. All accelerators should build individually as follows:
- Video Generator
make ACCELERATOR=video_generator FPGA_MODEL=xc7a50tcsg325-2 bitstream_build
- Video Generator
make ACCELERATOR=demo FPGA_MODEL=xc7a50tcsg325-2 bitstream_build
- Convolution
make ACCELERATOR=convolution FPGA_MODEL=xc7a50tcsg325-2 bitstream_build
- Example
make ACCELERATOR=example FPGA_MODEL=xc7a50tcsg325-2 bitstream_build
where xc7a50tcsg325-2 is the PicoEVB FPGA model.
V4L2 Driver
The driver allows for communication with the accelerator. This can be built either natively for the Xavier or using Yocto for the i.MX 8.
NVIDIA Jetson-based boards
The dependencies are met to follow these instructions:
1. Move the top kernel folder and build
cd v4l2-fpga/src/kernel/pci_driver
make
The resulting kernel module is located on v4l2-fpga/src/kernel/pci_driver/xilinx.ko
Zedboard or Zynq Ultrascale +
The dependencies are met to follow these instructions:
1. Install the Linux Sources and Headers.
By default, it is not exported. To get it working without regenerating the image:
# For the binaries
petalinux-build -c linux-xlnx
petalinux-build -c kernel-devsrc
This will generate the RPM files in:
$PRJ/build/tmp/work/$PLATFORM/
Look for the rpm files
In order to get all the tools, define the self-host suite in Petalinux-Packages when using petalinux-build -c rootfs
It may happen that the modules are not compiled when installing with rpm: rpm -ivh --nodeps $PACKAGE. Just go to usr/src/kernel and type make
2. Move the top kernel folder and build
cd v4l2-fpga/src/kernel/axi_driver
make
The resulting kernel module is located on v4l2-pcie/src/kernel/axi_driver/xilinx.ko
iMX8
RidgeRun offers a Yocto layer containing RidgeRun commonly used packages. You can download this package from https://github.com/RidgeRun/meta-ridgerun.
It contains a recipe to build the plugin but you need to purchase V4L2-PCIe with full source code, from https://shop.ridgerun.com/products/fpga-v4l2-pcie-driver
- Adding meta-ridgerun to your Yocto build
First you need to copy meta-ridgerun in your sources directory:
cp -r meta-ridgerun $YOCTO_DIRECTORY/sources/
Then add the RidgeRun meta layer to your bblayers.conf file. First, go to the build configuration directory
cd $YOCTO_DIRECTORY/build/conf/
Open the bblayers.conf file and add the RidgeRun meta layer path $YOCTO_DIRECTORY/sources/meta-ridgerun to BBLAYERS
- Once you have access to the repository, please open pcie-fpga-v4l2_0.1.0.bb in $YOCTO_DIRECTORY/sources/meta-ridgerun/recipes-kernel/pcie-fpga-v4l2/
- Modify the following line in SRC_URI with the correct v4l2-fpga URL by changing <Customer-Directory> with your own.
SRC_URI = " git://git@gitlab.com/RidgeRun/orders/<Customer-Directory>/pcie-fpga-v4l2.git;protocol=ssh;branch=${SRCBRANCH}"
- Make sure you have added your ssh key to your GitLab account. For more information: SSH Information
- Finally build the recipe:
bitbake pcie-fpga-v4l2
The resulting kernel module is located at build/tmp/work/imx8mqevk-poky-linux/pcie-fpga-v4l2/0.1.0-r0/image/.
- You can also build the complete image using the command
bitbake fsl-image-multimedia -k
This will generate a the imx8evq/build/tmp/deploy/images/imx8mqevk/fsl-image-multimedia-imx8mqevk-20190614130445.rootfs.sdcard.bz2 file.
- SSH Information
The recipe will fetch the repository using your ssh key, thus it's necessary to add the key to Gitlab page.
For adding it, go to Settings->SSH Keys and add your key, if don't have one you can find there a link about how to generate it.
SSH Issue
If GitLab key hasn't added to your list of known hosts on the PC, you will have fetch errors when trying to build the V4L2-FPGA recipe.
One easy way to add the key is when cloning the repository for the first time from GitLab, it will ask if you want to add the key to your list of known hosts.
Example:
git clone git@gitlab.com:RidgeRun/orders/<Customer-Directory>/pcie-fpga-v4l2.git
Installing
The V4L2 FPGA installation has two main steps for supported platforms.
- FPGA firmware: flash the binary on the FPGA on the platform.
- V4L2 driver: install the driver (xilinx.ko file) for each specific platform.
The instructions will be highlighted:
Light Blue for PC instruction
Light Green for Board instruction
FPGA firmware
NVIDIA Jetson-based boards
Programming remotely with XVC
- Run these commands to build the program
1. Install xvcd tool from Xilinx to flash the firmware on the FPGA.
- Install dependencies
sudo add-apt-repository main
sudo add-apt-repository universe
sudo add-apt-repository restricted
sudo add-apt-repository multiverse
sudo apt-get update
sudo apt -y install libftdi-dev
- Pull the
xvcdtool
git clone https://github.com/RHSResearchLLC/xvcd.git && cd xvcd
- Patch the
linux/src/xvcd.cfile with the following code
@@ -292,7 +292,7 @@ int main(int argc, char **argv)
                return 1;
        }

-       if (listen(s, 0) < 0)
+       if (listen(s, 5) < 0)
        {
                perror("listen");
                return 1;
- Building the
xvcdtool
cd linux/src
make
- Running
xvcdtool
sudo ./xvcd -P 0x6015
2. Transfer the firmware to the platform using the Vivado GUI on the host machine.
- Go to
hdl_wrapperdirectory in accelerator code:
cd v4l2-fpga/src/hdl/xilinx/${ACCELERATOR}/hdl_wrapper
- Start Vivado GUI
vivado hdl_wrapper.xpr
- Go to
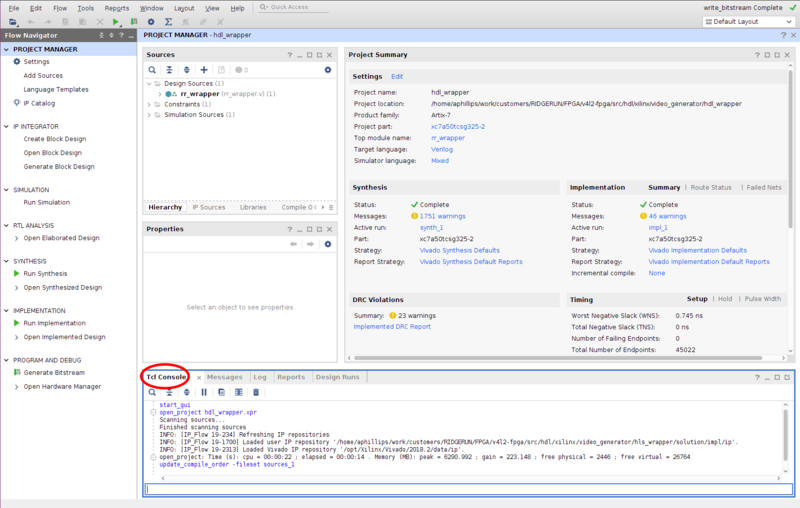
Tcl Console
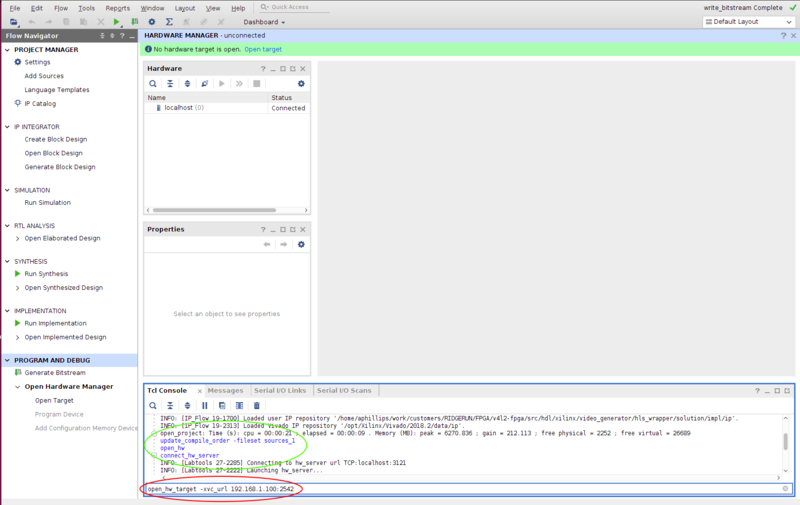
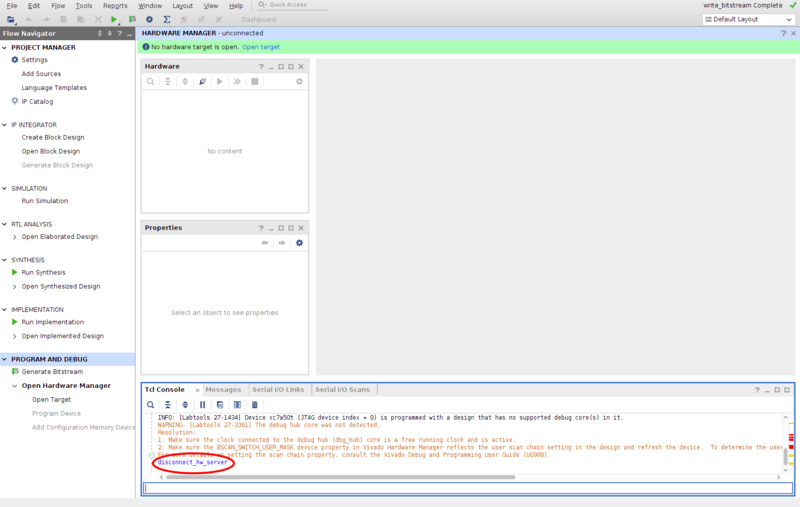
- Run the below commands on the console as shown in Figure 2.
open_hw
connect_hw_server
open_hw_target -xvc_url <TARGET_IP>:2542
Replace the <TARGET_IP> by your target IP on the network. Afterward, choose the .bit generated in 4. and proceed to flash the FPGA.
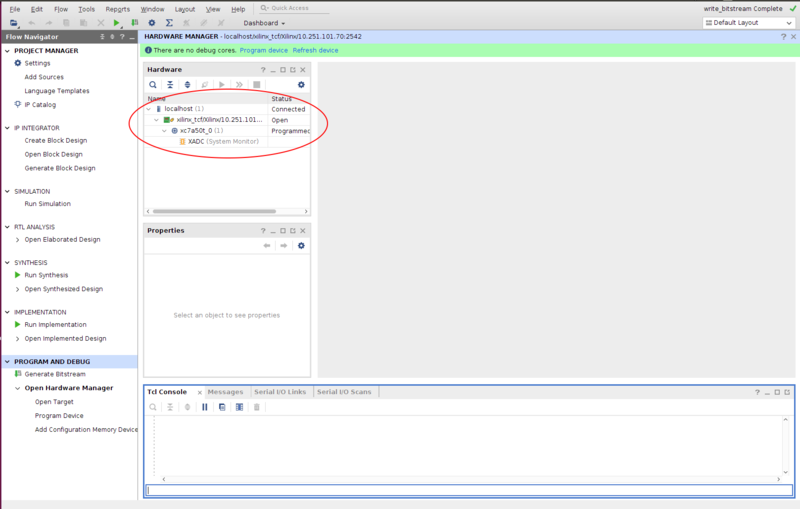
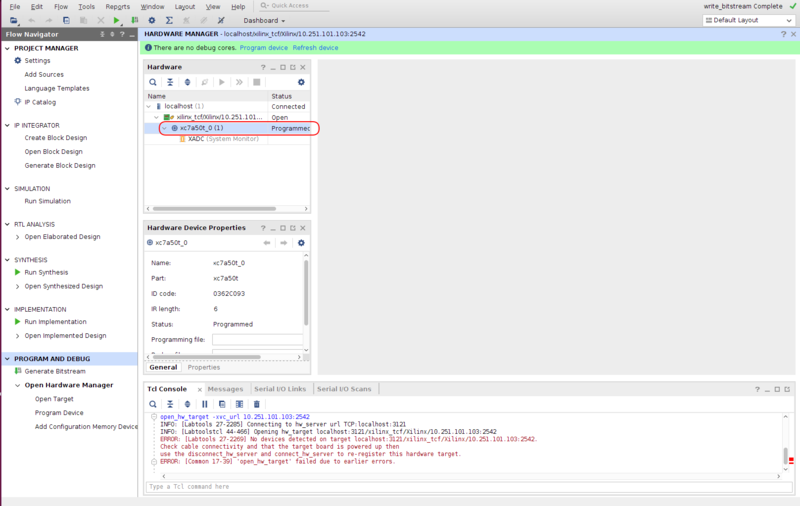
- Verify the connection had been successful as shown in Figure 3.
- The FPGA can be flashed to preserve the firmware temporally (volatile) or permanently (written on EEPROM). Both methods are explained on the
Temporal Flash and Permanent Flash sections.
Temporal Flash
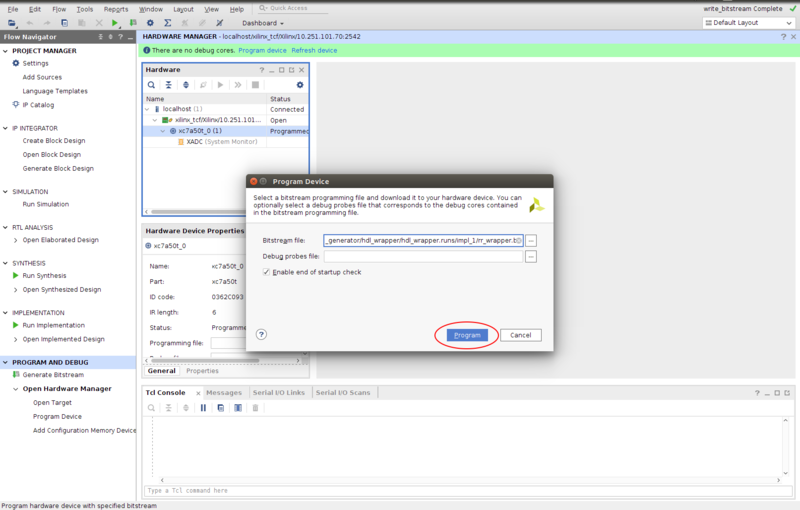
- Go to the Hardware Panel, right click on device name xc7a50t_0 and select the Program Device
- Program the FPGA device as shown in Figure 4.
- Go to the Disconnect XVC server section.
Permanent Flash
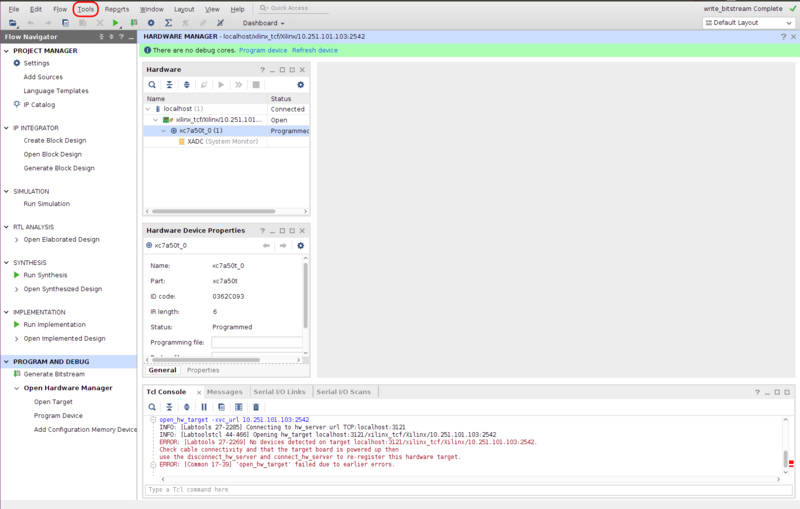
- Go to Tools icon and select Generate Memory Configuration File... (See Figure 5.).
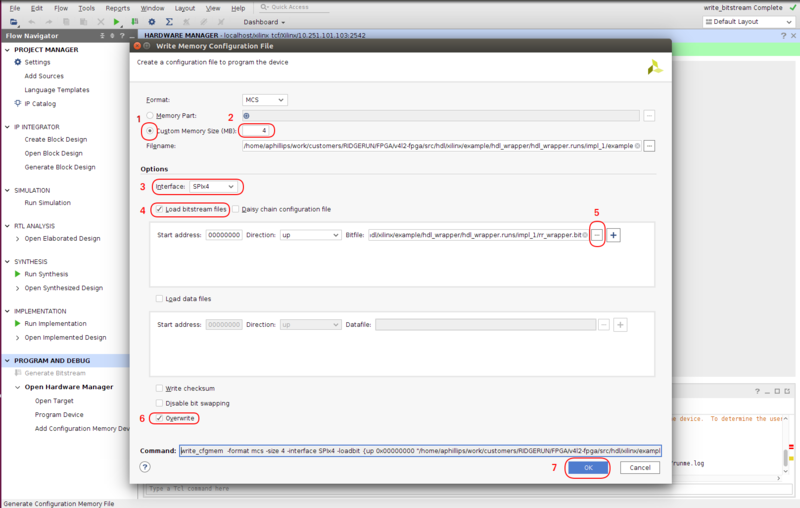
- In the Write Memory Configuration File window (See Figure 6.), modify the following items:
1. Select Custom Memory Size (MB).
2. Set memory size to 4.
3. Select Interface as SPIx4.
4. Enable check for Load bitstream files.
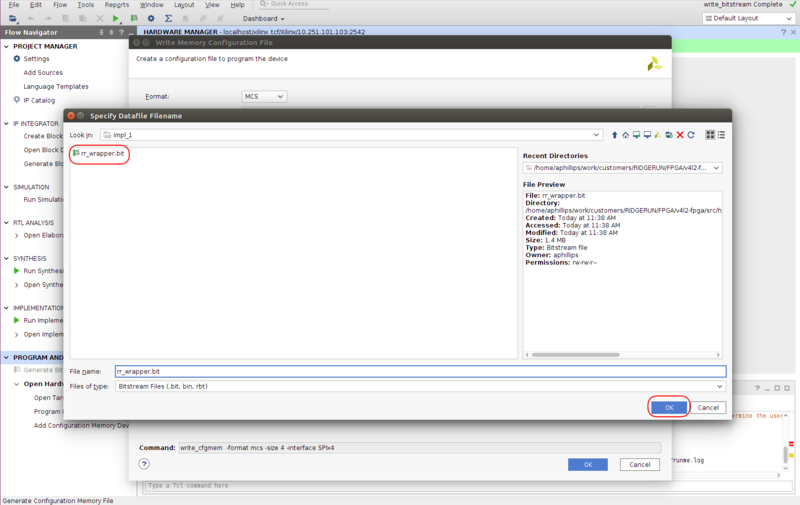
5. Search the '.bit file to configure. See Figure 7. to find the location.
6. Enable check for Overwrite.
7. Click OK button.
- Go to Hardware manager window, right-click on the device and Add Configuration Memory Device... (See Figure 8.).
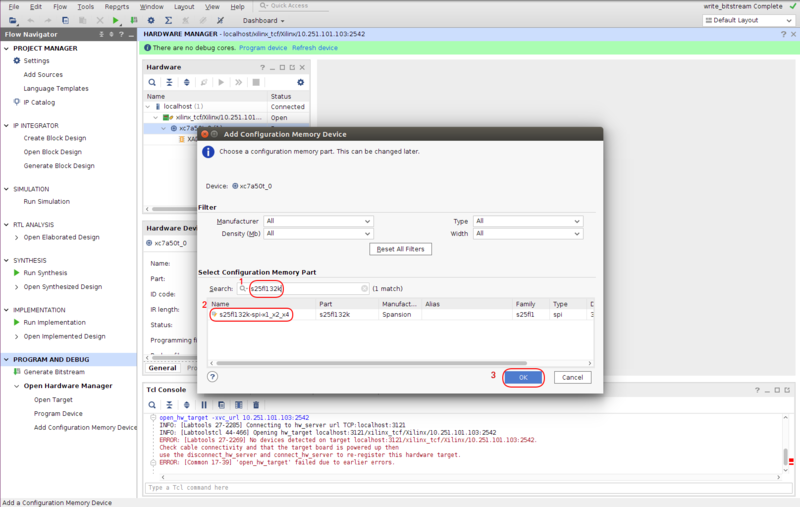
- Search the Select Configuration Memory Part, select it and click OK (See Figure 9.).
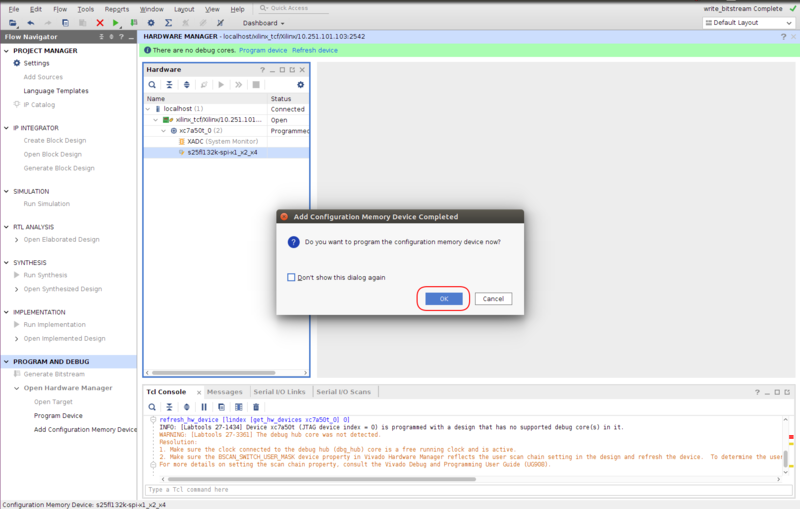
- The Add Configuration Memory Device Completed window is launched, click OK (See Figure 10.).
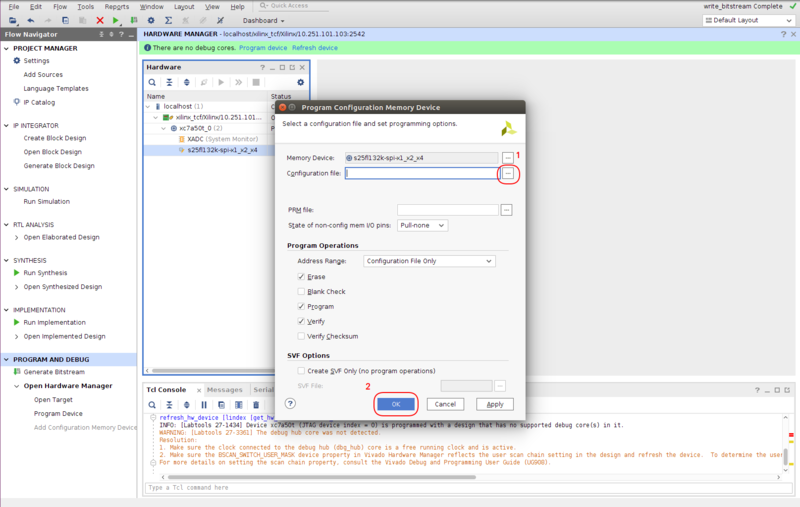
- The Program Configuration Memory Device is launched, click the search button, search the .MCS file, select it and click OK (See Figure 11. ).
- Click OK on the Program Configuration Memory Device window to start programming the FPGA. it will take ~30 minutes.
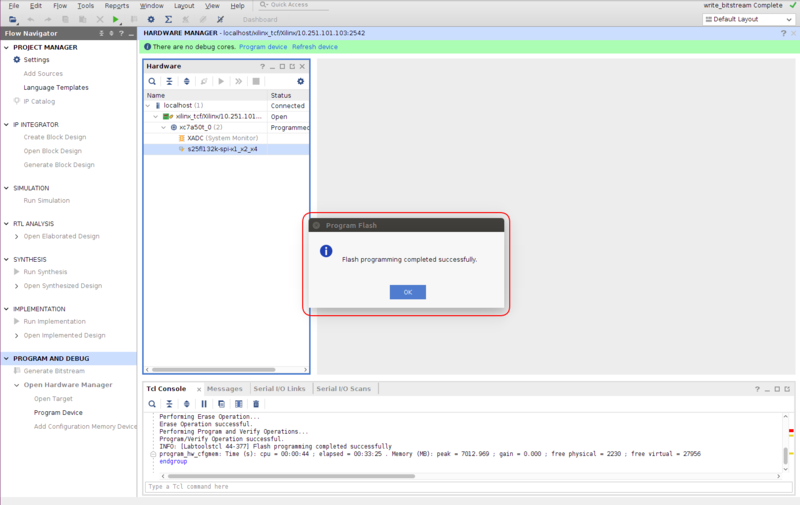
- The Program FPGA is completed, when the Program Flash is launched, click OK (See Figure 12.).
- Go to the Disconnect XVC server section.
Disconnect XVC server
- After finishing to program the device, run the below command on Tcl Console to disconnect the interface as shown in Figure 13.
disconnect_hw_server
Zynq-based platforms
Flashing the FPGA of a Zynq-based board is the same as the common Petalinux flow. In the host machine where the project of interest has been built:
1 Go to accelerator code directory:
make FPGA_MODEL=$FPGA_MODEL bitstream
where $FPGA_MODEL is defined by the user.
2. Go to hdl_wrapper directory in accelerator code:
cd v4l2-fpga/src/hdl/xilinx/${ACCELERATOR}/hdl_wrapper
3. Start Vivado GUI
vivado hdl_wrapper.xpr
4. In the GUI, go to File > Export > Export Hardware. Take note of the directory where the project is being exported. Let's set it to $PATH_TO_PROJECT/$PROJECT/$PROJECT.sdk/
5. Create the minimum Petalinux project
petalinux-create -t projects -n $PROJECTNAME -s $BSPFILE
petalinux-config --get-hw-description $PATH_TO_PROJECT/$PROJECT/$PROJECT.sdk/
petalinux-config
- Select the Image Packaging Configuration.
- Select Root filesystem type. Set SD card as the RootFS type.
6. Select the libraries and applications needed
petalinux-config -c rootfs
Choose the applications and libraries. Some of them:
- Petalinux Package: Multimedia (verify GStreamer)
- Petalinux Package: Self-Host Development
7. Prepare the DTB
petalinux-config -c device-tree
8. Edit the Device Tree according to the instructions of the driver. Copy and paste it to the project-spec/meta-user/recipes-bsp/device-tree/system-top.dts
9. Build and package
petalinux-build
petalinux-package --boot --fsbl images/linux/zynq_fsbl.elf --fpga images/linux/system.bit --u-boot --force
10. Copy the contents of images/linux/ according to the following layout
Partition 1: BOOT (FAT32)
Contents: BOOT.BIN image.ub system.dtb
Partition 2: ROOTFS (ext4)
Contents: decompress the rootfs.tar.gz
11. Proceed with the compilation of the driver as shown above
V4L2 driver
NVIDIA Jetson-based boards
- Copy the
.koto your platform - Installing using the following command:
sudo insmod xilinx.ko
iMX8
Follow these Installation instructions


