User Guide On Homography list
| Image Stitching for NVIDIA®Jetson™ |
|---|

|
| Before Starting |
| Image Stitching Basics |
| Overview |
| Getting Started |
| User Guide |
| Resources |
| Examples |
| Spherical Video |
| Performance |
| Contact Us |
This page serves as a guide to configure the homography-list parameter of the stitcher in order to meet different application requirements.
Homography List
The homography list is a JSON formatted string that defines the transformations and relationships between the images. Here we will explore (with examples) how to create this file in order to stitch the corresponding images.
Case: 2 Images

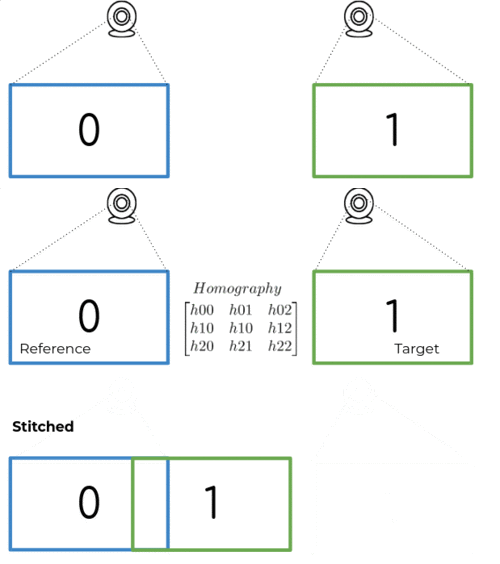
Let's assume we only have 2 images (with indices 0 and 1). These 2 images are related by a homography which can be computed using the Homography Estimation Tool. The computed homography transforms the Target image from the Reference image perspective.
This way, to fully describe a homography, we need to declare 3 parameters:
- Matrix: the 3x3 transformation matrix.
- Target: the index of the target image (i.e. the image to be transformed).
- Reference: the index of the reference image (i.e. the image used as a reference to transform the target image).
Having this information, we build the Homography JSON file:
{
    "homographies":[
        {
            "images":{
                "target":1,
                "reference":0
            },
            "matrix":{
                "h00": 1, "h01": 0, "h02": 510,
                "h10": 0, "h11": 1, "h12": 0,
                "h20": 0, "h21": 0, "h22": 1
            }
        }
    ]
}
With this file, we are describing a pair of images (0 and 1), where the given matrix will transform the image 1 based on 0.
Case: 3 Images

Similar to the 2 images case, we use homographies to connect the set of images. The rule is to use N-1 homographies, where N is the number of images.
One panoramic use case is to compute the homographies for both left (0) and right (2) images, using the center image (1) as the reference. The hoography list JSON file would look like this:
{
    "homographies":[
        {
            "images":{
                "target":0,
                "reference":1
            },
            "matrix":{
                "h00": 1, "h01": 0, "h02": -510,
                "h10": 0, "h11": 1, "h12": 0,
                "h20": 0, "h21": 0, "h22": 1
            }
        },
        {
            "images":{
                "target":2,
                "reference":1
            },
            "matrix":{
                "h00": 1, "h01": 0, "h02": 510,
                "h10": 0, "h11": 1, "h12": 0,
                "h20": 0, "h21": 0, "h22": 1
            }
        }
    ]
}
Your case
You can create your own homography list, using the other cases as a guide. Just keep in mind these rules:
- N images, N-1 homographies: if you have N input images, you only need to define N-1 homographies.
- Reference != Target: you can't use the same image as a target and as a reference for a given homography.
- No Target duplicates: an image can be a target only once.
- Image indices from 0 to N-1: if you have N images, you have to use consecutive numbers from 0 to N-1 for the target and reference indices. It means that you cannot declare something like
target: 6if you have 6 images; the correct index for your last image is 5.
Usage Example
The homography list parameter is used as a JSON formatted string without spaces or newlines; however, it can be stored in a file and then used from there. If the homography list is stored in a file, it can be used in the pipeline with the following format:
homography-list="`cat <json-file> | tr -d "\n" | tr -d "\t" | tr -d " "`"
Assuming that the homography list is stored in a homographies.json file, a full pipeline would look like the following.
BORDER_WIDTH=10

gst-launch-1.0 -e cudastitcher name=stitcher \
  homography-list="`cat homographies.json | tr -d "\n" | tr -d "\t" | tr -d " "`" \
  border-width=$BORDER_WIDTH \
  nvarguscamerasrc sensor-id=0 ! nvvidconv ! stitcher.sink_0 \
  nvarguscamerasrc sensor-id=1 ! nvvidconv ! stitcher.sink_1 \
  nvarguscamerasrc sensor-id=2 ! nvvidconv ! stitcher.sink_2 \
  stitcher. ! queue ! nvvidconv ! nvoverlaysink
You can find more complex examples here.
Important
The indices of the stitcher's sinks (sink_0, for example) are mapped directly to the image index we use in the homography list.


