Image Stitching for NVIDIA Jetson/User Guide/Gstreamer: Difference between revisions
No edit summary |
|||
| Line 198: | Line 198: | ||
= Projector = | = Projector = | ||
For more information on how to use the rr-projector please follow the [[RidgeRun Image Projector/ | For more information on how to use the rr-projector please follow the [[RidgeRun Image Projector/User Guide/Rrprojector | Projector User Guide]] | ||
= Cuda-Undistort = | = Cuda-Undistort = | ||
Revision as of 23:20, 18 October 2023
WORK IN PROGRESS. Please Contact RidgeRun OR email to support@ridgerun.com if you have any questions. |
| Image Stitching for NVIDIA®Jetson™ |
|---|
 |
| Before Starting |
| Image Stitching Basics |
| Overview |
| Getting Started |
| User Guide |
| Resources |
| Examples |
| Spherical Video |
| Performance |
| Contact Us |

|
This page provides a basic description of the parameters to build a cudastitcher pipeline.
Cuda-Stitcher
To build a cudastitcher pipeline use the following parameters:
- homography-list
List of homographies as a JSON formatted string without spaces or newlines. The homography list can be store in a JSON file and used in the pipeline with the following format:
homography-list="`cat <json-file> | tr -d "\n" | tr -d " "`"
The JSON file section provides a detailed explanation of the JSON file format for the homography list.
- pads
The stitcher element can crop the borders of the individual images to reduce the overlap region to reduce ghosting or remove unwanted borders. Individual crop parameters for each image can be configured on the GstStitcherPad, you must take into account that the crop is applied to the input image before applying the homography, so the crop areas are in pixels from the input image. Following is the list of properties available for the stitcher pad:
- bottom: amount of pixels to crop at the bottom of the image.
- left: amount of pixels to crop at the left side of the image.
- right: amount of pixels to crop at the right side of the image.
- top: amount of pixels to crop at the top side of the image.
The pads are used in the pipelines with the following format:
sink_<index>::right=<crop-size> sink_<index>::left=<crop-size> sink_<index>::top=<crop-size> sink_<index>::bottom=<crop-size>
You can find examples here.
- sink
The sink marks the end of each camera capture pipeline and maps each of the cameras to the respective image index of the homography list.
Pipeline Basic Example
The pipelines construction examples assume that the homographies matrices are stored in the homographies.json file and contains 1 homography for 2 images.
Case: 2 Cameras
To perform and display image stitching from two camera sources the pipeline should look like:
gst-launch-1.0 -e cudastitcher name=stitcher \
homography-list="`cat homographies.json | tr -d "\n" | tr -d " "`" \
  nvarguscamerasrc sensor-id=0 ! nvvidconv ! "video/x-raw(memory:NVMM), width=1920, height=1080, format=RGBA" ! queue ! stitcher.sink_0 \
  nvarguscamerasrc sensor-id=1 ! nvvidconv ! "video/x-raw(memory:NVMM), width=1920, height=1080, format=RGBA" ! queue ! stitcher.sink_1 \
  stitcher. ! queue ! nvvidconv ! nvoverlaysink
Case: 2 Video Files
To perform and display image stitching from two video sources the pipeline should look like:
gst-launch-1.0 -e cudastitcher name=stitcher \
homography-list="`cat homographies.json | tr -d "\n" | tr -d " "`" \
  filesrc location=video_0.mp4 ! tsdemux ! h264parse ! nvv4l2decoder ! nvvidconv ! "video/x-raw(memory:NVMM), width=1920, height=1080, format=RGBA" ! queue ! stitcher.sink_0 \
  filesrc location=video_1.mp4 ! tsdemux ! h264parse ! nvv4l2decoder ! nvvidconv ! "video/x-raw(memory:NVMM), width=1920, height=1080, format=RGBA" ! queue ! stitcher.sink_1 \
  stitcher. ! perf print-arm-load=true ! queue ! nvvidconv ! nvoverlaysink
JSON file
The homography list is a JSON formatted string that defines the transformations and relationships between the images. Here we will explore (with examples) how to create this file in order to stitch the corresponding images.
Case: 2 Images

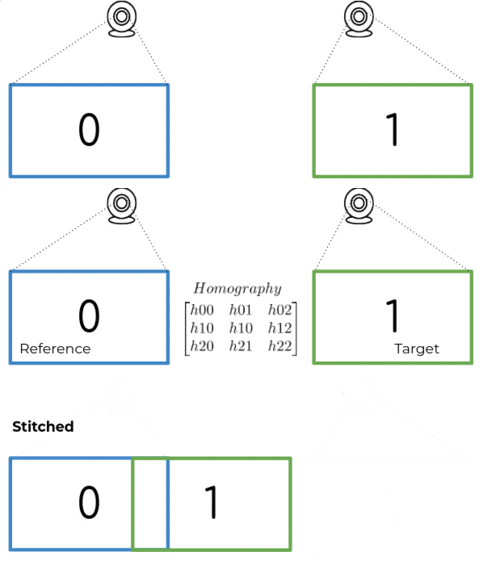
Let's assume we only have 2 images (with indices 0 and 1). These 2 images are related by a homography which can be computed using the Calibration Tool. The computed homography transforms the Target image from the Reference image perspective.
This way, to fully describe a homography, we need to declare 3 parameters:
- Matrix: the 3x3 transformation matrix.
- Target: the index of the target image (i.e. the image to be transformed).
- Reference: the index of the reference image (i.e. the image used as a reference to transform the target image).
Having this information, we build the Homography JSON file:
{
    "homographies":[
        {
            "images":{
                "target":1,
                "reference":0
            },
            "matrix":{
                "h00": 1, "h01": 0, "h02": 510,
                "h10": 0, "h11": 1, "h12": 0,
                "h20": 0, "h21": 0, "h22": 1
            }
        }
    ]
}
With this file, we are describing a pair of images (0 and 1), where the given matrix will transform the image 1 based on 0.
Case: 3 Images

Similar to the 2 images case, we use homographies to connect the set of images. The rule is to use N-1 homographies, where N is the number of images.
One panoramic use case is to compute the homographies for both left (0) and right (2) images, using the center image (1) as the reference. The hoography list JSON file would look like this:
{
    "homographies":[
        {
            "images":{
                "target":0,
                "reference":1
            },
            "matrix":{
                "h00": 1, "h01": 0, "h02": -510,
                "h10": 0, "h11": 1, "h12": 0,
                "h20": 0, "h21": 0, "h22": 1
            }
        },
        {
            "images":{
                "target":2,
                "reference":1
            },
            "matrix":{
                "h00": 1, "h01": 0, "h02": 510,
                "h10": 0, "h11": 1, "h12": 0,
                "h20": 0, "h21": 0, "h22": 1
            }
        }
    ]
}
Your case
You can create your own homography list, using the other cases as a guide. Just keep in mind these rules:
- N images, N-1 homographies: if you have N input images, you only need to define N-1 homographies.
- Reference != Target: you can't use the same image as a target and as a reference for a given homography.
- No Target duplicates: an image can be a target only once.
- Image indices from 0 to N-1: if you have N images, you have to use consecutive numbers from 0 to N-1 for the target and reference indices. It means that you cannot declare something like
target: 6if you have 6 images; the correct index for your last image is 5.
Controlling the Overlap
You can set cropping areas for each stitcher input (sink pad). This will allow you to:
- Crop an input image without requiring processing time.
- Reduce the overlapping area between the images to avoid ghosting effects.
Each input to the stitcher (or sink pad) has 4 properties (left right top bottom). Each of these defines the amount of pixels to be cropped in each direction. Say you want to configure the first pad (sink_0), and also want to crop 64 pixels of the bottom, then you can do it as follows inside your pipeline:
gst-launch-1.0 cudastitcher sink_0::left=64 ...
Now let's take a look at more visual examples.
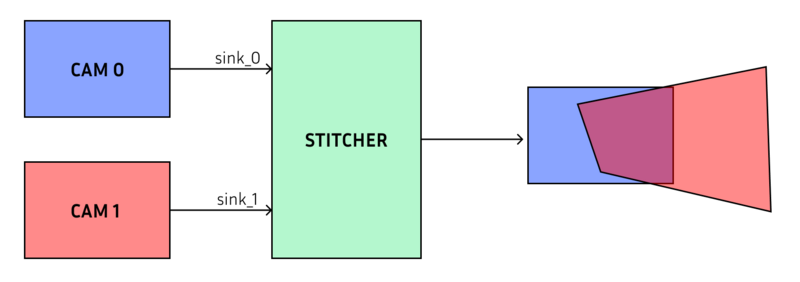
Example 1: No Cropping
Let's start with a case with no ROIs. We won't configure any pad in this case since 0 is the default of each property (meaning no cropping is done)
gst-launch-1.0 cudastitcher ! ...

Example 2: left/right Cropping
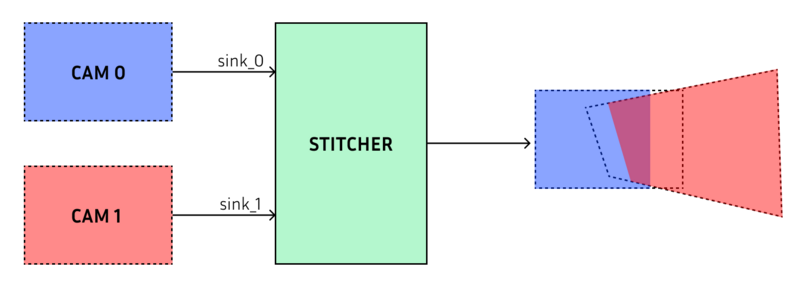
This hypothetical case shows how to reduce the overlap between two images. So let's crop 200 pixels from the blue image and 200 pixels from the red image. The overlapping area is represented in purple, this is also the area over which we will apply blending to create a seamless transition between both images.
gst-launch-1.0 cudastitcher sink_0::right=200 sink_1::left=200 ! ...

Example 3: top/bottom Cropping
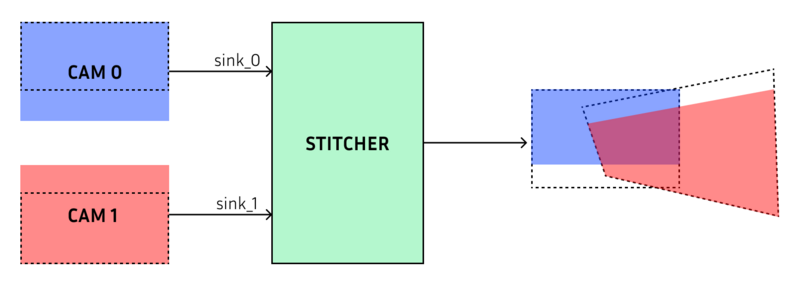
In this case, we are cropping the 200 bottom pixels of the red image, and 200 top pixels of the blue image
gst-launch-1.0 cudastitcher sink_0::bottom=200 sink_1::top=200 ! ...

Projector
For more information on how to use the rr-projector please follow the Projector User Guide
Cuda-Undistort
For more information on how to use the cuda-undistort please follow the Camera Calibration section

