CUDA Accelerated GStreamer Camera Undistort - User Guide - Camera Calibration
| CUDA Accelerated GStreamer Camera Undistort |
|---|

|
| Undistort Basics |
| Getting Started |
| User Guide |
| Examples |
| Performance |
| Contact Us |
The following page will introduce a way to calibrate your camera and get the parameters used in the camera undistortion. This method consists of a Python script that will guide you through the calibration process without going into technical details.
Dependencies
Please follow the dependencies section of this guide to resolve CUDA undistort library dependencies.
Print a calibration pattern, such as the OpenCV Calibration Pattern, and stick it on a flat surface.
Setting up the Parameters
Go inside the calibration directory of the cuda-undistort repository
cd calibration
Open the settings.json file, where you will find the following lines
{
    "cameraWidth": 640,
    "cameraHeight": 480,
    "chessboardInnerCornersWidth": 6,
    "chessboardInnerCornersHeight": 9,
    "camIndex": 0,
    "rtspAddress": "",
    "brownConradyCameraMatrix": [1.0, 0.0, 0.0, 0.0, 1.0, 0.0, 0.0, 0.0, 1.0],
    "fisheyeCameraMatrix": [1.0, 0.0, 0.0, 0.0, 1.0, 0.0, 0.0, 0.0, 1.0],
    "brownConradyDistortionParameters": [0.0, 0.0, 0.0, 0.0, 0.0, 0.0, 0.0, 0.0],
    "fisheyeDistortionParameters": [0.0, 0.0, 0.0, 0.0]
}
You need to adjust those parameters so that they match your camera specification and your printed calibration pattern.
- cameraWidth
- Width of the pictures the camera can get.
- cameraHeight
- Height of the pictures the camera can get.
The black (and the white) diagonally aligned squares of the calibration pattern form what are called the chessboard corners, so the following parameters are related to those corners.
- chessboardInnerCornersWidth
- Number of corners that are counted horizontally.
- chessboardInnerCornersHeight
- Number of corners that are counted vertically.
- cameraIndex
- When a camera is connected to a device, an index is used to refer to the camera. This index is the number that follows the video when listing the cameras with the following command
ls /dev/video*
- This parameter is the index of the camera.
- rtspAddress
- Address of IP camera to use for calibration over rtsp, only used if --rtsp option enabled.
The following parameters are only used if the tool is used to test previously obtained parameters (-t option) without calibration (without -c option)
If you are going to calibrate the cameras for the first time, these parameters are not used and can be left as they are.
- brownConradyCameraMatrix
- Camera matrix previously calculated.
- fisheyeCameraMatrix
- Camera matrix previously calculated.
- brownConradyDistortionParameters
- Distortion parameters for the brown Conrady model to test.
- fisheyeDistortionParameters
- Distortion parameters for the fisheye model to test.
Calibrating
Calibration Options
The calibration script has the following options:
| Argument | Description |
|---|---|
| -c, --calibrate | To execute the calibration process. |
| -p, --images_path [IMAGES_PATH] | Sets the path to store the calibration images. Default: imgs/calibration |
| -r, --remove | Removes the images from the IMAGES_PATH in case it's not empty. |
| -s, --settings_path [SETTINGS_PATH] | Sets the path to the settings file. Default: settings.json |
| -o, --output_path [OUTPUT_PATH] | Sets the path to the output file. Default: output.json |
| -t, --test | Runs a test routine for the user to see the calibration results. |
| -v, --v4l2 | Uses the v4l2 plugin to capture images from the camera. By default, the nvidia plugins are used. |
| --rtsp | Use rtsp to read from ip camera. Otherwise, v4l2 or NVIDIA plugins will be used. |
| -n, --normalize | Normalize image before thresholding |
| -a, --adaptive_threshold | Use adaptive threshold for calibration |
Running the Calibrator
Run the calibration tool as follows
python3 calibrationTool.py [OPTIONS]
where [OPTIONS] are the chosen options of the table above. Usually, you will want to run the calibration process, overwrite possible existing images, and run a test at the end to check the results. For this use case, run the calibrator as follows:
python3 calibrationTool.py -c -r -t
# Add the -v flag if you are using a camera that is accessed through v4l2.
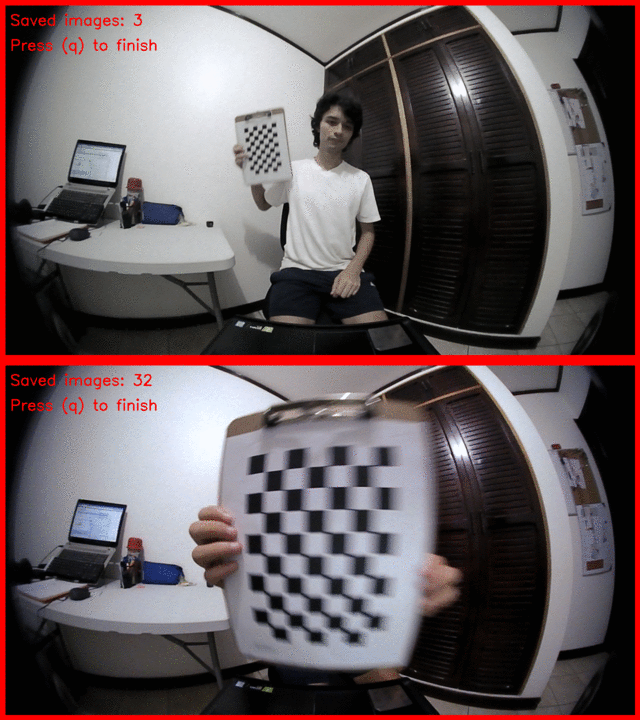
A window will appear, showing the captured images from the camera. In the beginning, the video will be slow, as the calibration pattern is not found.

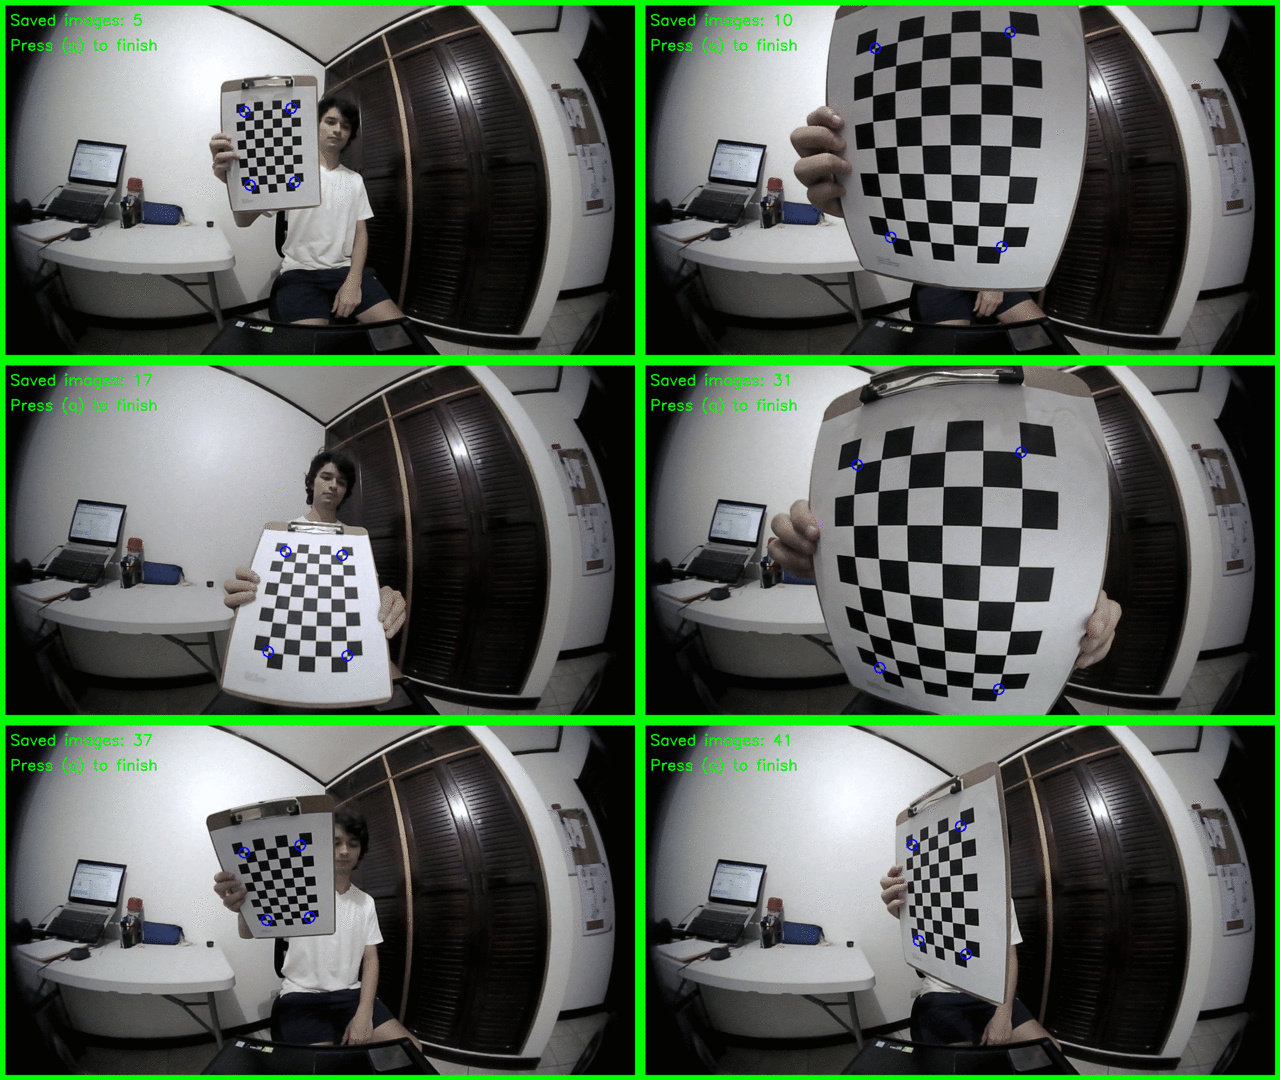
Show the calibration pattern to the camera, and you will see three things:
- A colored border
- Red: the calibration pattern is not being detected.
- Green: a calibration pattern was detected.
- Saved images
- The number of images that have been saved (which are captured every 2 seconds) when a calibration pattern is detected.
- Press (q) to finish
- You can press the (q) key to end the capture routine when you have enough pictures saved (between 40-50 is recommended).
Also, when the pattern is detected, you will see circles over the outermost corners. An image will be saved every 2 seconds, if the pattern is detected. Press (q) to finish.

To get a good quality calibration, make sure of the following:
- Save 40-50 images.
- Move the pattern to fully cover the image area.
- Tilt the pattern in both horizontal and vertical directions.
Now that the calibration images are ready, wait for another window to open. This one will show you the result of applying the computed parameters to the images captured by the camera at that moment, so you can check if the parameters are good enough. This window shows the undistorted images for both fisheye and Brown-Conrady models. Press (q) to exit. If you don't like the results, try to run the calibration tool again, following the guidelines mentioned before.

Now, the results are saved in JSON format in the output.json file, by default. This could change if you used the -o flag while running the tool. You can copy the needed parameters if you're planning to use the stitcher's homography estimation guide.
Also, the cuda-undistort element will need the computed camera parameters, but as environment variables. For this reason, those parameters will be printed in your terminal, so that you can copy them for your pipelines. You will see an output like the one below, so choose the CAMERA_MATRIX and DISTORTION_PARAMETERS for your desired model, whether it is fisheye or Brown-Conrady
  =============================================
 |  The following variables can be used as the |
 | parameters of the cuda-undistort element.   |
 | Use the parameters of your prefered model.  |
  =============================================

# =======
# FISHEYE
# =======
CAMERA_MATRIX="{\"fx\":9.5211633874478218e+02, \"fy\":9.4946222068253201e+02, \"cx\":6.8041416457132573e+02, \"cy\":3.1446117133659988e+02}"
DISTORTION_PARAMETERS="{\"k1\":3.8939572818197948e-01, \"k2\":-5.5685725182648649e-01, \"k3\":2.3785352925072494e+00, \"k4\":-1.2037220289124213e+00}"

# =============
# BROWN_CONRADY
# =============
CAMERA_MATRIX="{\"fx\":9.5211633874478218e+02, \"fy\":9.4946222068253201e+02, \"cx\":6.8041416457132573e+02, \"cy\":3.1446117133659988e+02}"
DISTORTION_PARAMETERS="{\"k1\":2.1107496349546324e+01, \"k2\":-2.4383787227376064e+02, \"p1\":-2.4875466379420917e-03, \"p2\":2.2798038164244493e-03, \"k3\":5.9419414118252871e+02, \"k4\":2.1085235633925034e+01, \"k5\":-2.4360553937983042e+02, \"k6\":5.9359831515760391e+02}"
If you need to generate the output above from the saved settings.json file, just run the tool without arguments:
python3 calibrationTool.py
Using the Undistort Element
Now that we have the camera matrix and the distortion parameters, just copy them as follows to build a pipeline. Check out the examples section for more pipelines.
Fisheye
CAMERA_MATRIX="{\"fx\":9.5211633874478218e+02, \"fy\":9.4946222068253201e+02, \"cx\":6.8041416457132573e+02, \"cy\":3.1446117133659988e+02}"
DISTORTION_PARAMETERS="{\"k1\":3.8939572818197948e-01, \"k2\":-5.5685725182648649e-01, \"k3\":2.3785352925072494e+00, \"k4\":-1.2037220289124213e+00}"
For Jetpack 4.n
Camera to display.
gst-launch-1.0 nvarguscamerasrc \
  ! nvvidconv \
  ! cudaundistort distortion-model=fisheye camera-matrix="$CAMERA_MATRIX" distortion-parameters="$DISTORTION_PARAMETERS" \
  ! nvvidconv \
  ! nvoverlaysink
Test to mp4
OUTPUT=output.mp4
gst-launch-1.0 videotestsrc num-buffers=60 \
  ! nvvidconv \
  ! cudaundistort distortion-model=fisheye camera-matrix="$CAMERA_MATRIX" distortion-parameters="$DISTORTION_PARAMETERS" \
  ! nvvidconv \
  ! nvv4l2h264enc bitrate=20000000 \
  ! h264parse ! mp4mux ! filesink location=$OUTPUT
For Jetpack 5.n
gst-launch-1.0 nvarguscamerasrc \
  ! nvvidconv ! 'video/x-raw' \
  ! cudaundistort distortion-model=fisheye camera-matrix="$CAMERA_MATRIX" distortion-parameters="$DISTORTION_PARAMETERS" \
  ! nvvidconv \
  ! nvoverlaysink
Brown-Conrady
CAMERA_MATRIX="{\"fx\":9.5211633874478218e+02, \"fy\":9.4946222068253201e+02, \"cx\":6.8041416457132573e+02, \"cy\":3.1446117133659988e+02}"
DISTORTION_PARAMETERS="{\"k1\":2.1107496349546324e+01, \"k2\":-2.4383787227376064e+02, \"p1\":-2.4875466379420917e-03, \"p2\":2.2798038164244493e-03, \"k3\":5.9419414118252871e+02, \"k4\":2.1085235633925034e+01, \"k5\":-2.4360553937983042e+02, \"k6\":5.9359831515760391e+02}"
For Jetpack 4.n
gst-launch-1.0 nvarguscamerasrc \
  ! nvvidconv \
  ! cudaundistort distortion-model=brown-conrady camera-matrix="$CAMERA_MATRIX" distortion-parameters="$DISTORTION_PARAMETERS" \
  ! nvvidconv \
  ! nvoverlaysink
For Jetpack 5.n
gst-launch-1.0 nvarguscamerasrc \
  ! nvvidconv ! 'video/x-raw' \
  ! cudaundistort distortion-model=brown-conrady camera-matrix="$CAMERA_MATRIX" distortion-parameters="$DISTORTION_PARAMETERS" \
  ! nvvidconv \
  ! autovideosink
How to get good quality calibration
To get good quality calibración is necessary to have the following considerations:
Chessboard
It is necessary put the chessboard on a hard surface, avoiding any type of bulge.
Be careful, because if the chessboard has any bulge, it will affect the calibration.
Process of calibration
- It is necessary save 30-50 images.
- To have good quality, the calibration must include all the range of camera vision. For these, are needed to move the chessboard or the pattern at different distances (close, far away, etc) and positions (up, down, left, right, center, etc.).
- Also, it is needed to rotate the chessboard or the pattern in the x, y, z positions.
