Library Integration for IMU - Interpolation

 |

|
Interpolation Process
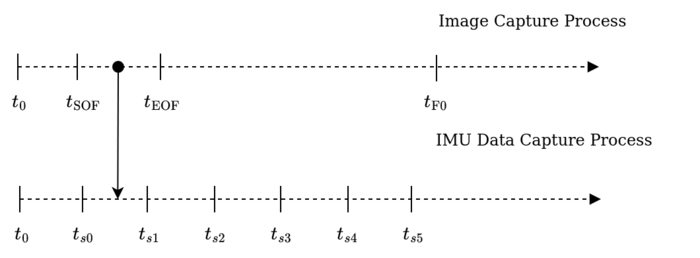
The interpolation process is crucial when determining the angle at which the sensor was placed in 3D when the image was captured. Usually, the gyroscope provides data at a higher rate than the imager, and the measurements hardly match the image timestamps. Therefore, it is required to take two points in time to interpolate the angle.
The image shown below illustrates this process, where the central value between the falls in between two samples of the gyroscope .
Given that the co-domain to interpolate is a quaternion space representing a sphere, the linear interpolation does not work properly. Hence, we utilise the slerp[1] (spherical linear interpolation) interpolation as the most basic implementation.

Using the Interpolator
Using the interpolator is similar to the integrator. However, there are some changes to take into account.
Creating the Settings
The first step is to create the interpolator settings for the interpolator. This is only to define the interval or the period between the image frames (the inverse of the frame rate).
auto settings = std::make_shared<InterpolatorSettings>();

// Define the interval as 33.33 ms in microseconds
settings->interval = 33333;
The interval must be in microseconds.
Creating the Interpolator Instance
The next step is to create the interpolator from the IInterpolator factory, similar to the integrator.
// Assume that the settings come from the previous step

auto interpolator = IInterpolator::Build(kSlerp, settings);
Synchronise the Interpolator (live source)
Step required when using a live imager
The synchronisation of the interpolator is required when using a live imager, where the timestamps may change depending on whether the imager stopped or not. Follow the next session if the interpolator is used in an offline video.
To adjust the interpolator to the point of interest, please set the timestamp to the target (image) to interpolate.
// Assume that the image contains the timestamp to interpolate and is valid
std::shared_ptr<IImage> image;

interpolator->Reset(image->GetTimestamp());
Synchronise the Interpolator (offline source)
The offline sources may not include the timestamp for the images, and the gyroscope may deviate from the time the image was captured. For this reason, it is crucial to set the interval to the proper value (see the Creating the Settings section) and fix the timestamps from the integration results.
Let's assume that the gyroscope started 0.026 seconds after the first image was captured, and the initial datum from the gyroscope has a 0-second timestamp. Therefore, all the timestamps must be moved 0.026 seconds to match the time references:
// Assume that the integrated vector is filled by the integrator
std::vector<std::pair<Quaternion<Double>, uint64_t>> integrated;

// Offset to correct
uint64_t offset = 26000;

for (auto &pair : integrated) {
  pair.second += offset;
}
In case the offset is negative, adjust the interpolator with the Reset() method:
// Offset to correct: negative from the perspective of the sensor
uint64_t offset = 26000;

interpolator->Reset(offset);
Apply the Interpolation
After synchronising the interpolator, it is possible to use the Apply() method to apply the interpolation of the quaternions based on:
- Interval: determines if it is possible to interpolate more than one frame at a time if the integrated data reaches more than .
- Initial Time: it is the current timestamp of the frame.
The Apply() method is used as follows:
// Assume that integrated is filled by the integrator and is valid
std::vector<std::pair<Quaternion<Double>, uint64_t>> integrated;

// Output
std::vector<std::pair<Quaternion<Double>, uint64_t>> interpolated;
interpolator->Apply(interpolated, integrated);
The output vector with the interpolated values will match the frame rate of the imager. For instance, if the gyroscope rate is 120 Hz and the imager is 60 Hz, it will likely hold one value. It depends on the availability of integrated data, buffering, and other factors.
Moreover, the Apply() method also affects the input vector, erasing the used data (from the past) and leaving the unused data whose timestamp exceeds the timestamp of the image in the integrated vector. To avoid erasing the used data, you can set the argument clean=false.


