Jetson Argus Camera Examples: Linux Driver Tutorials & Guides
Argus Examples
Argus is NVIDIA's low-level API for accessing and controlling camera hardware on Jetson boards. The software includes samples to test the Argus API, by default these samples are located in the /usr/src/jetson_multimedia_api/samples/ directory.
Prerequisites
Before testing any samples, make sure to complete the following steps:
- If you are using the board remotely, run this command to export the XDisplay to be able to display graphical content
export DISPLAY=:0
- Install CUDA, OpenCV, cuDNN and TensorRT (skip this step if you already installed them)
1. Download Jetpack from the following website
2. Run the installation script from the host machine with the following commands:
chmod +x  ./JetPack-L4T-<version>-linux-x64.run
./JetPack-L4T-<version>-linux-x64.run
3. Select Development Environment
4. Select "custom" and click "clear action"
5. Select "CUDA Toolkit", "OpenCV","cuDNN Package" and "TensorRT", and then install
- Create the symbolic links
cd /usr/lib/aarch64-linux-gnu
sudo ln -sf libv4l2.so.0 libv4l2.so
Output visualization
The samples tested generate an H.264 video, to visualize it, use any of the following options:
GStreamer
gst-launch-1.0 filesrc location=<H.264 video path> ! h264parse ! queue ! avdec_h264 ! queue ! xvimagesink

# Hardware accelerated
gst-launch-1.0 filesrc location=<H.264 video path> ! h264parse ! queue ! nvv4l2decoder ! 'video/x-raw(memory:NVMM),format=NV12' ! queue ! nvvidconv ! xvimagesink
VLC
vlc <H.264 video path>
Sample 01
This sample application showcases how to encode video streams in H.264, H.265, VP8, and VP9 formats. It reads YUV input buffers from a file, performs the encoding process, and outputs the encoded bitstream to an elementary file in the corresponding format (h264, h265, VP8, or VP9).
Requirements
- Video file containing one of the supported YUV formats:
- YUV420
- YUV444
- NV24
- P010_10LE
- NV24_10LE
To build the sample, execute these commands:
cd /usr/src/jetson_multimedia_api/samples/01_video_encode
make
And to run the sample, use this command:
/usr/src/jetson_multimedia_api/samples/01_video_encode/video_encode <in-file> <in-width> <in-height> <encoder-type> <out-file>
For example:
/usr/src/jetson_multimedia_api/samples/01_video_encode/video_encode output.h264 640 480 H264 test_sample01.h264
You should get an output similar to this:
Creating Encoder in blocking mode
Opening in BLOCKING MODE
NvMMLiteOpen : Block : BlockType = 4
===== NvVideo: NVENC =====
NvMMLiteBlockCreate : Block : BlockType = 4
875967048
842091865
H264: Profile = 66 Level = 51
NVMEDIA: Need to set EMC bandwidth : 126000
NvVideo: bBlitMode is set to TRUE
Could not read complete frame from input file
File read complete.
Got 0 size buffer in capture
App run was successful
Sample 03
This sample application demonstrates the process of capturing from a video file and encoding H.264 and H.265 video streams using the libv4l2 API. Before the encoding process begins, the NVIDIA® CUDA® API is utilized to render a black rectangle on the input YUV image data. The modified buffer is then shared with the encoding component.
Requirements
- Video file containing YUV format.
To build it, execute these commands:
cd /usr/src/jetson_multimedia_api/samples/03_video_cuda_enc
make
And to run the sample, use this command:
/usr/src/jetson_multimedia_api/samples/03_video_cuda_enc/video_cuda_enc <in-file> <in-width> <in-height> <encoder-type> <out-file>
An output like the following is expected:
Opening in BLOCKING MODE
NvMMLiteOpen : Block : BlockType = 4
===== NvVideo: NVENC =====
NvMMLiteBlockCreate : Block : BlockType = 4
875967048
842091865
H264: Profile = 100 Level = 50
NVMEDIA: Need to set EMC bandwidth : 126000
NvVideo: bBlitMode is set to TRUE
Could not read complete frame from input file
File read complete.
App run was successful
Sample 10
This sample demonstrates the use of the libargus API to configure camera class components for a capture operation. An EGLStream is created to facilitate the connection between the camera and the V4L2 video encoder, enabling the capture of encoded video streams. The demo effectively shows how to set up the camera, create an EGLStream, and capture video that is then encoded and saved to a file.
Requirements
- A MIPI CSI camera connected to the board
To build it, execute these commands:
cd /usr/src/jetson_multimedia_api/samples/10_argus_camera_recording
make
And to run the sample, use this command:
usr/src/jetson_multimedia_api/samples/10_argus_camera_recording/argus_camera_recording -s
The expected output is as follows:
Set governor to performance before enabling profiler
PRODUCER: Creating output stream
PRODUCER: Launching consumer thread
Opening in BLOCKING MODE
NvMMLiteOpen : Block : BlockType = 4
===== NvVideo: NVENC =====
NvMMLiteBlockCreate : Block : BlockType = 4
875967048
842091865
create video encoder return true
H264: Profile = 100 Level = 50
NVMEDIA: Need to set EMC bandwidth : 126000
PRODUCER: Starting repeat capture requests.
CONSUMER: Argus::STATUS_END_OF_STREAM
----------- Element = enc0 -----------
Total Profiling time = 4.58871
Average FPS = 29.8559
Total units processed = 138
Average latency(usec) = 5091
Minimum latency(usec) = 1891
Maximum latency(usec) = 12633
-------------------------------------
CONSUMER: Got EOS, exiting...
CONSUMER: Done.
PRODUCER: Done -- exiting.
************************************
Total Profiling Time = 0 sec
************************************
Argus Camera App
Another software included besides the multimedia API samples, is a camera capture app with graphic interface. To use this app first install this dependency:
sudo apt-get install gtk+-3.0
After that, run these commands to build the app:
cd /usr/src/jetson_multimedia_api/argus/
sudo mkdir build
cd build
sudo cmake ..
sudo make
And you are ready to test the app by simply running this commands:
cd /usr/src/jetson_multimedia_api/argus/build/apps/camera/ui/camera
./argus_camera
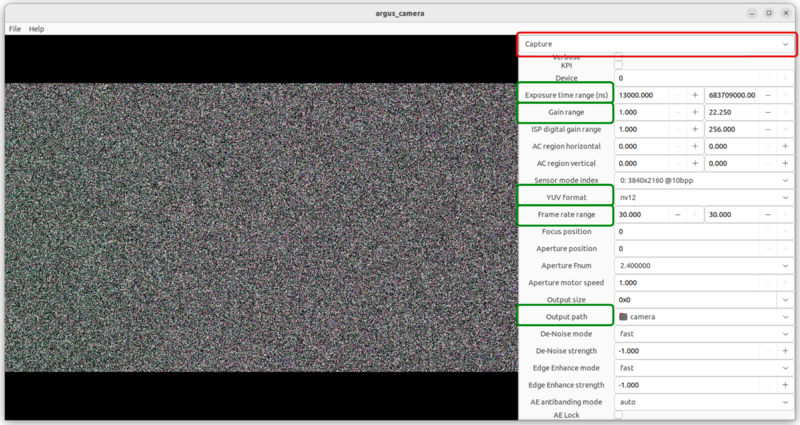
The following figure shows the interface displayed by the app, the selected capture option is marked in red, which allows the capture of single images. Many capture parameters can be also configured, some of the main options marked in green, include: Exposure time, Gain, YUV format, Frame rate and Output path.
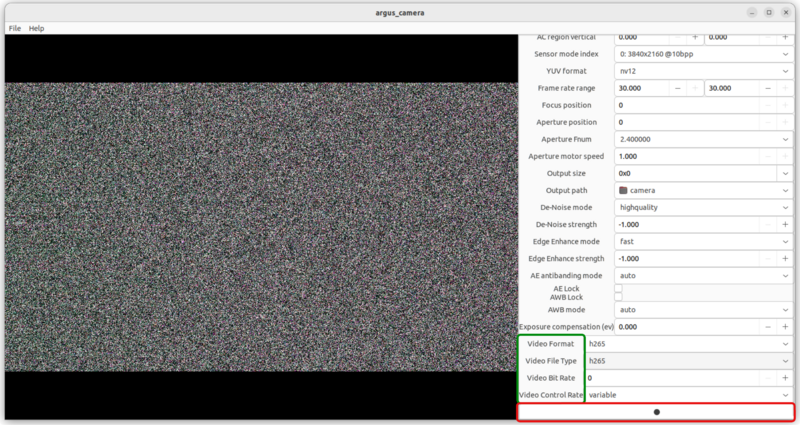
When you scroll down, at the bottom you will find some unique options for capturing images, marked in green in the following image, in addition to the button to take the capture:
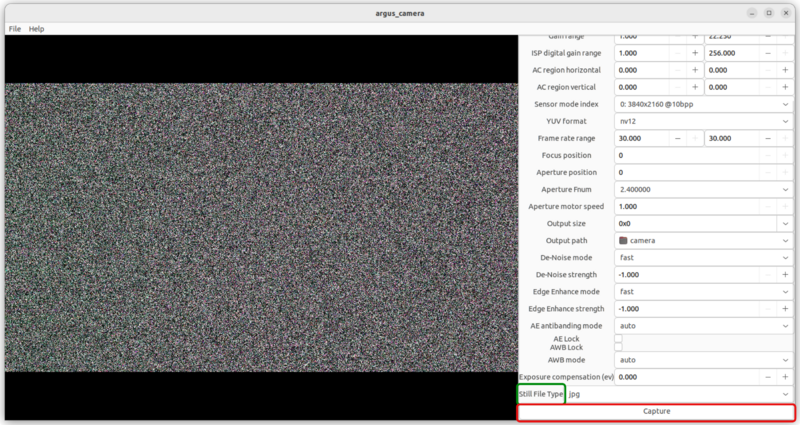
If you select instead the option for Video you will be able to record, most of the configuration options are maintained, as shown in the next figure:

If you scroll down, you will find at the bottom some unique options for video recording, and the button to start the recording:
