Birds Eye View/Getting Started/Quickstart Guide: Difference between revisions
(Created page with "This wiki will show you how to quickly get started with Birds Eye View. It will use the provided samples and calibration file to show a default scene. == Installing Dependencies == Run the following command to make sure all the dependencies are installed: <syntaxhighlight lang=bash> apt update apt install -y git meson ninja-build pkg-config libjsoncpp-dev libopencv-dev libgstreamer1.0-dev libgstreamer-plugins-base1.0-dev gstreamer1.0-plugins-bad qtbase5-dev qtmultimedi...") |
No edit summary |
||
| (14 intermediate revisions by one other user not shown) | |||
| Line 1: | Line 1: | ||
{{Birds Eye View/Head|previous=Getting Started/How to Get the Code|next=User Guide/Building and Installation|metakeywords="quickstart,guide"|metadescription="This guide will show you how to quickly get started with the Birds Eye View software project using the sample images and calibration file."}} | |||
<seo | |||
title="Birds Eye View - Quickstart Guide | RidgeRun" titlemode="replace" | |||
metakeywords="bev, birds-eye-view, birds eye view, cuda, stiching, stitcher, image processing, computer vision, jetson, nvidia" description="This wiki will show you how to quickly get started with Birds Eye View. View samples & the calibration file to show a default scene."> | |||
</seo> | |||
This wiki will show you how to quickly get started with Birds Eye View. It will use the provided samples and calibration file to show a default scene. | This wiki will show you how to quickly get started with Birds Eye View. It will use the provided samples and calibration file to show a default scene. | ||
{{ambox|type=info|text=This guide assumes you have already purchased a software license and received a copy of the source code. Head to [[Birds Eye View/Getting Started/How to Get the Code|How to Get the Code]] if you haven't.}} | |||
{{ambox|type=info|text=Proceed to [[Birds_Eye_View/User_Guide/Building_and_Installation|Building and Installation]] for a more detailed guide}} | |||
== Installing Dependencies == | == Installing Dependencies == | ||
Run the following command to make sure all the dependencies are installed: | Run the following command to make sure all the dependencies are installed: | ||
<syntaxhighlight lang=bash> | |||
apt update | <syntaxhighlight lang=bash line> | ||
apt install -y | sudo apt update | ||
sudo apt install -y \ | |||
libjsoncpp-dev \ | |||
libopencv-dev libopencv-core-dev \ | |||
libopencv-video-dev libopencv-highgui-dev libopencv-videoio-dev \ | |||
libgstreamer1.0-dev libgstreamer-plugins-base1.0-dev \ | |||
gstreamer1.0-plugins-bad gstreamer1.0-plugins-good gstreamer1.0-plugins-base \ | |||
gstreamer1.0-libav gstreamer1.0-plugins-ugly \ | |||
qtbase5-dev qtmultimedia5-dev libqt5multimedia5-plugins \ | |||
git wget unzip libcpputest-dev doxygen graphviz \ | |||
python3-pip ninja-build | |||
sudo -H pip3 install meson | |||
</syntaxhighlight> | </syntaxhighlight> | ||
| Line 14: | Line 37: | ||
==== With CUDA acceleration ==== | ==== With CUDA acceleration ==== | ||
<syntaxhighlight lang=bash> | <syntaxhighlight lang=bash line> | ||
meson builddir | meson builddir | ||
ninja -C builddir | ninja -C builddir | ||
| Line 20: | Line 43: | ||
==== Plain CPU ==== | ==== Plain CPU ==== | ||
<syntaxhighlight lang=bash> | <syntaxhighlight lang=bash line> | ||
meson builddir -Dnpp=disabled | meson builddir -Dnpp=disabled | ||
ninja -C builddir | ninja -C builddir | ||
| Line 28: | Line 51: | ||
Once you've built the project, you can run the example with the provided sample images and calibration file. | Once you've built the project, you can run the example with the provided sample images and calibration file. | ||
<syntaxhighlight lang=bash> | <syntaxhighlight lang=bash line> | ||
cd samples && ./download_samples.sh && cd - | cd samples && ./download_samples.sh && cd - | ||
./builddir/examples/birds_eye_view -p examples/birds_eye_view.json | ./builddir/examples/birds_eye_view -p examples/birds_eye_view.json | ||
</syntaxhighlight> | </syntaxhighlight> | ||
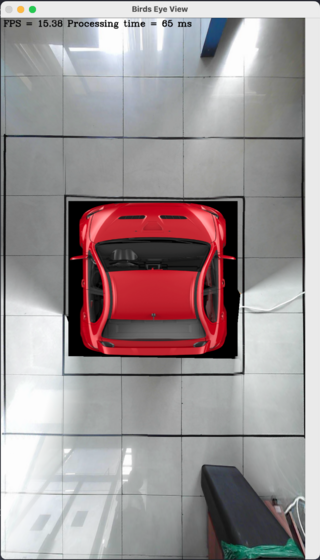
You should see the resulting image: | You should see the resulting image as below. Press ESC to stop the execution. | ||
[[File:bev-quickstart.png|thumbnail|center|320px|alt=Quick start result|Resulting image after running the quick start guide]] | |||
{{Birds Eye View/Foot|Getting Started/How to Get the Code|User Guide/Building and Installation}} | |||
Latest revision as of 15:24, 28 August 2024
| ⇦ Getting Started/How to Get the Code | Home | User Guide/Building and Installation ⇨ |
 |
| Getting Started |
|---|
| User Guide |
| Calibration Guide |
| GStreamer |
| Performance Measurements |
| Contact Us |
This wiki will show you how to quickly get started with Birds Eye View. It will use the provided samples and calibration file to show a default scene.
This guide assumes you have already purchased a software license and received a copy of the source code. Head to How to Get the Code if you haven't. |
Proceed to Building and Installation for a more detailed guide |
Installing Dependencies
Run the following command to make sure all the dependencies are installed:
sudo apt update
sudo apt install -y \
  libjsoncpp-dev \
  libopencv-dev libopencv-core-dev \
  libopencv-video-dev libopencv-highgui-dev libopencv-videoio-dev \
  libgstreamer1.0-dev libgstreamer-plugins-base1.0-dev \
  gstreamer1.0-plugins-bad gstreamer1.0-plugins-good gstreamer1.0-plugins-base \
  gstreamer1.0-libav gstreamer1.0-plugins-ugly \
  qtbase5-dev qtmultimedia5-dev libqt5multimedia5-plugins \
  git wget unzip libcpputest-dev doxygen graphviz \
  python3-pip ninja-build
sudo -H pip3 install meson
Building the Project
Once you have dependencies installed, you can proceed to configure and build the project:
With CUDA acceleration
meson builddir
ninja -C builddir
Plain CPU
meson builddir -Dnpp=disabled
ninja -C builddir
Running the Sample
Once you've built the project, you can run the example with the provided sample images and calibration file.
cd samples && ./download_samples.sh && cd -
./builddir/examples/birds_eye_view -p examples/birds_eye_view.json
You should see the resulting image as below. Press ESC to stop the execution.

