
Getting started with TI Jacinto 7 Edge AI - Demos - Python Demos - Detection
")


| Getting started with TI Jacinto 7 Edge AI | ||||||
|---|---|---|---|---|---|---|
| Introduction | ||||||
|
|
||||||
| GStreamer | ||||||
|
|
||||||
| Demos | ||||||
|
||||||
| Reference Documentation | ||||||
| Contact Us |
Object detection demo
Requirements
- A sample video in the J7's /opt/edge_ai_apps/data/videos/ directory.
Run the object detection demo example
- Navigate to the python apps directory:
cd /opt/edge_ai_apps/apps_python
- Create a directory to store the output files:
mkdir out
- Run the demo:
./object_detection.py -m ../models/detection/TFL-OD-200-ssd-mobV1-coco-mlperf-300x300 -i ../data/videos/video_0000.mp4 -o ./out/obj_detect.avi
Note: The video name under /opt/edge_ai_apps/data/videos/ might be different, change if necessary. |
- The demo will start running. The command line will look something like the following:
- The command line output should display something like the following:
APP: Init ... !!!
MEM: Init ... !!!
MEM: Initialized DMA HEAP (fd=4) !!!
MEM: Init ... Done !!!
IPC: Init ... !!!
IPC: Init ... Done !!!
REMOTE_SERVICE: Init ... !!!
REMOTE_SERVICE: Init ... Done !!!
 20892.833230 s: GTC Frequency = 200 MHz
APP: Init ... Done !!!
 20892.833412 s:  VX_ZONE_INIT:Enabled
 20892.833478 s:  VX_ZONE_ERROR:Enabled
 20892.833538 s:  VX_ZONE_WARNING:Enabled
 20892.834107 s:  VX_ZONE_INIT:[tivxInit:71] Initialization Done !!!
 20892.834386 s:  VX_ZONE_INIT:[tivxHostInit:48] Initialization Done for HOST !!!

 Number of subgraphs:1 , 64 nodes delegated out of 64 nodes

[UTILS] gst_src_cmd = filesrc location=../data/videos/video_0000.mp4 ! decodebin  ! videoscale ! video/x-raw, width=1280, height=720 ! videoconvert ! appsink drop=true max-buffers=2
[UTILS] Gstreamer source is opened!
[UTILS] gst_sink_cmd = appsrc format=GST_FORMAT_TIME block=true ! videoscale !  jpegenc ! avimux !  filesink location=./out/obj_detect.avi
[UTILS] Gstreamer sink is opened!
[UTILS] Starting pipeline thread
- Navigate to the out directory:
cd out
There should be a video named obj_detect.avi as a result of the object detection model.
- Figure 2 shows an example of how the video should look like:
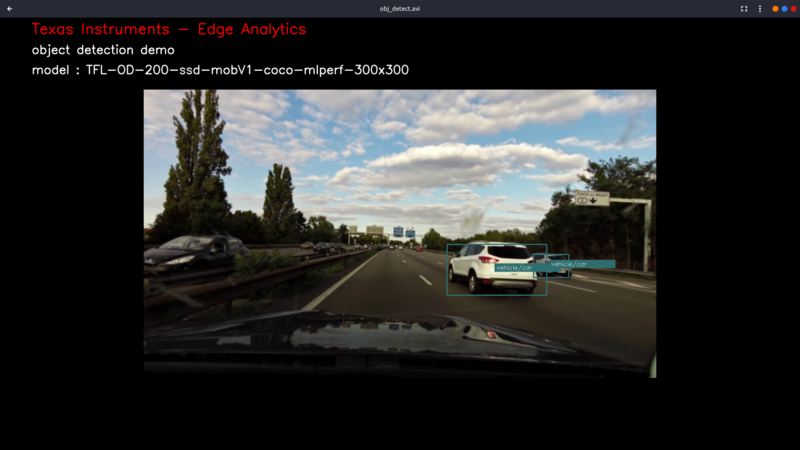
There are multiple input and output configurations available. In this example demo, a video input and a video output was specified.
For more information about configuration arguments please refer to the Configuration arguments section below.
Configuration arguments
  -h, --help            show this help message and exit
  -m MODEL, --model MODEL
                    Path to model directory (Required)
                        ex: ./image_classification.py --model ../models/classification/$(model_dir)
  -i INPUT, --input INPUT
                    Source to gst pipeline camera or file
                        ex:  --input v4l2 - for camera
                             --input ./images/img_%02d.jpg - for images
                                   printf style formating will be used to get file names
                             --input ./video/in.avi - for video input
                             default: v4l2
  -o OUTPUT, --output OUTPUT
                    Set gst pipeline output display or file
                        ex:  --output kmssink - for display
                             --output ./output/out_%02d.jpg - for images
                             --output ./output/out.avi - for video output
                             default: kmssink
  -d DEVICE, --device DEVICE
                    Device name for camera input
                    default: /dev/video2
  -c CONNECTOR, --connector CONNECTOR
                    Connector id to select output display
                    default: 39
  -u INDEX, --index INDEX
                    Start index for multiple file input output
                    default: 0
  -f FPS, --fps FPS     Framerate of gstreamer pipeline for image input
                    default: 1 for display and video output 12 for image output
  -n, --no-curses       Disable curses report
                    default: Disabled
Note: If live video from a camera is specified, please refer to the Change the default framerate (optional) section in case the camera used does not support a framerate of 30 fps. If the Gstreamer pipeline does not open, this could be the case. |
Change the default framerate (optional)
By default, the GStreamer pipeline runs with a 30/1 framerate. If the camera used does not support this framerate or if the framerate needs to be changed, follow these steps:
1. Navigate to the python apps directory:
cd /opt/edge_ai_apps/apps_python
2. Open the utils.py file with any text editor and look for these lines:
    if (source == 'camera'):
        source_cmd = 'v4l2src ' + \
                              ('device=' + args.device if args.device else '')
        source_cmd = source_cmd + ' io-mode=2 ! ' + \
                  'image/jpeg, width=1280, height=720, framerate=30/1 ! ' + \
                  'jpegdec !'
3. Add custom framerate support by modifying the code lines like so:
    if (source == 'camera'):
        source_cmd = 'v4l2src ' + \
                              ('device=' + args.device if args.device else '')
        source_cmd = source_cmd + ' io-mode=2 ! ' + \
                  'image/jpeg, width=1280, height=720, framerate=' + str(args.fps) + '/1 ! ' + \
                  'jpegdec !''
IMPORTANT: Since we are adding an option to change the default framerate, the demo has to be run with the -f option: |
./object_detection.py --device /dev/video0 -m ../models/detection/TFL-OD-200-ssd-mobV1-coco-mlperf-300x300 -f 60 -o ./out/obj_detect.avi
In the above example, the demo was run with a framerate of 60 fps.