
TI Jacinto 7 Edge AI Object Detection Demo using C++
")


| Getting started with TI Jacinto 7 Edge AI | ||||||
|---|---|---|---|---|---|---|
| Introduction | ||||||
|
|
||||||
| GStreamer | ||||||
|
|
||||||
| Demos | ||||||
|
||||||
| Reference Documentation | ||||||
| Contact Us |
Object detection demo
Requirements
- A connected USB camera to the Jacinto board.
Run the object detection demo example
- Navigate to the C++ apps directory:
cd /opt/edge_ai_apps/apps_cpp
- Create a directory to store the output files:
mkdir out
- Select the right camera device:
To select the camera device corresponding to the USC camera or CSI camera being used, run the following command:
ls -l /dev/v4l/by-path/
The above command will output something like the following:
lrwxrwxrwx 1 root root 12 Jun  1 19:28 platform-xhci-hcd.2.auto-usb-0:1.2:1.0-video-index0 -> ../../video0
lrwxrwxrwx 1 root root 12 Jun  1 19:28 platform-xhci-hcd.2.auto-usb-0:1.2:1.0-video-index1 -> ../../video1
In this case, a symbolic link to /dev/video0 is created for the USB camera driver (try both symbolic links if one does not work).
- Run the demo:
./bin/Release/app_object_detection --device /dev/video0 -m ../models/detection/TFL-OD-200-ssd-mobV1-coco-mlperf-300x300 -o ./out/detect_%d.jpg
- The demo will start running. The command line will look something like the following:
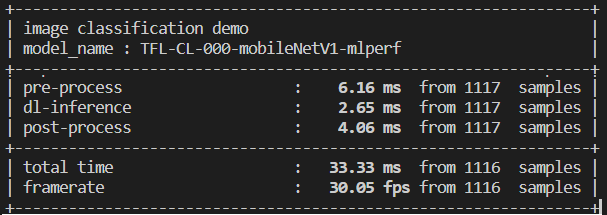
Figure 1. Terminal output.
- Since this is a continuous live feed from the camera, manually stop the pipeline by typing Ctrl+C in the command line after you are happy with the amount of frames taken.
- After the pipeline is stopped, navigate to the out directory:
cd out
There should be several images named detect_<number>.jpg as a result of the object detection model.
- Figure 2 shows an example of how these images should look like:
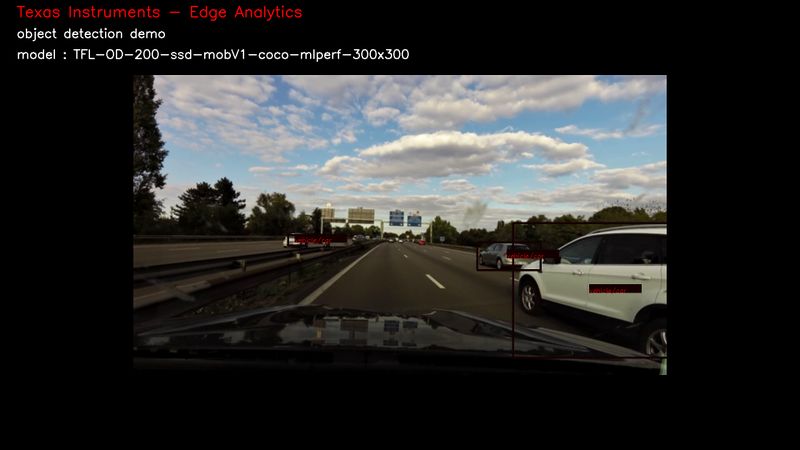
Figure 2. Object detection output example.
There are multiple input and output configurations available. In this example demo, a live video input and image output was specified.
For more information about configuration arguments please refer to the Configuration arguments section below.
Configuration arguments
  -h, --help            show this help message and exit
  -m MODEL, --model MODEL
                    Path to model directory (Required)
                        ex: ./image_classification.py --model ../models/classification/$(model_dir)
  -i INPUT, --input INPUT
                    Source to gst pipeline camera or file
                        ex:  --input v4l2 - for camera
                             --input ./images/img_%02d.jpg - for images
                                   printf style formating will be used to get file names
                             --input ./video/in.avi - for video input
                             default: v4l2
  -o OUTPUT, --output OUTPUT
                    Set gst pipeline output display or file
                        ex:  --output kmssink - for display
                             --output ./output/out_%02d.jpg - for images
                             --output ./output/out.avi - for video output
                             default: kmssink
  -d DEVICE, --device DEVICE
                    Device name for camera input
                    default: /dev/video2
  -c CONNECTOR, --connector CONNECTOR
                    Connector id to select output display
                    default: 39
  -u INDEX, --index INDEX
                    Start index for multiple file input output
                    default: 0
  -f FPS, --fps FPS     Framerate of gstreamer pipeline for image input
                    default: 1 for display and video output 12 for image output
  -n, --no-curses       Disable curses report
                    default: Disabled