Template:RidgeRun and Arducam NVIDIA Jetson Demo/Main contents
Overview of NVIDIA®Jetson™ Orin NX AI Media Sever demo
The purpose of the RidgeRun and Arducam NVIDIA Jetson™ Demo is to provide an idea of the simplicity in the overall design of a complex Gstreamer-based application (like for example the media server) when using RidgeRun's GstD and GstInterpipe products.
The implementation of the controller application for the media server, in this case, is a Python script but it may as well be a QT GUI, a C / C++ application, among other alternatives, this provides a great sense of flexibility to your design; The diagram below basically presents the media server as a set of functional blocks that, when interconnected, provide several data (video buffers) flow paths.

Demo requirements
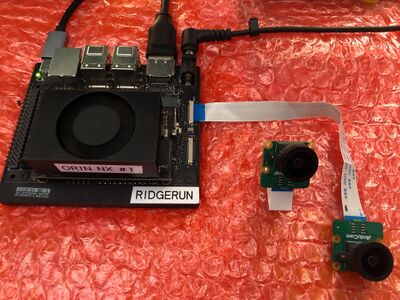
- Hardware
- NVIDIA Jetson Orin NX Developer Board
- Arducam imx708 camera
- Software
- NVIDIA JetPack 5.1.1
- NVIDIA DeepStream 6.2
- IMX708 camera driver
- Docker container
Demo Script Overview
The following sections show a segmented view of the media-server.py script:
Pipeline Class Definition
In the code snippet shown below, the Gstd python client is imported and we create the PipelineEntity object with some helper methods to simplify the pipeline control in the media server. We also create pipeline arrays to group the base pipelines (capture, processing, DeepStream, and display), encoding, recording, and snapshot. Finally, we create the instance of the Gstd client.
#!/usr/bin/env python3

import time
from pygstc.gstc import *

# Create PipelineEntity object to manage each pipeline
class PipelineEntity(object):
    def __init__(self, client, name, description):
        self._name = name
        self._description = description
        self._client = client
        print("Creating pipeline: " + self._name)
        self._client.pipeline_create(self._name, self._description)
    def play(self):
        print("Playing pipeline: " + self._name)
        self._client.pipeline_play(self._name)
    def stop(self):
        print("Stopping pipeline: " + self._name)
        self._client.pipeline_stop(self._name)
    def delete(self):
        print("Deleting pipeline: " + self._name)
        self._client.pipeline_delete(self._name)
    def eos(self):
        print("Sending EOS to pipeline: " + self._name)
        self._client.event_eos(self._name)
    def set_file_location(self, location):
        print("Setting " + self._name + " pipeline recording/snapshot location to " + location);
        filesink_name = "filesink_" + self._name;
        self._client.element_set(self._name, filesink_name, 'location', location);
    def listen_to(self, sink):
        print(self._name + " pipeline listening to " + sink);
        self._client.element_set(self._name, self._name + '_src', 'listen-to', sink);

pipelines_base = []
pipelines_video_rec = []
pipelines_video_enc = []
pipelines_snap = []

# Create GstD Python client
client = GstdClient()
Pipelines Creation
Capture Pipelines
In this snippet, we create the capture pipeline and a processing pipeline, in order to convert the camera output to the required format/colorspace required in the DeepStream pipeline input, RGBA with NVMM memory in this case. Notice that these pipelines are appended to the pipelines_base array.
The media server expects the imx708 camera to be identified as /dev/video0. This must be validated and changed if necessary for the media server to work properly.
camera = PipelineEntity(client, 'camera', 'nvarguscamerasrc sensor-id=0 name=video ! \
video/x-raw(memory:NVMM),width=4608,height=2592,framerate=14/1,format=NV12 \
! interpipesink name=camera \
forward-eos=true forward-events=true async=true sync=false')
pipelines_base.append(camera)

camera0 = PipelineEntity(client, 'camera0', 'interpipesrc listen-to=camera ! nvvidconv \
! video/x-raw(memory:NVMM),width=1280,height=720 ! interpipesink name=camera_src0 \
forward-eos=true forward-events=true async=true sync=false')
pipelines_base.append(camera0)

camera0_rgba_nvmm = PipelineEntity(client, 'camera0_rgba_nvmm', 'interpipesrc \
listen-to=camera_src0 ! nvvideoconvert ! \
video/x-raw(memory:NVMM),format=RGBA,width=1280,height=720 ! queue ! interpipesink \
name=camera0_rgba_nvmm forward-events=true forward-eos=true sync=false \
caps=video/x-raw(memory:NVMM),format=RGBA,width=1280,height=720,pixel-aspect-ratio=1/1,\
interlace-mode=progressive,framerate=14/1')
pipelines_base.append(camera0_rgba_nvmm)
DeepStream Pipeline
The snippet below shows the DeepStream pipeline, notice that this pipeline is also appended to the pipelines_base array.
# Create Deepstream pipeline
deepstream = PipelineEntity(client, 'deepstream', 'interpipesrc listen-to=camera0_rgba_nvmm \
! nvstreammux0.sink_0 interpipesrc listen-to=camera0_rgba_nvmm ! nvstreammux0.sink_1 \
nvstreammux name=nvstreammux0 \
batch-size=2 batched-push-timeout=40000 width=1280 height=720 ! queue ! nvinfer \
batch-size=2 config-file-path=/opt/nvidia/deepstream/deepstream/sources/apps/sample_apps/deepstream-test1/dstest1_pgie_config.txt ! \
queue ! nvtracker ll-lib-file=/opt/nvidia/deepstream/deepstream/lib/libnvds_nvmultiobjecttracker.so \
enable-batch-process=true ! queue ! nvmultistreamtiler width=1280 height=720 rows=1 \
columns=2 ! nvvideoconvert ! nvdsosd ! queue ! interpipesink name=deep forward-events=true \
forward-eos=true sync=false')
pipelines_base.append(deepstream)
Encoding Pipelines
The pipelines created in the code below are in charge of encoding the input video stream (DeepStream) with h264, h265 and jpeg codecs.
The h264 and h265 pipelines are appended to the pipelines_video_enc array while the jpeg pipeline is part of the pipelines_snap array.
# Create encoding pipelines
h264 = PipelineEntity(client, 'h264', 'interpipesrc name=h264_src format=time listen-to=deep \
! nvvideoconvert ! nvv4l2h264enc name=encoder maxperf-enable=1 insert-sps-pps=1 \
insert-vui=1 bitrate=10000000 preset-level=1 iframeinterval=30 control-rate=1 idrinterval=30 \
! h264parse ! interpipesink name=h264_sink async=true sync=false forward-eos=true forward-events=true')
pipelines_video_enc.append(h264_deep)

h265 = PipelineEntity(client, 'h265', 'interpipesrc name=h265_src format=time listen-to=deep \
! nvvideoconvert ! nvv4l2h265enc name=encoder maxperf-enable=1 insert-sps-pps=1 \
insert-vui=1 bitrate=10000000 preset-level=1 iframeinterval=30 control-rate=1 idrinterval=30 \
! h265parse ! interpipesink name=h265_sink async=true sync=false forward-eos=true forward-events=true')
pipelines_video_enc.append(h265)

jpeg = PipelineEntity(client, 'jpeg', 'interpipesrc name=jpeg_src format=time listen-to=deep \
! nvvideoconvert ! video/x-raw(memory:NVMM),format=NV12,width=1280,height=720 ! nvjpegenc ! \
interpipesink name=jpeg forward-events=true forward-eos=true sync=false async=false \
enable-last-sample=false drop=true')
pipelines_snap.append(jpeg)
Video Recording Pipelines
These pipelines are responsible for writing an encoded stream to file.
Notice that these pipelines are appended to the pipelines_video_rec array.
# Create recording pipelines
record_h264 = PipelineEntity(client, 'record_h264', 'interpipesrc format=time \
allow-renegotiation=false listen-to=h264_sink ! h264parse ! matroskamux ! filesink \
name=filesink_record_h264 location=test-h264.mkv')
pipelines_video_rec.append(record_h264)

record_h265 = PipelineEntity(client, 'record_h265', 'interpipesrc format=time \
allow-renegotiation=false listen-to=h265_sink ! h265parse ! matroskamux ! filesink \
name=filesink_record_h265 location=test-h265.mkv')
pipelines_video_rec.append(record_h265)
Image Snapshots Pipeline
The pipeline below saves a jpeg encoded buffer to file. This pipeline is also appended to the pipelines_snap array.
# Create snapshot pipeline
snapshot = PipelineEntity(client, 'snapshot', 'interpipesrc format=time listen-to=jpeg \
num-buffers=1 ! filesink name=filesink_snapshot location=test-snapshot.jpg')
pipelines_snap.append(snapshot)
Video Display Pipeline
The snippet below shows the display pipeline. This pipeline is appended to the pipelines_base array.
# Create display pipeline
display = PipelineEntity(client, 'display', 'interpipesrc listen-to=camera ! \
queue ! nvegltransform ! nveglglessink')
pipelines_base.append(display)
Pipelines Execution
First, we play all the pipelines in the pipelines_base array. This includes the capture, processing, DeepStream, and display pipelines.
# Play base pipelines
for pipeline in pipelines_base:
    pipeline.play()

time.sleep(10)
Then the main function is defined. This function will request an option and display a menu that has the following options
def main():
    while (True):
        print("\nMedia Server Menu\n \
             1) Start recording\n \
             2) Take a snapshot\n \
             3) Stop recording\n \
             4) Exit")

        option = int(input('\nPlease select an option:\n'))
If option 1 is selected we request the name of the file and set the locations for our first video recordings. Then we play all the recording and encoding pipelines.
        if option == 1:
            rec_name = str(input("Enter the name of the video recording (without extension):\n"))
            #Set locations for video recordings
            for pipeline in pipelines_video_rec:
                pipeline.set_file_location(rec_name + '_' + pipeline._name + '.mkv')

            #Play video recording pipelines
            for pipeline in pipelines_video_rec:
                pipeline.play()

            #Play video encoding pipelines
            for pipeline in pipelines_video_enc:
                pipeline.play()

            time.sleep(20)
If option 2 is selected we request the name of the file and set the location for the first snapshot. Then we play the pipelines in the pipelines_snap array (jpeg encoding and snapshot pipeline that saves the snapshot to file).
        elif option == 2:
            snap_name = str(input("Enter the name of the snapshot (without extension):\n"))

            #Set location for snapshot
            snapshot.set_file_location(snap_name + '_' + snapshot._name + '.jpeg')

            #Play snapshot pipelines
            for pipeline in pipelines_snap:
                pipeline.play()

            time.sleep(5)
If option 3 is selected the recording will be stopped. An EOS will be sent to the encoding pipelines for proper closing, both the recording and the encoding pipelines will be stopped. This process is performed in order to have the pipelines available for recording another video.
        elif option == 3:
            #Send EOS event to encode pipelines for proper closing
            #EOS to recording pipelines
            for pipeline in pipelines_video_enc:
                pipeline.eos()
            #Stop recordings
            for pipeline in pipelines_video_rec:
                pipeline.stop()
            for pipeline in pipelines_video_enc:
                pipeline.stop()
If option 4 is selected all the pipelines will be stopped and deleted, the menu will exit and the user is able to check the videos recorded after closing GstD
        elif option == 4:
            # Send EOS event to encode pipelines for proper closing
            # EOS to recording pipelines
            for pipeline in pipelines_video_enc:
                pipeline.eos()
            # Stop pipelines
            for pipeline in pipelines_snap:
                pipeline.stop()
            for pipeline in pipelines_video_rec:
                pipeline.stop()
            for pipeline in pipelines_video_enc:
                pipeline.stop()
            for pipeline in pipelines_base:
                pipeline.stop()

            # Delete pipelines
            for pipeline in pipelines_snap:
                pipeline.delete()
            for pipeline in pipelines_video_rec:
                pipeline.delete()
            for pipeline in pipelines_video_enc:
                pipeline.delete()
            for pipeline in pipelines_base:
                pipeline.delete()
            break

        else:
    	    print('Invalid option')
Then main function is called at the end of the file in order for the menu to be executed after the base pipelines are set to playing state.
main()
Initial instructions. IMX708 camera driver setup
The following instructions are based on the following RidgeRun's Developer Wiki: Raspberry Pi Camera Module 3 IMX708 Linux driver for Jetson
Download JetPack
The current version of the driver is supported on Jetpack 5.1.1 on Orin NX. Porting the driver to other versions and platforms is possible.
1. Download and install the NVIDIA SDK Manager (membership is required).
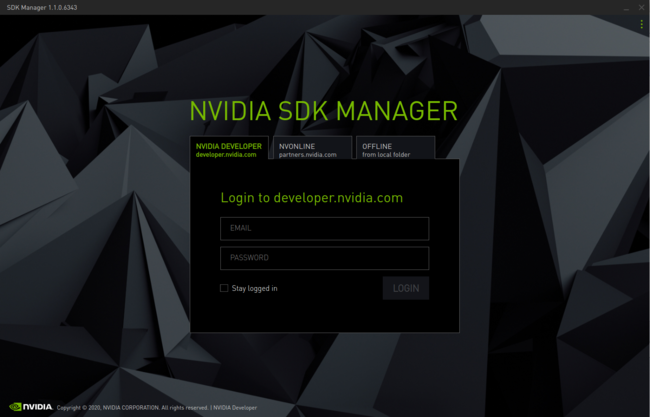
2. Put your NVIDIA membership credentials in the SDK Manager main window:
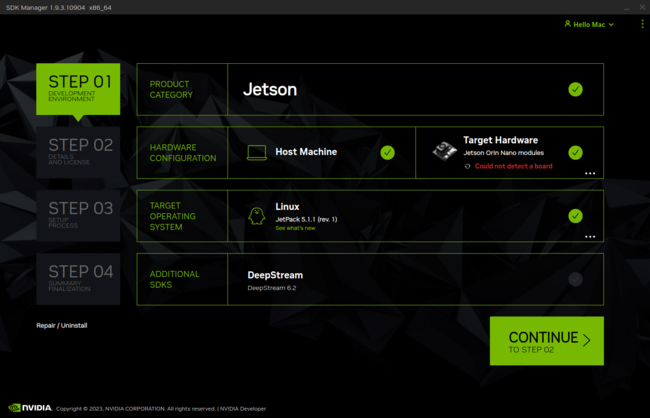
3. Select JetPack version and Jetson Orin NX as shown below and press Continue:
4. Accept the terms and conditions and press Continue. The SDK Manager will download and install the selected components:
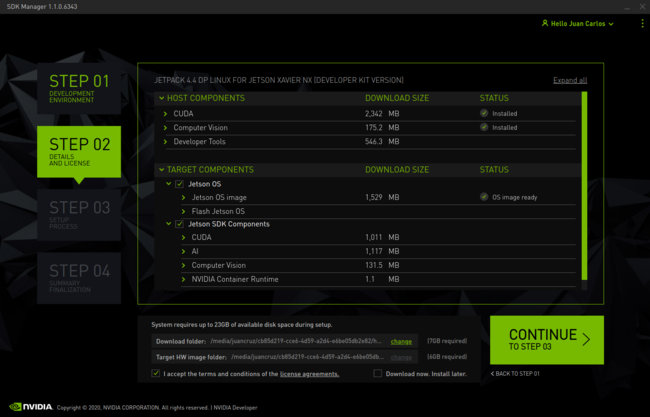
5. Be careful with the platform you will be flashing, the image shown is for Jetson Xavier, in your case Jetson Orin NX must be shown. Select Manual Setup. Make sure the board is in Recovery Mode and then press Flash:
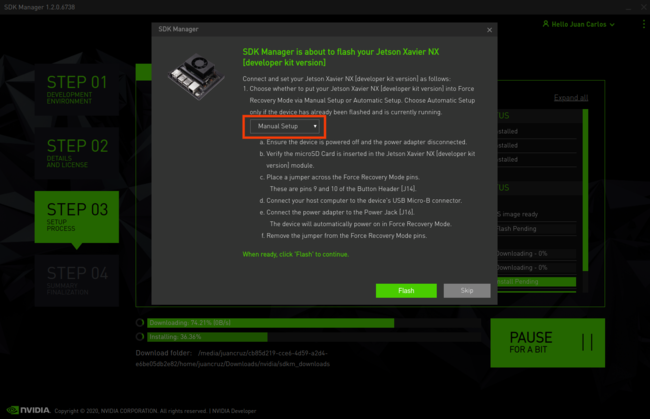
Recovery Mode for Jetson Orin NX
- To set the Jetson Orin Nano developer kit in Recovery Mode the following steps are required:
- Ensure the device is powered off and the power adapter is disconnected.
- Place a jumper across the Force Recovery Mode pins (9 and 10) on the button header [J14]. Please, see Figure 6 below.
- Connect your host computer to the developer kit's USB Micro-B connector.
- Connect the power supply to the power jack [J16]. The developer kit automatically powers on in Force Recovery Mode.
- Remove the jumper from the Force Recovery Mode pins.
- Use the
lsusbcommand to check if theNVidia corpmessage is shown.
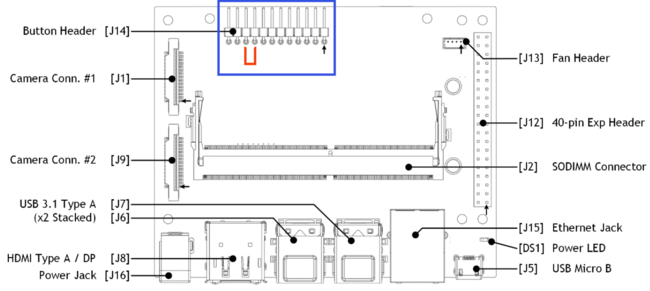
6. When the OS has been installed successfully in the Orin Nano, you will be asked to enter the board IP, a username and a password, as shown below in Figure7:
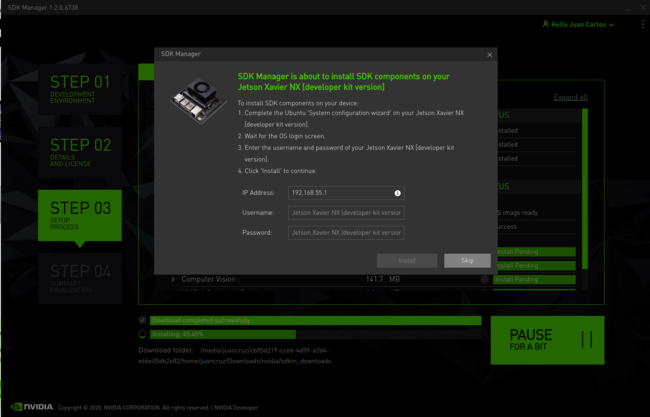
7. Don't close the window of Figure 7 and don't modify its content yet. You need to connect a screen to the board via HDMI, a keyboard/mouse via USB port, and a network cable via Ethernet port. You can remove the jumper that keeps the board in Recovery Mode and then reboot the Jetson board at this point if necessary.
Installing the Driver - JetPack sources patch and SCP files copy
Install dependencies on the host computer
sudo apt update
sudo apt install git \
wget \
quilt \
build-essential \
bc \
libncurses5-dev libncursesw5-dev \
rsync
Get the source code from NVIDIA oficial repository
cd
wget https://developer.nvidia.com/downloads/embedded/l4t/r35_release_v3.1/sources/public_sources.tbz2/ -O public_sources.tbz2
tar -xjf public_sources.tbz2 Linux_for_Tegra/source/public/kernel_src.tbz2 --strip-components 3
Export the Jetpack directory as the environment variable DEVDIR:
(In our case the nvidia directory is in the HOME directory, which in our case is /home/nvidia/ Remember that this directory is created by the sdk manager when you downloaded the sources and flashed your Jetson board).
export DEVDIR=/home/nvidia/nvidia_sdk/JetPack_5.1.1_Linux_JETSON_ORIN_NX_TARGETS/Linux_for_Tegra
And now create the sources directory and extract the kernel sources:
mkdir $DEVDIR/sources
tar -xjf kernel_src.tbz2 -C $DEVDIR/sources
Build and install the driver
Get the driver patches
Download contents provided in RidgeRun GitHub by running the command:
git clone git@github.com:RidgeRun/NVIDIA-Jetson-IMX708-RPIV3.git
cd NVIDIA-Jetson-IMX708-RPIV3/patches_orin_nano
Then you will need the patch in the directory $DEVDIR/sources by running:
cp -r patches/ $DEVDIR/sources
Next, you can then apply the patch and go back to the Linux_for_Tegra directory.
cd $DEVDIR/sources
quilt push -a
cd ..
Set up the toolchain
You will need to download the toolchain to compile the sources:
mkdir $HOME/l4t-gcc
cd $HOME/l4t-gcc
wget -O toolchain.tar.xz https://developer.nvidia.com/embedded/jetson-linux/bootlin-toolchain-gcc-93
sudo tar -xf toolchain.tar.xz
Build
Create output directories:
KERNEL_OUT=$DEVDIR/sources/kernel_out
MODULES_OUT=$DEVDIR/sources/modules_out
mkdir -p $KERNEL_OUT
mkdir -p $MODULES_OUT
export CROSS_COMPILE_AARCH64=$HOME/l4t-gcc/bin/aarch64-buildroot-linux-gnu-
Compile the Kernel:
cd $DEVDIR/sources
make -C kernel/kernel-5.10/ ARCH=arm64 O=$KERNEL_OUT LOCALVERSION=-tegra CROSS_COMPILE=${CROSS_COMPILE_AARCH64} tegra_defconfig

make -C kernel/kernel-5.10/ ARCH=arm64 O=$KERNEL_OUT LOCALVERSION=-tegra CROSS_COMPILE=${CROSS_COMPILE_AARCH64} menuconfig
- Be sure that IMX708 is selected and deselect any other IMX driver:
Device Drivers  --->
  <*> Multimedia support  --->
      Media ancillary drivers  --->
          NVIDIA overlay Encoders, decoders, sensors and other helper chips  --->
              <*> IMX708 camera sensor support
make -C kernel/kernel-5.10/ ARCH=arm64 O=$KERNEL_OUT LOCALVERSION=-tegra CROSS_COMPILE=${CROSS_COMPILE_AARCH64} Image

make -C kernel/kernel-5.10/ ARCH=arm64 O=$KERNEL_OUT LOCALVERSION=-tegra CROSS_COMPILE=${CROSS_COMPILE_AARCH64} dtbs

make -C kernel/kernel-5.10/ ARCH=arm64 O=$KERNEL_OUT LOCALVERSION=-tegra CROSS_COMPILE=${CROSS_COMPILE_AARCH64} modules

make -C kernel/kernel-5.10/ ARCH=arm64 O=$KERNEL_OUT LOCALVERSION=-tegra INSTALL_MOD_PATH=$MODULES_OUT modules_install
Installation
Install using scp command
Get the Jetson IP address going to your board, connect it by ethernet, run the command shown below and copy the ip address showed in eth0 (inet):
ifconfig
In your computer, copy the files via SSH by running
scp $KERNEL_OUT/arch/arm64/boot/Image nvidia@orin_ip_address:/tmp
scp $KERNEL_OUT/arch/arm64/boot/dts/nvidia/tegra234-p3767-0000-p3768-0000-a0.dtb nvidia@orin_ip_address:/tmp
Open a terminal on your Jetson and run:
sudo cp /tmp/Image /boot/
sudo cp /tmp/tegra234-p3767-0000-p3768-0000-a0.dtb /boot/dtb/kernel_tegra234-p3767-0000-p3768-0000-a0.dtb
Modify the extlinux.conf to accept the modified dtb by copying this code in the extlinux.conf file:
sudo nano /boot/extlinux/extlinux.conf
TIMEOUT 30
DEFAULT primary

MENU TITLE L4T boot options

LABEL primary
      MENU LABEL primary kernel
      LINUX /boot/Image
      FDT /boot/dtb/kernel_tegra234-p3767-0000-p3768-0000-a0.dtb
      INITRD /boot/initrd
      APPEND ${cbootargs} root=PARTUUID=77f45bd2-b473-4f54-8ff7-4ba0edc48af8 rw rootwait rootfstype=ext4 mminit_loglevel=4 console=ttyTCU0,115200 console=ttyAMA0,115200 firmware_class.path=/etc/firmware fbcon=map:0 net.ifnames=0 nv-auto-config

# When testing a custom kernel, it is recommended that you create a backup of
# the original kernel and add a new entry to this file so that the device can
# fallback to the original kernel. To do this:
#
# 1, Make a backup of the original kernel
#      sudo cp /boot/Image /boot/Image.backup
#
# 2, Copy your custom kernel into /boot/Image
#
# 3, Uncomment below menu setting lines for the original kernel
#
# 4, Reboot

# LABEL backup
#    MENU LABEL backup kernel
#    LINUX /boot/Image.backup
#    FDT /boot/dtb/kernel_tegra234-p3767-0000-p3768-0000-a0.dtb
#    INITRD /boot/initrd
#    APPEND ${cbootargs}
And now you can reboot
Docker instructions
This guide provides instructions to run a docker container with the evaluation products of RidgeRun.
The images are available in the docker hub, to run these images on your target board, you only require docker and Nvidia run time.
Docker Hub
Download the Docker image for the Jetson Orin NX as follows.
- For Orin NX:
sudo docker pull ridgerun/products-evals-demos:jp_5x_with_ds_6.2
Running the image
For this step, you need to have Nvidia run time.
sudo docker run --device /dev/video0 --name demo_rr --net=host --runtime nvidia --ipc=host -v /tmp/.X11-unix/:/tmp/.X11-unix/ -v /tmp/argus_socket:/tmp/argus_socket --cap-add SYS_PTRACE --privileged -v /dev:/dev -v /proc:/writable_proc -e DISPLAY=$DISPLAY -it ridgerun/products-evals-demos:jp_5x_with_ds_6.2 /demo.sh
Whenever you need to run the image again, please use the following commands.
sudo docker start demo_rr
sudo docker attach demo_rr
Output:
nvidia@ubuntu:~$ sudo docker attach demo_rr
(rr-eval) root@ubuntu:/opt/nvidia/deepstream/deepstream-6.2$
Afterwards, you can run any example from the wiki for each product.
ADD THE PRODUCTS AVAILABLE FOR TESTING THE EVALS#########################################
Running The Demo
Environment setup
1. Proceed to install RidgeRun's GstD and GstInterpipe on the Jetson Orin NX
2. Proceed to install pygstc
3. Clone the Ridgerun Arducam imx708 Jetson Collaboration demo repository to a suitable path in your working station.
git clone git@gitlab.ridgerun.com:ridgerun/demos/ridgerun-arducam-imx708-jetson-collaboration.git
Demo Directory Layout
The ridgerun-arducam-imx708-jetson-collaboration directory has the following structure:
ridgerun-arducam-imx708-jetson-collaboration/
├── deepstream-models
│   ├── config_infer_primary_1_cameras.txt
│   ├── config_infer_primary_4_cameras.txt
│   ├── config_infer_primary.txt
│   ├── libnvds_mot_klt.so
│   └── Primary_Detector
│       ├── cal_trt.bin
│       ├── labels.txt
│       ├── resnet10.caffemodel
│       ├── resnet10.caffemodel_b1_fp16.engine
│       ├── resnet10.caffemodel_b30_fp16.engine
│       ├── resnet10.caffemodel_b4_fp16.engine
│       ├── resnet10.caffemodel_b4_gpu0_fp16.engine
│       └── resnet10.prototxt
├── python-example
│   └── media-server.py
└── README.md
- deepstream-models: Required by the DeepStream processing block in the media server.
- python-example: Contains the python-based media server demo scripts.
Executing the media server script
1. Proceed to initialize GstD on the board
gstd
Output:
nvidia@ubuntu:~$ gstd

GstD version 0.15.1
Copyright (C) 2015-2021 RidgeRun (https://www.ridgerun.com)
2. On the container head to the /ridgerun-arducam-imx708-jetson-collaboration/python-example directory
3. Then execute the media server demo script
./media-server.py
Output
root@ubuntu:/ridgerun-arducam-imx708-jetson-collaboration/python-example# ./media-server.py
Creating pipeline: camera
Creating pipeline: camera0
Creating pipeline: camera0_rgba_nvmm
Creating pipeline: display
Creating pipeline: deepstream
Creating pipeline: h264
Creating pipeline: h265
Creating pipeline: jpeg
Creating pipeline: record_h264
Creating pipeline: record_h265
Creating pipeline: snapshot
Playing pipeline: camera
Playing pipeline: camera0
Playing pipeline: camera0_rgba_nvmm
Playing pipeline: display
Playing pipeline: deepstream

Media Server Menu
              1) Start recording
              2) Take a snapshot
              3) Stop recording
              4) Exit

Please select an option:
Please keep in mind that it will take some time for the menu to show up after "Playing pipeline: deepstream" because the deepstream model is being loaded.
When the menu appears on the terminal you can choose to start a recording or to take a snapshot.
If you decide to start the recording the media server will ask you for the name of the file, start the encoding and recording pipelines and prompt the menu again.
Please select an option:
1
Enter the name of the video recording (without extension):
car_detection
Setting record_h264 pipeline recording/snapshot location to car_detection_record_h264.mkv
Setting record_h265 pipeline recording/snapshot location to car_detection_record_h265.mkv
Playing pipeline: record_h264
Playing pipeline: record_h265
Playing pipeline: h264
Playing pipeline: h265

Media Server Menu
              1) Start recording
              2) Take a snapshot
              3) Stop recording
              4) Exit

Please select an option:
After starting the recording, the user can stop the current recording and start a new one
Please select an option:
3
Sending EOS to pipeline: h264
Sending EOS to pipeline: h265
Stopping pipeline: record_h264
Stopping pipeline: record_h265
Stopping pipeline: h264
Stopping pipeline: h265

Media Server Menu
              1) Start recording
              2) Take a snapshot
              3) Stop recording
              4) Exit

Please select an option:
1
Enter the name of the video recording (without extension):
roadsign_detection
Setting record_h264 pipeline recording/snapshot location to roadsign_detection_record_h264.mkv
Setting record_h265 pipeline recording/snapshot location to roadsign_detection_record_h265.mkv
Playing pipeline: record_h264
Playing pipeline: record_h265
Playing pipeline: h264
Playing pipeline: h265

Media Server Menu
              1) Start recording
              2) Take a snapshot
              3) Stop recording
              4) Exit

Please select an option:
The current recording can be stopped and a snapshot can be taken.
Please select an option:
3
Sending EOS to pipeline: h264
Sending EOS to pipeline: h265
Stopping pipeline: record_h264
Stopping pipeline: record_h265
Stopping pipeline: h264
Stopping pipeline: h265

Media Server Menu
              1) Start recording
              2) Take a snapshot
              3) Stop recording
              4) Exit

Please select an option:
2
Enter the name of the snapshot (without extension):
snap_test
Setting snapshot pipeline recording/snapshot location to snap_test_snapshot.jpeg
Playing pipeline: jpeg
Playing pipeline: snapshot

Media Server Menu
              1) Start recording
              2) Take a snapshot
              3) Stop recording
              4) Exit

Please select an option:
After taking the snapshot another recording can be started and stopped.
Please select an option:
1
Enter the name of the video recording (without extension):
person_detection
Setting record_h264 pipeline recording/snapshot location to person_detection_record_h264.mkv
Setting record_h265 pipeline recording/snapshot location to person_detection_record_h265.mkv
Playing pipeline: record_h264
Playing pipeline: record_h265
Playing pipeline: h264
Playing pipeline: h265

Media Server Menu
              1) Start recording
              2) Take a snapshot
              3) Stop recording
              4) Exit

Please select an option:
3
Sending EOS to pipeline: h264
Sending EOS to pipeline: h265
Stopping pipeline: record_h264
Stopping pipeline: record_h265
Stopping pipeline: h264
Stopping pipeline: h265

Media Server Menu
              1) Start recording
              2) Take a snapshot
              3) Stop recording
              4) Exit

Please select an option:
Finally, select the last option to exit the media server when desired.
Please select an option:
4
Sending EOS to pipeline: h264
Sending EOS to pipeline: h265
Stopping pipeline: jpeg
Stopping pipeline: snapshot
Stopping pipeline: record_h264
Stopping pipeline: record_h265
Stopping pipeline: h264
Stopping pipeline: h265
Stopping pipeline: camera
Stopping pipeline: camera0
Stopping pipeline: camera0_rgba_nvmm
Stopping pipeline: display
Stopping pipeline: deepstream
Deleting pipeline: jpeg
Deleting pipeline: snapshot
Deleting pipeline: record_h264
Deleting pipeline: record_h265
Deleting pipeline: h264
Deleting pipeline: h265
Deleting pipeline: camera
Deleting pipeline: camera0
Deleting pipeline: camera0_rgba_nvmm
Deleting pipeline: display
Deleting pipeline: deepstream
Expected Results
After exiting the media server, press Ctrl+C on the terminal where Gstd was started and you should find the output files in that same directory, it should contain media with the deepstream output:
car_detection_record_h264.mkv
car_detection_record_h265.mkv
person_detection_record_h264.mkv
person_detection_record_h265.mkv
roadsign_detection_record_h264.mkv
roadsign_detection_record_h265.mkv
snap_test_snapshot.jpeg
