GstInterpipe - Simple Examples
| ← |
⌂ Home |
→ |
This page contains examples to demonstrate the usage of the interpipesink and interpipesrc elements.
The GstInterpipe potential is based on its features that take place on runtime, so it is no possible to fully test it and demonstrate its capabilities using a quick gst-launch-1.0 prototype pipeline. In this case it will be necessary to develop a quick C or C++ application that integrates the GStreamer framework with the sample logic, but fortunately there is a simpler and quicker alternative: GStreamer Daemon (Gstd). The perfect complement for the GstInterpipe is the GStreamer Daemon (Gstd). It gives the possibility to create a set of different independent pipelines, on which you can independently change their state or their element properties. That is exactly what we need to demonstrate all the potential of GstInterpipe.
Based on the above explanation, the following samples were developed using the GStreamer Daemon (Gstd), so if you want to run this samples, you first need to install gstd. To build and install gstd you can follow this guide: Building GStreamer Daemon.
Also, the following samples are intended to be run in any platform so only general/common-known GStreamer elements were used on them (videotestsrc, filesink, etc). The idea is to explain the concept of possible use-cases where GstInterpipe could be applied to simply the implementation and demonstrate how to use the interpipesink and interpipesrc elements.
CCTV Example (Dynamic Switching)
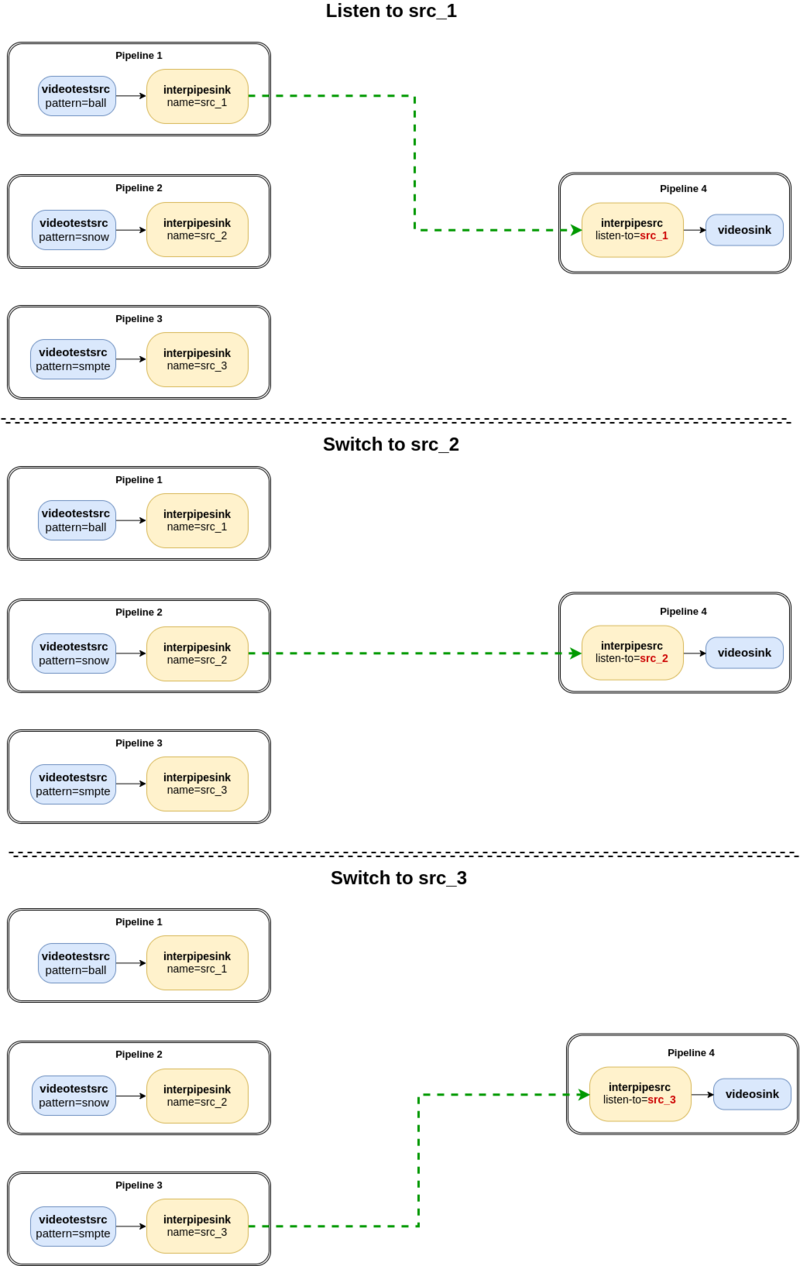
This example demonstrate the usage of the dynamic switching property of the GstInterpipe. The objective of this sample is to show the simplicity that GstInterpipe offers in a real case of use where you have different source pipelines and one sink pipeline, and you want to alternate the source that is connected with the sink pipeline. For example a Closed Circuit Television (CCTV) system.
In this sample there are 3 source pipelines labeled as: scr_pipe_1, scr_pipe_2, scr_pipe_3. Each source pipeline is a videotestsrc with a different pattern. In the other side there is 1 sink pipeline, who is labeled as sink_pipe_4. This sink pipeline consists of a videosink that displays on screen the video buffers it receives.
In the sample the source pipeline periodically (each 8 s) change the source pipeline it is listening to, so you will see a different video pattern on the rendering screen.
As you can view from the sample code, to change the the source pipeline that the sink pipeline is listening to, is as easy as change the value of the interpipesrc element "listen-to" property with the name of the desired interpipesink to be listened.
The below diagram illustrates the concept.

Sample bash script code:
#!/bin/bash

echo -e "\n ====== CCTV Example (Switch the scr_pipe to listen in runtime) ====== \n"

gstd &

sleep 2

echo -e "\n ====> Create the scr_pipe_1 \n"
gstd-client pipeline_create pipe_1_src videotestsrc pattern=ball is-live=true \
! "video/x-raw, framerate=15/1,width=640, height=480" ! queue ! interpipesink name=src_1 \
caps=video/x-raw,width=640,height=480,framerate=15/1 sync=false async=false

echo -e "\n ====> Create the scr_pipe_2 \n"
gstd-client pipeline_create pipe_2_src videotestsrc pattern=snow is-live=true \
! "video/x-raw, framerate=15/1, width=640, height=480" ! queue ! interpipesink name=src_2 \
caps=video/x-raw,width=640,height=480,framerate=15/1 sync=false async=false

echo -e "\n ====> Create the scr_pipe_3 \n"
gstd-client pipeline_create pipe_3_src videotestsrc pattern=smpte is-live=true \
! "video/x-raw, framerate=15/1, width=640, height=480" ! queue ! interpipesink name=src_3 \
caps=video/x-raw,width=640,height=480,framerate=15/1 sync=false async=false

echo -e "\n ====> Create the sink_pipe_4 (listener) \n"
gstd-client pipeline_create pipe_4_sink interpipesrc name=interpipesrc1 listen-to=src_1 \
is-live=true allow-renegotiation=true enable-sync=true ! queue \
! fpsdisplaysink async=false sync=false

echo -e "\n ====> Change to PLAYING STATE \n"
gstd-client pipeline_play pipe_1_src
gstd-client pipeline_play pipe_2_src
gstd-client pipeline_play pipe_3_src
gstd-client pipeline_play pipe_4_sink

echo -e "\n ====> Every 8 seconds the sink_pipe will change the src_pipe that is listening to \n"
echo -e "\n ====> Start listening to scr_pipe_1 \n"
sleep 8

gstd-client element_set pipe_4_sink interpipesrc1 listen-to src_2
echo -e "\n ====> Change to listening to scr_pipe_2 \n"
sleep 8

gstd-client element_set pipe_4_sink interpipesrc1 listen-to src_3
echo -e "\n ====> Change to listening to scr_pipe_3 \n"
sleep 8

gstd-client element_set pipe_4_sink interpipesrc1 listen-to src_1
echo -e "\n ====> Change to listening to scr_pipe_1 \n"
sleep 8

gstd-client element_set pipe_4_sink interpipesrc1 listen-to src_3
echo -e "\n ====> Change to listening to scr_pipe_3 \n"
sleep 8

gstd-client pipeline_delete pipe_1_src
gstd-client pipeline_delete pipe_2_src
gstd-client pipeline_delete pipe_3_src
gstd-client pipeline_delete pipe_4_sink

sleep 2

killall gstd

echo -e "\n ====> CCTV Example Finished!!! \n"
To run the sample follow this steps:
- Build and install GStreamer Daemon (gstd): Building GStreamer Daemon.
- Copy the script code in a file
- Change the file permissions to be executable (chmod 777 <file.sh>)
- Run the script: ./<file.sh>
| ← |
⌂ Home |
→ |
