NVIDIA Jetson Generative AI Lab RidgeRun Exploration

|
|
Introduction
This wiki explores the following NVIDIA Jetson Generative AI Lab: Text Generation, Image Generation, Text + Vision and NanoSAM. The idea behind this guide is to provide more details and instructions for the user and developer on utilising the Jetson Generative AI Lab tool. Here we explain how to run some examples, what dependencies are needed, and how to use this powerful tool.
Install the dependencies
The NVIDIA Jetson Generative AI Lab is only available to run on the following Jetson boards:
- Jetson AGX Orin 64GB Developer Kit
- Jetson AGX Orin 32GB Developer Kit
- Jetson Orin Nano Developer Kit
JetPack 5.1.2 NVIDIA Installation
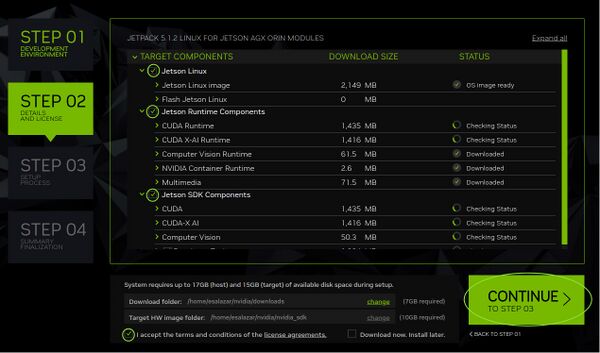
1. Download and run the NVIDIA SDK Manager
2. Install JetPack 5.1.2 on the Orin AGX DevKit board.
- Disable the host installation (1).
- Select the Jetson board (2).
- Select JetPack 5.1.2 (3)
- Continue the installation process.

3. Select all NVIDIA packages.

Install Jetson Generative AI Lab dependencies
1. Check if docker is already installed:
sudo docker version

Client:
 Version:           24.0.5
 API version:       1.43
 Go version:        go1.20.3
 Git commit:        24.0.5-0ubuntu1~20.04.1
 Built:             Mon Aug 21 19:50:14 2023
 OS/Arch:           linux/arm64
 Context:           default

Server:
 Engine:
  Version:          24.0.5
  API version:      1.43 (minimum version 1.12)
  Go version:       go1.20.3
  Git commit:       24.0.5-0ubuntu1~20.04.1
  Built:            Mon Aug 21 19:50:14 2023
  OS/Arch:          linux/arm64
  Experimental:     false
 containerd:
  Version:          1.7.2
  GitCommit:
 runc:
  Version:          1.1.7-0ubuntu1~20.04.1
  GitCommit:
 docker-init:
  Version:          0.19.0
  GitCommit:
If there is no output from the sudo docker version command, install docker by following the instructions in Docker Engine on Ubuntu:
- 1.1. Uninstall all conflicting packages:
for pkg in docker.io docker-doc docker-compose docker-compose-v2 podman-docker containerd runc; do sudo apt-get remove $pkg; done
- 1.2. Set up Docker's apt repository:
# Add Docker's official GPG key:
sudo apt-get update
sudo apt-get install ca-certificates curl gnupg
sudo install -m 0755 -d /etc/apt/keyrings
curl -fsSL https://download.docker.com/linux/ubuntu/gpg | sudo gpg --dearmor -o /etc/apt/keyrings/docker.gpg
sudo chmod a+r /etc/apt/keyrings/docker.gpg

# Add the repository to Apt sources:
echo \
  "deb [arch=$(dpkg --print-architecture) signed-by=/etc/apt/keyrings/docker.gpg] https://download.docker.com/linux/ubuntu \
  $(. /etc/os-release && echo "$VERSION_CODENAME") stable" | \
  sudo tee /etc/apt/sources.list.d/docker.list > /dev/null
sudo apt-get update
- 1.3. Install the latest Docker version:
sudo apt-get install docker-ce docker-ce-cli containerd.io docker-buildx-plugin docker-compose-plugin
- 1.4. Run the
hello-worldimage to verify the Docker installation:
sudo docker run hello-world
2. Check if the nvidia-container packages are already installed:
apt list | grep nvidia-container

libnvidia-container-tools/stable,now 1.10.0-1 arm64 [installed]
libnvidia-container0/stable,now 0.11.0+jetpack arm64 [installed]
libnvidia-container1/stable,now 1.10.0-1 arm64 [installed]
nvidia-container-runtime/stable,now 3.9.0-1 all [installed]
nvidia-container-toolkit/stable,now 1.11.0~rc.1-1 arm64 [installed]
If there is no output from the apt list | grep nvidia-container command, install the following apt package:
sudo apt install nvidia-container-toolkit nvidia-container-runtime
3. Check if CUDA is already installed
nvcc --version

nvcc: NVIDIA (R) Cuda compiler driver
Copyright (c) 2005-2022 NVIDIA Corporation
Built on Sun_Oct_23_22:16:07_PDT_2022
Cuda compilation tools, release 11.4, V11.4.315
Build cuda_11.4.r11.4/compiler.31964100_0
If there is no output, install CUDA by running the following command:
sudo apt install cuda-toolkit-11-4
Modify the following environment variables:
PATH="/usr/local/cuda/bin:$PATH"
LD_LIBRARY_PATH="/usr/local/cuda/lib64:$LD_LIBRARY_PATH"
3. Install the following apt dependencies packages:
sudo apt-get update && sudo apt install git python3-pip
4. Clone the jetson-containers repository and install the requirements:
git clone --depth=1 https://github.com/dusty-nv/jetson-containers
cd jetson-containers
pip3 install -r requirements.txt
5. Modify the /etc/docker/daemon.json file to enable the NVCC compiler and GPU:
{
    "runtimes": {
        "nvidia": {
            "path": "nvidia-container-runtime",
            "runtimeArgs": []
        }
    },

    "default-runtime": "nvidia"
}
Restart the Docker service:
sudo systemctl restart docker
Check if the change was successfully applied:
sudo docker info | grep 'Default Runtime'
Default Runtime: nvidia
For more details, check the pre-setup jetson-containers instructions.
Additional Docker set up steps
To Run As Non-Root User (No Sudo)
# Create the docker group
sudo groupadd docker

# Add yourself to the group
sudo usermod -aG docker $USER

# To avoid re-logging
newgrp docker

# Test proper installation
docker ps
Move Docker Out Of Root Filesystem Partition
Docker can create many files that can quickly fill the root filesystem partition. To prevent this from happening follow the next steps. NOTE: The following steps only have significant effects when there is another disc, for example, an NVME in the Jetson. If there is no other disc, these steps are not needed.
1. Verify if the /var/lib/docker/ directory exists:
ls /var/lib/docker/
If not, create it by running the following command:
docker run hello-world
2. Copy the Docker directory to another path, for example /home/nvidia :
sudo cp -r /var/lib/docker/ <path>
3. Remove the original Docker directory:
sudo rm -rf /var/lib/docker/
4. Create a symbolic link at the original root location to point at the new home location:
cd /var/lib/
sudo ln -s <path>/docker/ docker
5. Restart the Docker service:
systemctl restart docker
Run text-generation-webui tutorial
In order to run the text-generation-webui example, follow the next instructions:
1. Pull or build and run the text-generation-webui compatible docker image
cd jetson-containers
./run.sh $(./autotag text-generation-webui)
The following GIF shows the terminal output the first time the above is run:

The run.sh and autotag are in charge of finding this compatible docker image based on the example that the user wants to run. In this case, the compatible image is dustynv/text-generation-webui:r35.4.1. Also, they are going to run the docker container as:
docker run --runtime nvidia -it --rm --network host --volume /tmp/argus_socket:/tmp/argus_socket --volume /etc/enctune.conf:/etc/enctune.conf --volume /etc/nv_tegra_release:/etc/nv_tegra_release --volume /tmp/nv_jetson_model:/tmp/nv_jetson_model --volume /home/nvidia/jetson-containers/data:/data --device /dev/snd --device /dev/bus/usb dustynv/text-generation-webui:r35.2.1
2. Open the browser and access http://<IP_ADDRESS>:7860. For example:
http://192.168.0.5:7860
3. Now, a model has to be downloaded and loaded into the generative example.
There are two ways to download the model(s): from within the web UI, or using download-model.py script inside the docker container.
Download a model from within the web UI
1. On the web UI, click on the Model tab and go to the Download model or LoRA subsection.
2. Look for a text generation model in Hugging Face Hub and enter username/model path. The path can be copied from the Hub into the clipboard. The Tutorial - text-generation-webui already used some GGUF (GPT (Generative pre-trained transformers)-Generated Unified Format) models. According to the tutorial, the fastest oobabooga model to to use the llama.cpp with 4-bit quantized GGUF models, which are:
| Model | Quantization | Memory (MB) |
|---|---|---|
| TheBloke/Llama-2-7b-Chat-GGUF | llama-2-7b-chat.Q4_K_M.gguf | 5,268 |
| TheBloke/Llama-2-13B-chat-GGUF | llama-2-13b-chat.Q4_K_M.gguf | 8,609 |
| TheBloke/LLaMA-30b-GGUF | llama-30b.Q4_K_S.gguf | 19,045 |
| TheBloke/Llama-2-70B-chat-GGUF | llama-2-70b-chat.Q4_K_M.gguf | 37,655 |
To use the models in the above table, copy the model username/model path, click on Get file list, select the model file for a particular quantization, input the file name and hit Download button. To check the model size, check TheBloke/Llama-2-7B-Chat-GGUF/provided-files section, for example.
The following GIF shows an example of how to download the model:

Load a model
When the model has finished downloading, click on the refresh button to list the model, and select the preferred model to use.
For a GGUF model:
- Set
n-gpu-layersto128 - Set
n_gqato8ifLlama-2-70Bare used (on Jetson AGX Orin 64GB)
Then click the Load button.
The following GIF shows an example of how to download the model:

Chat with the AI model
The Instruction Template sub-tab on the Parameters tab has one parameter that needs to be changed when a Llama model fine-tuned for chat is used, such as the models specified in the Download a model from within the web UI section. To perform that change:
1. Click on the Parameters tab.
2. Click on the Instruction Template sub-tab.
3. Select Llama-v2 from the Instruction Template drop-down (or Vicuna, Guanaco, etc., if one of those models is used).
4. On the Generation tab, some settings can be changed such as the max_new_tokens which is related to the maximum length the AI should output per reply or randomness control parameters like temperature and top_p.
5. Click on the Chat tab and under the <codeMode section select the Instruct option.
Now, the user can chat with the AI model. Here are some questions that the user can ask the AI model. Here is an example on how to run the above steps:

Run Image generation tutorial
To run the Stable Diffusion (Image Generation) example, follow the next instructions:
1. Pull or build and run the stable-diffusion-webui compatible docker image
cd jetson-containers
./run.sh $(./autotag stable-diffusion-webui)
The following GIF shows the terminal output the first time the above is run:

The compatible pull image is dustynv/stable-diffusion-webui:r36.2.0 and the container is run as follows:
docker run --runtime nvidia -it --rm --network host --volume /tmp/argus_socket:/tmp/argus_socket --volume /etc/enctune.conf:/etc/enctune.conf --volume /etc/nv_tegra_release:/etc/nv_tegra_release --volume /tmp/nv_jetson_model:/tmp/nv_jetson_model --volume /home/nvidia/jetson-containers/data:/data --device /dev/snd --device /dev/bus/usb dustynv/stable-diffusion-webui:r36.2.0
Notice in the above gif that the model is loaded after running the image generation container. The model used is [v1-5-pruned-emaonly.safetensors https://huggingface.co/runwayml/stable-diffusion-v1-5/blob/main/v1-5-pruned-emaonly.safetensors]. So, the tutorial is ready to use.
Create images
1. Open the browser and access http://<IP_ADDRESS>:7860. For example:
http://192.168.0.5:7860
2. In the prompt box write the image description that would you like to create. For example:
Futuristic city with sunset, high quality, 4K image.
3. Click in the Generate button and check the result. The following gif summarizes the image creation process:

The image created is the following:

4. The image generated can be saved into your system. Just first click on the save button and then on the file size save it. The next image shows how to do it:

Run Text Plus Vision tutorial
The Text + Vision NVIDIA tutorial, cover some methods that allow to run the Text Plus Vision tutorial, which are:
1. Chat with Llava using text-generation-webui
2. Run from the terminal with llava.serve.cli
3. Quantized GGUF models with llama.cpp
4. Optimized Multimodal Pipeline with local_llm
The one that is going to be explored in this wiki is the Chat with Llava using text-generation-webui tutorial.
Chat with Llava using text-generation-webui
to run the text plus vision example, follow the next instructions:
1. Update to the latest container:
docker pull $(./autotag text-generation-webui)
2. Download the text plus vision model:
./run.sh --workdir=/opt/text-generation-webui $(./autotag text-generation-webui) \
  python3 download-model.py --output=/data/models/text-generation-webui \
    TheBloke/llava-v1.5-13B-GPTQ
Notice that the above command is going to download a model to be used. The model is TheBloke/llava-v1.5-13B-GPTQ
3. Open the browser, access http://<IP_ADDRESS>:7860, drop an image in the Chat tab and get the answer from the IA:

The image to test is a free-to-use image taken from https://www.pexels.com/photo/people-walking-in-market-439818/
NanoSAM (Segment Anything Model) tutorial
cd jetson-containers
./run.sh $(./autotag nanosam)
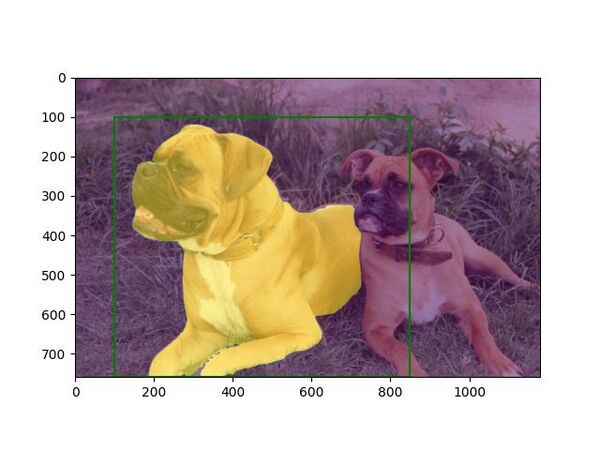
The NVIDIA NanoSAM tutorial uses the Example 1 - Segment with bounding box to show how to generate a segmentation output using the bounding-box specified in the example code. In this case, the example is going to segment the dog that is enclosed in the rectangle created by the (100,100), (850,759) points.
1. Move to the nanosam directory:
cd /opt/nanosam
2. Run the example:
python3 examples/basic_usage.py \
    --image_encoder="data/resnet18_image_encoder.engine" \
    --mask_decoder="data/mobile_sam_mask_decoder.engine"
Note that this example is going to use the ResNet18 model as the image encoder and the MobileSAM as the mask decoder.
3. The output is going to be saved in the /opt/nanosam/data/ under the basic_usage_out.jpg image. To check in your host machine, follow the next commands:
- 3.1. Copy the image into the
/data/directory that is mounted from the Jetson host:
cp data/basic_usage_out.jpg /data/
- 3.2. Copy the image into your computer using
scp:
scp data/basic_usage_out.jpg <host_user>@<host_IP>:<working_directory_path</code>
The output generated should look like the following:

For direct inquiries, please refer to the contact information available on our Contact page. Alternatively, you may complete and submit the form provided at the same link. We will respond to your request at our earliest opportunity.
Links to RidgeRun Resources and RidgeRun Artificial Intelligence Solutions can be found in the footer below.

