IMX6 Window Manager support
Introduction
This Document shows the instructions on how to enable the currently supported window managers on Ridgerun SDK for iMX6 boards. The current support is based on yocto and the supported window managers up to this date are Matchbox and Enlightenment. In the First section you'll see the instructions on how to enable the desired window manager in Ridgerun SDK and in the next section you'lll see some instructions on how to get the window manager from the Yocto project.
Enable Window manager on Ridgerun SDK
Currently X11 and the window managers are supported only for the professional version of the iMX6 Ridgerun SDKs, you can go to Ridgerun Store and see the available SDKs.
You have the option to install only one of the window managers and it is going to be automatically started at boot time or you can also have both of them and chose the one that is going to be started (the default configuration is Enlightenment).
To enable the desired window manager follow this steps:
1. Type "make coreconfig" and for the toolchain select Linaro.
make coreconfig
2. In menuconfig go to Toolchain configurations and in the Floating point support section select Hardware floating point.

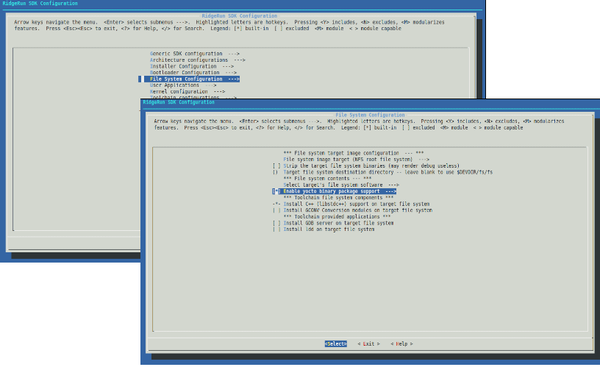
3. Go to File System Configuration and check the option Enable yocto binary package support.

4. Exit and save configuration.
5. Type "make config".
make config
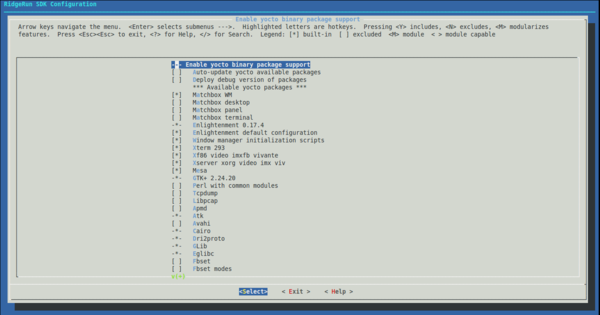
6. Go to File System Configuration -> Enable yocto binary package support and select Matchbox WM to install Matchbox and/or Enlightenment 0.17.4 to install Enlightenment. Additionally you can select other features for the selected window manager:
- Matchbox desktop: A small desktop for mathbox.
- Matchbox panel: Panel for Matchbox
- Matchbox terminal: A terminal for Matchbox.
- Enlightenment default configuration: By default, the first time you run Enlightenment you'll see a wizard that allows you to configure it, this package configures Enlightenment with a default environment so you don't see the wizard.
- Window manager initialization scripts: Scripts to automatically start the installed window manager (if both are installed, Enlightenment is going to be started).
7. In File System Configuration -> Enable yocto binary package support select Xf86 video imxfb vivante, Xserver xorg video imx viv and Mesa
Note: It's recommended to select the Window manager initialization scripts option no matter the desired window manager and additionally, the Enlightenment default configuration option if you selected Enlightenment.

8. Exit and save configuration.
9. Compile your SDK.
make
Once you compiled and installed the SDK, the selected window manager is going to start automatically at boot time.
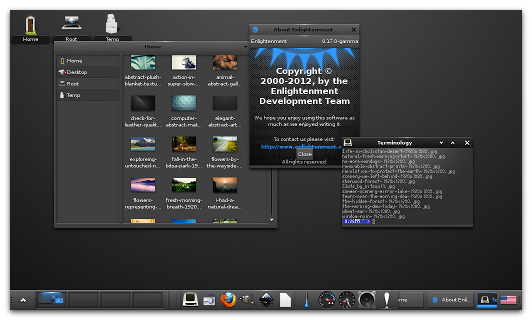
Here is a screenshot of Enlightenment running on Freescale iMX6 Sabre-SDP.

In the next section you'll see the steps to get Enlightenment (or any other package) from Yocto.
Getting Window manager from Yocto
This section shows the steps followed to enable the Enlightenment window manager for the iMX6 board. The first section gives a small overview of the windowing manager and the second section shows the steps to enable its usage from yocto in order to get all its dependencies. The instructions here are focused on Enlightenment but you can follow a similar procedure with any other package.
Enlightenment overview
Enlightenment is a stacking window manager for the X protocol, or as described for its developers "is not just a window manager for Linux/X11 and others, but also a whole suite of libraries to help you create beautiful user interfaces with much less work than doing it the old fashioned way and fighting with traditional toolkits". It gives the user a complete desktop environment, something similar to the well known GNOME or UNITY.
The Enlightenment environment is fully customizable giving the user the possibility to choose between multiple themes, profiles and other configurations. It also allows the user the configuration of multiple desktops and the addition of multiple gadgets or widgets as modules that can be loaded or disabled at any time. At least in my case the difference between a theme and a profile is not very clear but as described for Bodhilinux Themes and Bodhilinux Profiles "Themes answer the how of displaying aspects on your desktop. Profiles answer the where and what".
The next image shows an example of a Desktop profile.

Enlightenment is build on top of what is known as EFL (the Enlightenment Foundation Libraries).
Description about Enlightenment
Enabling Enlightenment window manager in Yocto
In order to add all the dependencies needed to enable Enlightenment in RR SDK the first step was to enable its usage in the Freescale demo image from yocto (fsl-image-gui) which by default uses Matchbox.
1. First of all, get Yocto dora release by doing:
mkdir yocto && cd yocto
repo init -u https://github.com/Freescale/fsl-community-bsp-platform -b dora
repo sync
That is going to download all the necessary repositories to the created yocto folder
Note: in order to execute the previous commands you need repo (GIT based repository manager from google) to be in your system. Here you can find some information about repo as well as the instructions on how to download it.
2. Next step is to configure the bitbake environment by doing from the yocto directory:
. setup-environment build
That is going to set up the environment (something similar to our make env).
3. Once the environment is configured you have to modify the bblayers file in order to include the openembedded layer which has the recipes for building Enlightenment.
geany build/conf/bblayers.conf
Just add ${BSPDIR}/sources/meta-openembedded/meta-efl to the end of the file. It should look something like this:
LCONF_VERSION = "6"

BBPATH = "${TOPDIR}"
BSPDIR := "${@os.path.abspath(os.path.dirname(d.getVar('FILE', True)) + '/../..')}"

BBFILES ?= ""
BBLAYERS = " \
  ${BSPDIR}/sources/poky/meta \
  ${BSPDIR}/sources/poky/meta-yocto \
  \
  ${BSPDIR}/sources/meta-openembedded/meta-oe \
  \
  ${BSPDIR}/sources/meta-fsl-arm \
  ${BSPDIR}/sources/meta-fsl-arm-extra \
  ${BSPDIR}/sources/meta-fsl-demos \
  ${BSPDIR}/sources/meta-openembedded/meta-efl \
"
4. With that modification you enable the usage of the recipes in the meta-efl layer. Now we have to enable the compilation of Enlightenment, to do so edit the fsl-image-gui image recipe:
geany sources/meta-fsl-demos/recipes-fsl/images/fsl-image-gui.bb
and add to the IMAGE_INSTALL variable the packagegroup-x11-illume recipe which selects all the necessary dependencies to compile Enlightenment. It should look something like:
include recipes-sato/images/core-image-sato.bb

IMAGE_FEATURES += "debug-tweaks"
DISTRO_FEATURES += "pulseaudio"
WEB = "web-webkit"

SOC_EXTRA_IMAGE_FEATURES ?= "tools-testapps"

# Add extra image features
EXTRA_IMAGE_FEATURES += " \
    ${SOC_EXTRA_IMAGE_FEATURES} \
    nfs-server \
    tools-debug \
    tools-profile \
    qt4-pkgs \
"

SOC_IMAGE_INSTALL = ""
SOC_IMAGE_INSTALL_mx5 = "glcubes-demo"

IMAGE_INSTALL += " \
    ${SOC_IMAGE_INSTALL} \
    cpufrequtils \
    nano \
    packagegroup-fsl-gstreamer \
    packagegroup-fsl-tools-testapps \
    packagegroup-fsl-tools-benchmark \n
    packagegroup-qt-in-use-demos \
    packagegroup-x11-illume \
    qt4-plugin-phonon-backend-gstreamer \
    qt4-demos \
    qt4-examples \
    fsl-gui-extrafiles \
    "

export IMAGE_BASENAME = "fsl-image-gui"
5. Once you enable the recipe, the next step is change the mobile profile used by default for openembedded for the standard (the one for a desktop environment).
geany sources/meta-openembedded/meta-efl/recipes-efl/packagegroups/packagegroup-x11-illume.bb
and modify the ECONFIG variable to use the standard profile instead of the mobile. It should look something like this:
DESCRIPTION = "The Illume Windowing Environment -- install this task to get the Enlightenment Window Manager + the Illume environment."
SECTION = "x11/wm"
LICENSE = "MIT"
LIC_FILES_CHKSUM = "file://${TOPDIR}/meta-openembedded/meta-efl/COPYING.MIT;md5=3da9cfbcb788c80a0384361b4de20420"
PV = "1.0"
PR = "r5"

inherit packagegroup allarch

# Default theme and config
ETHEME ?= "e-wm-theme-default"
ECONFIG ?= "e-wm-config-standard"

RPROVIDES_${PN} += "task-x11-illume"
RREPLACES_${PN} += "task-x11-illume"
RCONFLICTS_${PN} += "task-x11-illume"
RDEPENDS_${PN} = "\
    packagegroup-core-x11-xserver \
    packagegroup-core-x11-utils \
    \
    e-wm \
    ${ECONFIG} \
    ${ETHEME} \
"
6. After that, the next step to configure the desired package types (rpm, deb, ipk) and other options from the local.conf file:
geany build/conf/local.conf
It should look something like this:
MACHINE ??= 'imx6qsabresd'
DISTRO ?= 'poky'
PACKAGE_CLASSES ?= "package_deb"
EXTRA_IMAGE_FEATURES = "debug-tweaks"
USER_CLASSES ?= "buildstats image-mklibs image-prelink"
PATCHRESOLVE = "noop"
DL_DIR = "/opt/yocto/downloads/"
BB_DISKMON_DIRS = "\
    STOPTASKS,${TMPDIR},1G,100K \
    STOPTASKS,${DL_DIR},1G,100K \
    STOPTASKS,${SSTATE_DIR},1G,100K \
    ABORT,${TMPDIR},100M,1K \
    ABORT,${DL_DIR},100M,1K \
    ABORT,${SSTATE_DIR},100M,1K"
CONF_VERSION = "1"

BB_NUMBER_THREADS = '4'
PARALLEL_MAKE = '-j 4'

DL_DIR ?= "${BSPDIR}/downloads/"
ACCEPT_FSL_EULA = ""
7. Now you are ready to generate the image.To do so just go to the build directory and type:
bitbake fsl-image-gui
With that command an sdcard image is going to be generated under build/tmp/deploy/images/imx6qsabresd and all the packages are going to be located at /build/tmp/deploy under the folder rpm, deb or ipk, depending on the selected package class.
Note: if this is the first time that you generate a yocto image the process is gong to take a wile, and for a wile I really mean a wile.
8. Once the image is generated you can go ahead and select all the necessary dependencies to make Enlightenment work. A useful command to show all its dependencies is the following:
bitbake -g e-wm && cat pn-depends.dot | grep -v -e '-native' | grep -v digraph | grep -v -e '-image' | awk '{print $1}' | sort | uniq
this command shows you all the dependencies, make sure to have all of them.
Note: In this link you can find a list of useful commands to be used with bitbake.
This process is explained to get all the Enlightenment dependencies but you can follow a similar one in order to add any other package. In the next section you can find useful links giving an overview of the yocto project as well as some tips.
