RidgeRun Display Microservice

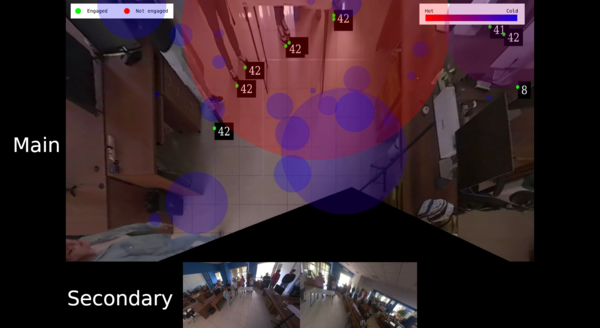
RidgeRun's display Microservice is designed to display video and information for people engagement. It shows a mosaic of videos made of a main (BEV) video and secondary camera streams. Additionally it can overlay a heatmap on top of the main video.

The following picture shows a basic diagram of the service

The service can be configured using a configuration file or via REST API.
Service Configuration
The service can be configured in 2 different ways: providing a configuration file via the --config_file CLI argument or via the /configuration request (see the [service API documentation]). In both cases the configuration will be in JSON format as follows:
{
"inputs": {
"cameras": [
"cam0",
"cam1"
],
"heatmap": true
}
This configuration allows to include any number of cameras using this format. The identifies cam0, cam1, camN need to match the same names used on the Camera service to identify each camera.
The configuration entries are as follows:
- cameras: The list of the camera to be displayed. This name has to match any of the camera streams provided by the Camera Service.
- heatmap: Define whether a heatmap representing the engagement is shown on top of the BEV.
Heatmap
The heatmap can be enabled/disabled by using the heatmap field in the configuration. If enabled, a heatmap will be overlayed on top of the BEV stream. The data for the heatmap is obtained from redis from the Heatmap stream with the following format:
"heatmap":[{"position":{"x":int, "y": int}, "intensity":float, "radius": int}, {"position":{"x":int, "y": int}, "intensity":float, "radius": int}, ...]
Running the Service
Using Docker
You can obtain or build a docker image for the display microservice, check below the method of your preference. The image includes a base L4T image and the dependencies to run the display microservice application. The image was developed and tested for NVIDIA JetPack 6.0. Once you get your image with either method proceed to Launch the container
Pre-build Image
Once you have obtained the display-service docker image, you can install it in your jetson with the following command:
docker load < display-service.tar.gz
Build Image
You can build the display service image using the Dockerfile in the docker directory. First, we need to prepare the context directory for this build. You need to create a directory and include this repository and the remaining dependencies. The Dockerfile will look for all the packages in the context directory and copy them to the container.
After this, your context directory should look like this:
display-context/ ├── display └── rrms-utils
Then build the container image with the following command:
docker build \ --network=host \ -f Dockerfile \ -t ridgerun/display-service:latest \ display-context/
Change display-context/ to your context's path and the tag to the name you want to give to the image.
Launch the container
You can ensure the image has been created successfully by running
docker images
You should get an entry showing the ridgerun/display-service image
nvidia@ubuntu:~$ docker images REPOSITORY TAG ridgerun/display-service latest
The container can be launched by running the following command:
DISPLAY=:1 xhost +local:docker
docker run \
-e DISPLAY=:1 \
--runtime nvidia \
-it \
--network host \
-v /tmp/argus_socket:/tmp/argus_socket \
--name display-service \
ridgerun/display-service:latest
Here we are creating a container called display-service that will start the display service application (check Using Standalone Application), launching the server in 127.0.0.1 and port 5052.By default, the service will try to communicate with the camera and [1] services to obtain the URI for the streams to be shown. In order to start the display service with your own configuration you can use the following command.
DISPLAY=:1 xhost +local:docker
docker run \
-e DISPLAY=:1 \
--runtime nvidia \
-it \
--network host \
-v /tmp/argus_socket:/tmp/argus_socket \
-v <configuration file path on host>:/init_config.json \
--name display-service \
ridgerun/display-service:latest \
--config_file /init_config.json --host=<host to be used> --port=<port to be used>
Just change <configuration file path on host> with the path to your configuration file in local host.
You can verify the container is running with:
docker ps
You should see an entry with the display-service container:
nvidia@ubuntu:~$ docker ps
CONTAINER ID   IMAGE                                            COMMAND                  CREATED          STATUS          PORTS     NAMES
429b11d89523   ridgerun/display-service                       "display --config…"   13 hours ago     Up 3 minutes             display-service
Using Standalone Application
The display service can also be used outside of the docker container. You can install it by running the following command from the project directory:
pip install .
Then you will have the service with the following options:
usage: display [-h] [--port PORT] [--host HOST] [--config_file CONFIG_FILE]

options:
  -h, --help            show this help message and exit
  --port PORT           Port for server
  --host HOST           Server ip address
  --config_file CONFIG_FILE
                        JSON file with streams and heatmap configuration
To start the service in address 127.0.0.1 and port 5052 just run:
display-service
If you want to serve in a different port or address, use the --port and --host options.
If you want to start with a configuration, you can use the --config_file argument to specify the path to your configuration.
