Birds Eye View -
Chunk:
| ⇦ Getting Started/Quickstart Guide | Home | User Guide/Minimal Application ⇨ |
This wiki shows how to build the source code. It assumes you have already purchased a license and received access to the source code. If not, head to How to Get the Code for instructions on how to proceed. == Install the Dependencies == Before anything, ensure you have installed the following dependencies: * Git: To clone the repository. * Meson: To configure the project. * Ninja: To build
Chunk:
the project. * JsonCPP dev files: For the parameter loading. * OpenCV dev files: For image loading, processing and displaying. * GStreamer dev files and plugins: (optional) for image loading. * QT5 dev files: (optional) for image displaying. * CppUTest dev files: (optional) for unit testing. * Doxygen, Graphviz: (optional) for documentation generation. * Wget, Unzip: (optional) to download and unpack the sample images. In Debian-based systems (like Ubuntu) you can run:
sudo apt update
sudo apt install -y \
  libjsoncpp-dev \
  libopencv-dev libopencv-core-dev \
  libopencv-video-dev libopencv-highgui-dev libopencv-videoio-dev \
  libgstreamer1.0-dev libgstreamer-plugins-base1.0-dev \
  gstreamer1.0-plugins-bad gstreamer1.0-plugins-good gstreamer1.0-plugins-base \
  gstreamer1.0-libav gstreamer1.0-plugins-ugly \
  qtbase5-dev qtmultimedia5-dev libqt5multimedia5-plugins \
  git wget unzip libcpputest-dev doxygen graphviz \
  python3-pip ninja-build
sudo -H pip3 install meson
== Building the Project == 1. Start by cloning the project using the repository you have been given
git clone git@gitlab.ridgerun.com:$YOUR_REPO/libpanorama
cd libpanorama
Replace `$YOUR_REPO` with the actual repository path you
Chunk: were given by RidgeRun |
2. Configure the project by running the following (recommended): ==== CUDA Accelerated ====
meson setup builddir --prefix /usr/
==== Plain CPU ====
meson setup -Dnpp=disabled builddir --prefix /usr/
Note that there is nothing special about the name builddir, you can choose whatever name you want. If you choose to change it, make sure you change it in the remainder of the steps in this guide.
"If anything fails, please provide the output log of the configuration step to support@ridgerun.com |
There are some configuration options you can use, in case you want to fine tune your build. These are not necessary and we recommend
Chunk:
not using them, unless you have a specific reason to.
| Option name | Possible values | Description | Default |
|---|---|---|---|
| examples | enabled/disabled | Whether to build or not the examples. | enabled |
| tests | enabled/disabled | Whether to build or not the tests. | enabled |
| docs | enabled/disabled | Whether to build or not the API docs. | enabled |
| npp | enabled/disabled | Whether to use CUDA (NPP) acceleration or not. | enabled |
| opencv | enabled/disabled | Whether to build or not OpenCV IO classes. | enabled |
| gstreamer | enabled/disabled | Whether to build or not GStreamer IO classes. | enabled |
| qt | enabled/disabled | Whether to build or not QT IO classes. | enabled |
To use configuration options pass them like meson setup -Doption1=value1 -Doption2=value2 builddir. 3. Build the project by running:
ninja -C builddir
4. Optionally, run the unit tests by executing:
ninja -C builddir test
5. Optionally, install the project by running:
sudo ninja -C builddir install
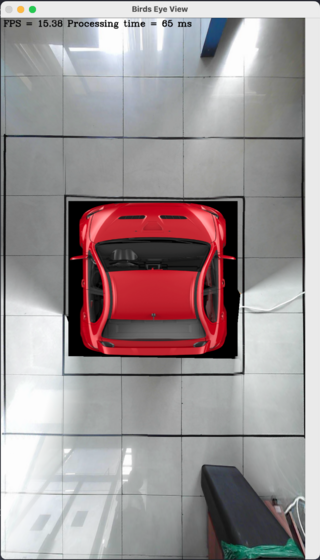
== Validating the Build == To ensure the build was successful, run the default example with the provided samples. 1. Download the sample images, if you haven't already.
cd samples
./download_samples.sh
cd ..
2. Run the example as:
./builddir/examples/birds_eye_view -p examples/birds_eye_view.json
You should see an output as the one below:
