Getting Started Guide for Jetson TX1: Difference between revisions
| Line 35: | Line 35: | ||
== Setting up your Jetson to boot from SD card == | == Setting up your Jetson to boot from SD card == | ||
== Configuring SDK to deploy | == Configuring SDK to deploy kernel and filesystem to a SD card == | ||
This section describes how to configure the tegrax1-jetson's SDK to deploy all the components (kernel and file system) into a bootable SD card. The RidgeRun SDK support several filesystem types (SD, eMMC and NFS) however in this case we are going to use it on the SD card as well. | |||
1. Open a make config menu | |||
<pre style="background:#d6e4f1"> | |||
make config | |||
</pre> | |||
running make config your SDK is going to download all basic packages needed by the SDK build system. | |||
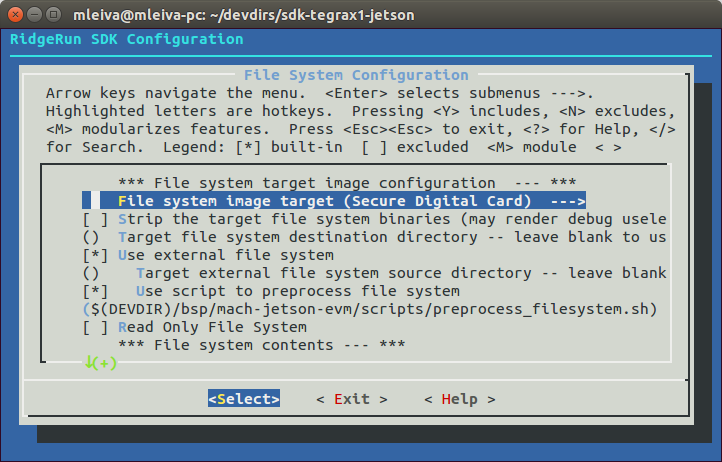
2. Go to File System Configuration submenu and configure your filesystem as is shown in Fig.1 and Fig.2 | |||
[[Image:tegraX1-jetson-sdk-v_1_0_0-opt-fs.png|thumb|center|722px|tegraX1-jetson-sdk-v_1_0_0-opt-fs.png]] | |||
<div style="text-align: center;">'''Figure 1'''. Main menu File System Configuration option</div> | |||
<br> | |||
[[Image:tegraX1-jetson-sdk-v_1_0_0-fs-menu.png|thumb|center|722px|tegraX1-jetson-sdk-v_1_0_0-fs-menu.png]] | |||
<div style="text-align: center;">'''Figure 2'''. File System Configuration sub menu</div> | |||
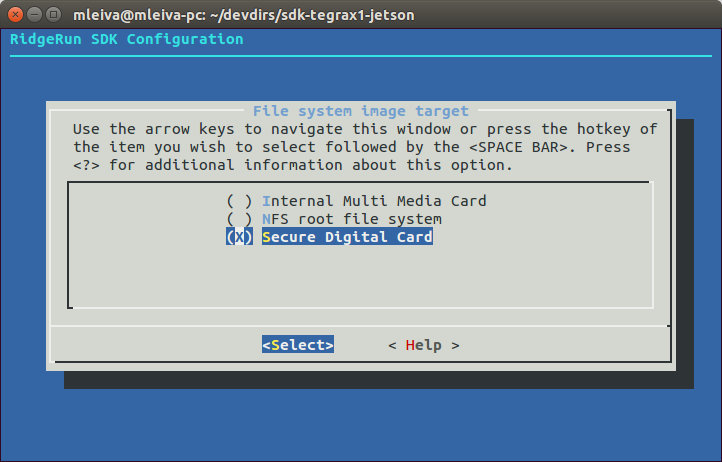
3. Configure your file system target as is shown in Fig.3 | |||
[[Image:tegraX1-jetson-sdk-v_1_0_0-fs-target.png|thumb|center|722px|tegraX1-jetson-sdk-v_1_0_0-fs-target.png]] | |||
<div style="text-align: center;">'''Figure 2'''. File system target</div> | |||
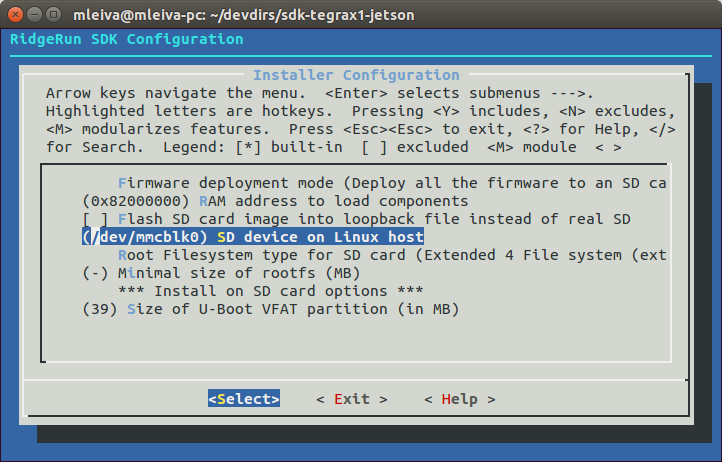
<br> 4. Go to Installer Configuration submenu and configure your destination SD device as is shown in Fig.4 | |||
[[Image:tegraX1-jetson-sdk-v_1_0_0-ints-dev-mmc.png|thumb|center|722px|tegraX1-jetson-sdk-v_1_0_0-ints-dev-mmc.png]] | |||
<div style="text-align: center;">'''Figure 3'''. Configure SD device</div> | |||
5. Compile your SDK | |||
<pre style="background:#d6e4f1"> | |||
make | |||
</pre> | |||
== Installing SDK's firmware to a SD card == | == Installing SDK's firmware to a SD card == | ||
Revision as of 19:01, 6 October 2016
Introduction
On this page you are going to find all the necessary information to start from scratch to use the RidgeRun SDK on your Tegra X1 Jetson module. In the following sections we assume that you have already downloaded Jetpack version XXXX and that you have installed the toolchains XXXX from codesourcery as well as your RidgeRun Tegra X1 SDK following the steps on the RidgeRun installation guide.
The first section of this guide shows you how to install Jetpack in your computer and how to configure a TFTP and NFS server. Subsequently, the second section contains instructions about how to configure the RidgeRun's SDK to create a SD card with all software components (uboot, kernel and filesystem) needed to boot to Linux Shell in your Jetson Board. Finally some links to gstreamer pipelines are provided.
On the rest of this document, we refer as $DEVDIR to the path where the RidgeRun SDK for Tegra X1 is installed.
Basic preliminary work
Installing Toolchain
Installing Jetpack
Setting up serial access to the Linux console
You use the serial port to control u-boot and Linux. The picocom terminal emulator work well for this purpose.
Setting up a TFTP server
If you are planning to use the SDK's installer to install images generated by the SDK in NAND, installing a TFTP server you will speed up downloads to the target hardware by using TFTP.
Setting up an NFS server
For application development, it is convenient to use root NFS mount file system for the target hardware. This allows you to rebuild your application on the host and immediately run the application on the target hardware with no interveining steps. You host PC needs to be configured as a NFS server for this in order to work properly.
Booting from a SD card
Setting up your Jetson to boot from SD card
Configuring SDK to deploy kernel and filesystem to a SD card
This section describes how to configure the tegrax1-jetson's SDK to deploy all the components (kernel and file system) into a bootable SD card. The RidgeRun SDK support several filesystem types (SD, eMMC and NFS) however in this case we are going to use it on the SD card as well.
1. Open a make config menu
make config
running make config your SDK is going to download all basic packages needed by the SDK build system.
2. Go to File System Configuration submenu and configure your filesystem as is shown in Fig.1 and Fig.2


3. Configure your file system target as is shown in Fig.3

4. Go to Installer Configuration submenu and configure your destination SD device as is shown in Fig.4

5. Compile your SDK
make
Installing SDK's firmware to a SD card
Booting from emmc
Configuring SDK to install firmware in emmc
Configuring your Filesystem type
Flashing uboot, kernel and filesystem in emmc
Setting up your Jetson to boot from emmc
CUDA Demos
Using Gstreamer
Some GStreamer examples to implement basic multimedia pipelines can be found at Gstreamer pipelines for Tegra X1. If you require support creating a custom pipeline please don't hesitate to contact us
