RidgeRun and Arducam NVIDIA Jetson Demo - Installing Instructions - IMX708 camera driver setup
| RidgeRun and Arducam NVIDIA®Jetson™Demo |
|---|

|
| Getting Started |
| Installing Instructions |
| Executing the demo |
| Contact Us |
Initial instructions. IMX708 camera driver setup
The following instructions are based on the following RidgeRun's Developer Wiki: Raspberry Pi Camera Module 3 IMX708 Linux driver for Jetson
Download JetPack
The current version of the driver is supported on Jetpack 5.1.1 on Orin NX. Porting the driver to other versions and platforms is possible.
1. Download and install the NVIDIA SDK Manager (membership is required).
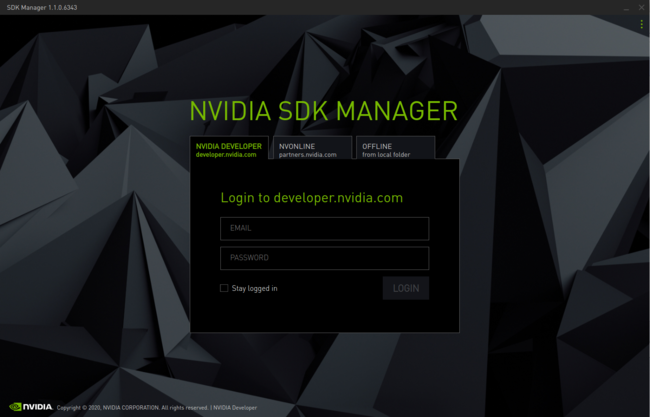
2. Put your NVIDIA membership credentials in the SDK Manager main window:
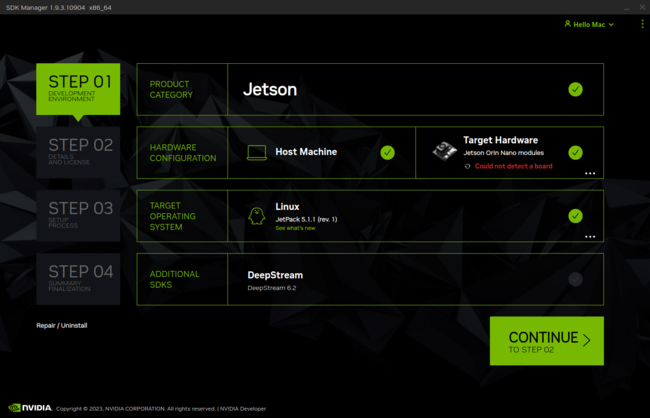
3. Select JetPack version and Jetson Orin NX as shown below and press Continue:
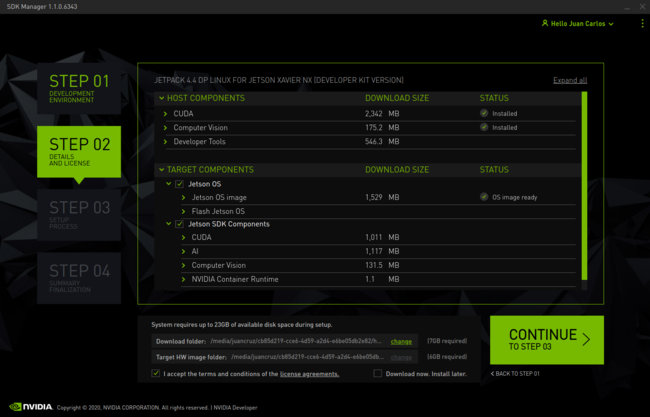
4. Accept the terms and conditions and press Continue. The SDK Manager will download and install the selected components:
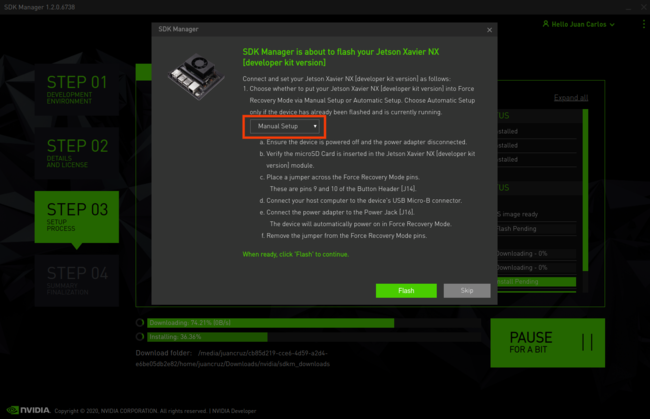
5. Be careful with the platform you will be flashing, the image shown is for Jetson Xavier, in your case Jetson Orin NX must be shown. Select Manual Setup. Make sure the board is in Recovery Mode and then press Flash:
Recovery Mode for Jetson Orin NX
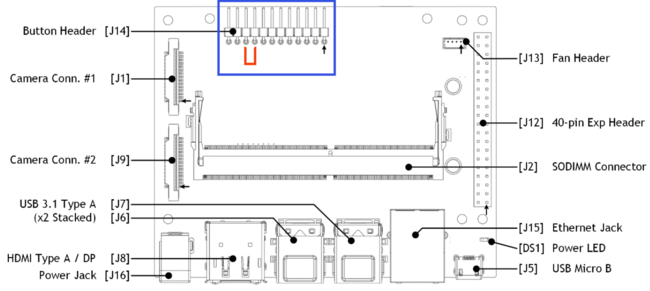
- To set the Jetson Orin Nano developer kit in Recovery Mode the following steps are required:
- Ensure the device is powered off and the power adapter is disconnected.
- Place a jumper across the Force Recovery Mode pins (9 and 10) on the button header [J14]. Please, see Figure 6 below.
- Connect your host computer to the developer kit's USB Micro-B connector.
- Connect the power supply to the power jack [J16]. The developer kit automatically powers on in Force Recovery Mode.
- Remove the jumper from the Force Recovery Mode pins.
- Use the
lsusbcommand to check if theNVidia corpmessage is shown.
6. When the OS has been installed successfully in the Orin Nano, you will be asked to enter the board IP, a username and a password, as shown below in Figure7:
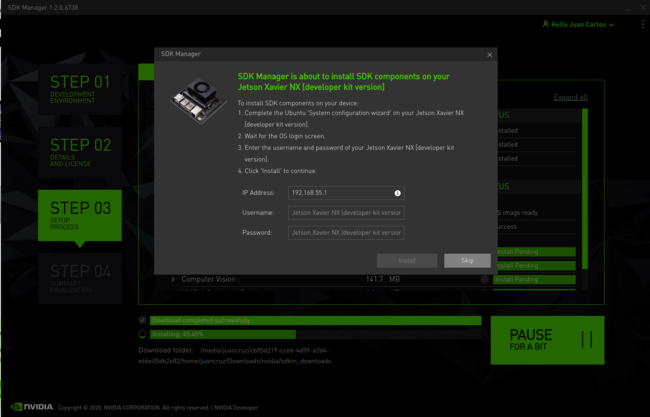
7. Don't close the window of Figure 7 and don't modify its content yet. You need to connect a screen to the board via HDMI, a keyboard/mouse via USB port, and a network cable via Ethernet port. You can remove the jumper that keeps the board in Recovery Mode and then reboot the Jetson board at this point if necessary.
Installing the Driver - JetPack sources patch and SCP files copy
Install dependencies on the host computer
sudo apt update
sudo apt install git \
wget \
quilt \
build-essential \
bc \
libncurses5-dev libncursesw5-dev \
rsync
Get the source code from NVIDIA oficial repository
cd
wget https://developer.nvidia.com/downloads/embedded/l4t/r35_release_v3.1/sources/public_sources.tbz2/ -O public_sources.tbz2
tar -xjf public_sources.tbz2 Linux_for_Tegra/source/public/kernel_src.tbz2 --strip-components 3
Export the Jetpack directory as the environment variable DEVDIR:
(In our case the nvidia directory is in the HOME directory, which in our case is /home/nvidia/ Remember that this directory is created by the sdk manager when you downloaded the sources and flashed your Jetson board).
export DEVDIR=~/nvidia/nvidia_sdk/JetPack_5.1.1_Linux_JETSON_ORIN_NX_TARGETS/Linux_for_Tegra
And now create the sources directory and extract the kernel sources:
mkdir $DEVDIR/sources
tar -xjf kernel_src.tbz2 -C $DEVDIR/sources
Build and install the driver
Get the driver patches
Download contents provided in RidgeRun GitHub by running the command:
git clone https://github.com/RidgeRun/NVIDIA-Jetson-IMX708-RPIV3.git
cd NVIDIA-Jetson-IMX708-RPIV3/patches_orin_nano
Then you will need the patch in the directory $DEVDIR/sources by running:
cp -r patches/ $DEVDIR/sources
Next, you can then apply the patch and go back to the Linux_for_Tegra directory.
cd $DEVDIR/sources
quilt push -a
cd ..
Set up the toolchain
You will need to download the toolchain to compile the sources:
mkdir $HOME/l4t-gcc
cd $HOME/l4t-gcc
wget -O toolchain.tar.xz https://developer.nvidia.com/embedded/jetson-linux/bootlin-toolchain-gcc-93
sudo tar -xf toolchain.tar.xz
Build
Create output directories:
KERNEL_OUT=$DEVDIR/sources/kernel_out
MODULES_OUT=$DEVDIR/sources/modules_out
mkdir -p $KERNEL_OUT
mkdir -p $MODULES_OUT
export CROSS_COMPILE_AARCH64=$HOME/l4t-gcc/bin/aarch64-buildroot-linux-gnu-
Compile the Kernel:
cd $DEVDIR/sources
make -C kernel/kernel-5.10/ ARCH=arm64 O=$KERNEL_OUT LOCALVERSION=-tegra CROSS_COMPILE=${CROSS_COMPILE_AARCH64} tegra_defconfig

make -C kernel/kernel-5.10/ ARCH=arm64 O=$KERNEL_OUT LOCALVERSION=-tegra CROSS_COMPILE=${CROSS_COMPILE_AARCH64} menuconfig
- Be sure that IMX708 is selected and deselect any other IMX driver:
Device Drivers  --->
  <*> Multimedia support  --->
      Media ancillary drivers  --->
          NVIDIA overlay Encoders, decoders, sensors and other helper chips  --->
              <*> IMX708 camera sensor support
make -C kernel/kernel-5.10/ ARCH=arm64 O=$KERNEL_OUT LOCALVERSION=-tegra CROSS_COMPILE=${CROSS_COMPILE_AARCH64} Image

make -C kernel/kernel-5.10/ ARCH=arm64 O=$KERNEL_OUT LOCALVERSION=-tegra CROSS_COMPILE=${CROSS_COMPILE_AARCH64} dtbs

make -C kernel/kernel-5.10/ ARCH=arm64 O=$KERNEL_OUT LOCALVERSION=-tegra CROSS_COMPILE=${CROSS_COMPILE_AARCH64} modules

make -C kernel/kernel-5.10/ ARCH=arm64 O=$KERNEL_OUT LOCALVERSION=-tegra INSTALL_MOD_PATH=$MODULES_OUT modules_install
Installation
Install using scp command
Get the Jetson IP address going to your board, connect it by ethernet, run the command shown below and copy the ip address showed in eth0 (inet):
ifconfig
In your computer, copy the files via SSH by running
scp $KERNEL_OUT/arch/arm64/boot/Image nvidia@orin_ip_address:/tmp
scp $KERNEL_OUT/arch/arm64/boot/dts/nvidia/tegra234-p3767-0000-p3768-0000-a0.dtb nvidia@orin_ip_address:/tmp
Open a terminal on your Jetson and run:
sudo cp /tmp/Image /boot/
sudo cp /tmp/tegra234-p3767-0000-p3768-0000-a0.dtb /boot/dtb/kernel_tegra234-p3767-0000-p3768-0000-a0.dtb
Modify the extlinux.conf to accept the modified dtb by copying this code in the extlinux.conf file:
sudo nano /boot/extlinux/extlinux.conf
TIMEOUT 30
DEFAULT primary

MENU TITLE L4T boot options

LABEL primary
      MENU LABEL primary kernel
      LINUX /boot/Image
      FDT /boot/dtb/kernel_tegra234-p3767-0000-p3768-0000-a0.dtb
      INITRD /boot/initrd
      APPEND ${cbootargs} root=PARTUUID=77f45bd2-b473-4f54-8ff7-4ba0edc48af8 rw rootwait rootfstype=ext4 mminit_loglevel=4 console=ttyTCU0,115200 console=ttyAMA0,115200 firmware_class.path=/etc/firmware fbcon=map:0 net.ifnames=0 nv-auto-config

# When testing a custom kernel, it is recommended that you create a backup of
# the original kernel and add a new entry to this file so that the device can
# fallback to the original kernel. To do this:
#
# 1, Make a backup of the original kernel
#      sudo cp /boot/Image /boot/Image.backup
#
# 2, Copy your custom kernel into /boot/Image
#
# 3, Uncomment below menu setting lines for the original kernel
#
# 4, Reboot

# LABEL backup
#    MENU LABEL backup kernel
#    LINUX /boot/Image.backup
#    FDT /boot/dtb/kernel_tegra234-p3767-0000-p3768-0000-a0.dtb
#    INITRD /boot/initrd
#    APPEND ${cbootargs}
And now you can reboot
