Orion T-7 AI Platform
|
|
General Description
ORION T-7 is a product developed by Peak Wireless Corporation. It is a compact edge computing platform powered by the NVIDIA® Jetson™ TX2 supercomputer-on-module, providing 256 CUDA® cores on the NVIDIA® Pascal™ architecture. It integrates most common components for edge computing applications including Cameras, SSD, SD card, LAN, and WAN module. It is ideal for deployable computer vision and deep learning applications.
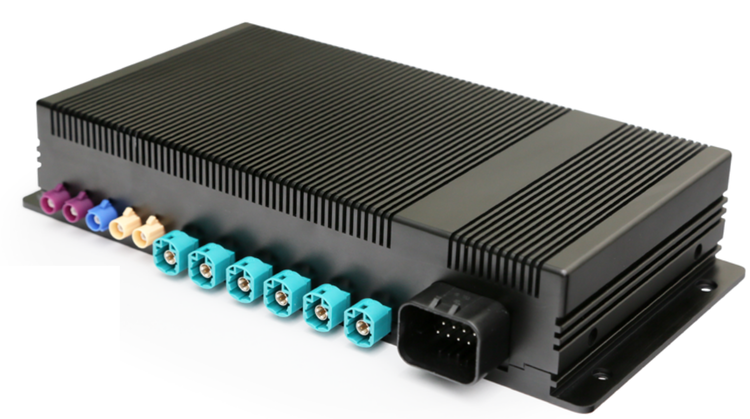
For more information, you can visit the official website of the product.
Orion T-7 Features
- NVIDIA® Jetson™ TX2 High-Performance AI Computer
- x6 SerDes Camera Port
- Gigabit Ethernet, WiFi, Bluetooth
- Support M.2 2280 SSD
- Support M.2 3042 LTE Module
- Built-in GPS Engine, Support Dead Reckoning
- Built-in 3-Axis Accelerometer
- Built-in 3-Axis Gyroscope
- WiFi, CAN, USB 3.0, RS-232, DI, HDMI
Applications
- Telematics
- Transportation
- Manufacturing
- Health care
- Retail
- Law Enforcement
- Security & Surveillance
Hardware Overview
ORION T-7 Board
In the following picture you can see the main components of the ORION T-7 board:

Main Connector
The main connector is composed by two pieces:
- Red/Black 776273-1 piece (male connector): cable side.
- Black 776266-1 piece (female connector): board side.

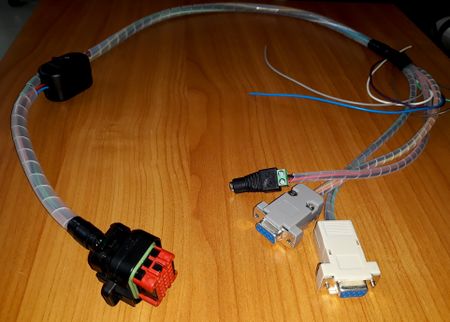
Main Cable
The main cable has the following components:
- 1 x 776273-1 Male connector.
- 1 x 2.1mm jack - Female DC power adapter.
- 1 x power switch.
- 2 x RS232 DB9 9 Pin Female connector.
The DC power adapter must be connected to the board charger.
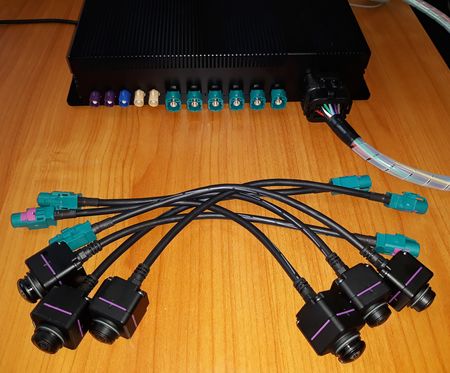
Cameras Set
The ORION T-7 has support for 6 cameras connected via High Speed Data (HSD) connectors.
Getting Started Guide
Physical Setup
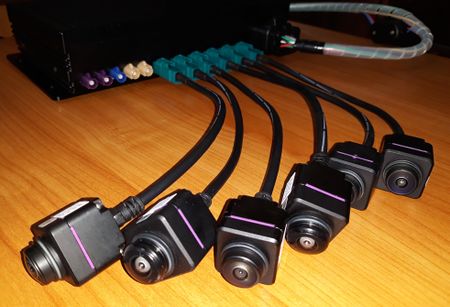
Camera Connection
- Connect the cameras to the ORION T-7 board as is shown in the following image:
Power Connection
- Connect the main cable to the board as follows:

- Connect the charger to the female DC power adapter of the main cable. Make sure the switch is turned off as is shown in the following picture:

After all the connections have been established, you can turn on the power switch.
Testing the Cameras
At this point you should be able to access the operating system of the board via ssh or by using a HDMI cable to a monitor, a mouse and a keyboard connected to the USB ports present in the ORION T-7. Once the session has been established, you can verify if all the 6 video devices were loaded properly. Open a terminal (Ctrl+Alt+T) and run:
ls /dev/ | grep video
Then, test the cameras by selecting one of the following options:
1 Channel
Select one of the six camera-IDs and run the pipeline:
gst-launch-1.0 v4l2src device=/dev/[videoID] ! 'video/x-raw,format=(string)UYVY,width=(int)1280,height=(int)720,framerate=(fraction)30/1' ! xvimagesink sync=false
Replacing the [videoID] by the video device you chose. You can find this pipeline in a script named v.sh at the 'home' directory of the board system. Here is an example of 1-channel capture.

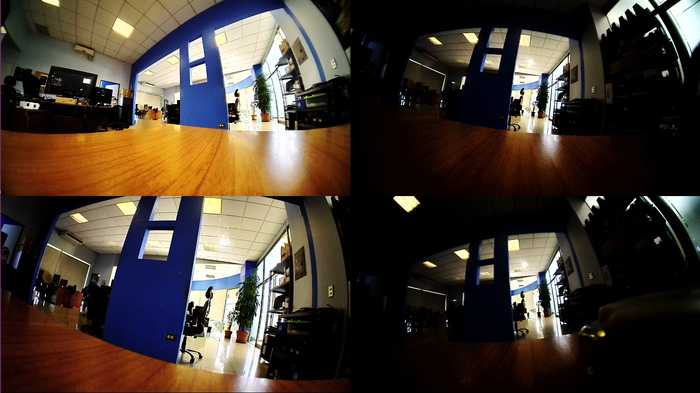
4 Channel
Run the following pipeline in order to capture from four cameras simultaneously:
gst-launch-1.0 -ev videomixer name=mix \
sink_0::xpos=0 \
sink_1::xpos=1280 \
sink_2::ypos=720 \
sink_3::xpos=1280 \
sink_3::ypos=720 \
! xvimagesink sync=false \
 v4l2src device=/dev/video0 \
! 'video/x-raw,format=(string)UYVY,width=(int)1280,height=(int)720,framerate=(fraction)30/1' \
! mix.sink_0 \
 v4l2src device=/dev/video1 \
! 'video/x-raw,format=(string)UYVY,width=(int)1280,height=(int)720,framerate=(fraction)30/1' \
! mix.sink_1 \
 v4l2src device=/dev/video2 \
! 'video/x-raw,format=(string)UYVY,width=(int)1280,height=(int)720,framerate=(fraction)30/1' \
! mix.sink_2 \
 v4l2src device=/dev/video3 \
! 'video/x-raw,format=(string)UYVY,width=(int)1280,height=(int)720,framerate=(fraction)30/1' \
! mix.sink_3
You can find this pipeline in a script named 4cams.sh at the 'home' directory of the board system. Here is an example of 4-channel capture:
6 Channel
Run the following pipeline in order to capture from the six cameras simultaneously:
gst-launch-1.0 -ev videomixer name=mix \
sink_0::xpos=0 \
sink_1::xpos=1280 \
sink_2::ypos=720 \
sink_3::xpos=1280 \
sink_3::ypos=720 \
sink_4::xpos=0 \
sink_4::ypos=1440 \
sink_5::xpos=1280 \
sink_5::ypos=1440 \
! xvimagesink sync=false \
 v4l2src device=/dev/video0 \
! 'video/x-raw,format=(string)UYVY,width=(int)1280,height=(int)720,framerate=(fraction)30/1' \
! mix.sink_0 \
 v4l2src device=/dev/video1 \
! 'video/x-raw,format=(string)UYVY,width=(int)1280,height=(int)720,framerate=(fraction)30/1' \
! mix.sink_1 \
 v4l2src device=/dev/video2 \
! 'video/x-raw,format=(string)UYVY,width=(int)1280,height=(int)720,framerate=(fraction)30/1' \
! mix.sink_2 \
 v4l2src device=/dev/video3 \
! 'video/x-raw,format=(string)UYVY,width=(int)1280,height=(int)720,framerate=(fraction)30/1' \
! mix.sink_3 \
 v4l2src device=/dev/video4 \
! 'video/x-raw,format=(string)UYVY,width=(int)1280,height=(int)720,framerate=(fraction)30/1' \
! mix.sink_4 \
 v4l2src device=/dev/video5 \
! 'video/x-raw,format=(string)UYVY,width=(int)1280,height=(int)720,framerate=(fraction)30/1' \
! mix.sink_5
You can find this pipeline in a script named 6cams.sh at the 'home' directory of the board system. Here is an example of 6-channel capture:

Switching Demo
Description
This demo is about a switch that display a number of cameras given by the user on simultaneous streaming mode.
Requirements
This demo uses the following RidgeRun's products:
Usage
- Run the script called gstd_interpipe.sh present at the 'home' directory of the board system.
- The number of cameras to display can be given by pressing a key from 1 to 6.
- Hit the Esc key to finish the program execution.
Performance Stats
Framerate and CPU Usage
For these performance tests the results were obtained by using GstShark. The CPU usage indicates the usage mean of the 4 cores used on the platform to run the pipelines when capturing from 1 to 6 cameras. The video output was sent to the following three sinks, where you can see a pipeline example used to get the stats for one camera in each case:
- fakesink: The video is not displayed.
GST_DEBUG=*TRACER*:9 GST_TRACERS="cpuusage;framerate" gst-launch-1.0 v4l2src device=/dev/video0 \
! "video/x-raw,format=(string)UYVY,width=(int)1280,height=(int)720,framerate=(fraction)30/1" ! fakesink
- videosink: The video is displayed.
GST_DEBUG=*TRACER*:9 GST_TRACERS="cpuusage;framerate" gst-launch-1.0 v4l2src device=/dev/video0 \
! "video/x-raw,format=(string)UYVY,width=(int)1280,height=(int)720,framerate=(fraction)30/1" ! xvimagesink
- filesink: The video is written on a .mkv file.
GST_DEBUG=*TRACER*:9 GST_TRACERS="cpuusage;framerate" gst-launch-1.0 v4l2src device=/dev/video0 ! "video/x-raw,format=(string)UYVY,width=(int)1280,height=(int)720,framerate=(fraction)30/1" ! nvvidconv ! omxh265enc ! matroskamux ! filesink location=test_cam0.mkv
You can find the test results in the following table:
| Fakesink (No Display) | Videosink (Display) | Filesink (Video File) | ||||
|---|---|---|---|---|---|---|
| Number of Cameras | Framerate (fps) | CPU Usage (%) | Framerate (fps) | CPU Usage (%) | Framerate (fps) | CPU Usage (%) |
| 1 | 30 | 5.5 | 30 | 23.5 | 30 | 13.5 |
| 2 | 30 | 20 | 30 | 13.5 | 30 | 20.5 |
| 3 | 30 | 20 | 30 | 18 | 30 | 25 |
| 4 | 30 | 21.5 | 30 | 18.5 | 30 | 22.5 |
| 5 | 30 | 22 | 30 | 14 | 30 | 23.5 |
| 6 | 30 | 22 | 30 | 14 | 30 | 27.5 |
Glass to Glass Video Latency
The glass to glass test let us identify the latency the capture is having. As you can see in the photo, in this case was possible to identify a latency of 142 ms.

This time can be considered as acceptable, depending on the application where these sensors are being used.
|
RidgeRun Resources | |||||
|
|||||
| Visit our Main Website for the RidgeRun Products and Online Store. RidgeRun Engineering informations are available in RidgeRun Professional Services, RidgeRun Subscription Model and Client Engagement Process wiki pages. Please email to support@ridgerun.com for technical questions and contactus@ridgerun.com for other queries. Contact details for sponsoring the RidgeRun GStreamer projects are available in Sponsor Projects page. |  
|
