
Coral from Google - Introduction - Getting Started
| Coral from Google |
|---|
 |
| Introduction |
| GStreamer |
| GstInference |
| Camera Drivers |
| Reference Documentation |
| Contact Us |
The following guide is based on the official Coral Dev board started guide.
Hardware requirements
Besides the Coral Dev board, you need the following hardware:
- Linux or Mac computer
- USB-A to USB-micro-B cable (to connect your PC to the board's serial port)
- USB-A to USB-C cable (to connect your PC to the board's data port)
- 2 - 3A (5V) USB Type-C power supply (such as a phone charger)
- Ethernet cable or Wi-Fi connection
Software requirements
1. Install a console serial program, such as screen, picocom or minicom.
2. Install the latest version of the fastboot tool.
Download it from the Android SDK Platform-tools and then run the following commands:
mkdir -p ~/.local/bin

sudo mv ~/Downloads/platform-tools/fastboot ~/.local/bin/
To verify the installation run the following:
fastboot --version
3. Install the Mendel Development Tool (MDT).
This is the tool that will be used to connect with the Dev board. To install it, run this command:
pip3 install --user mendel-development-tool
Flash the board
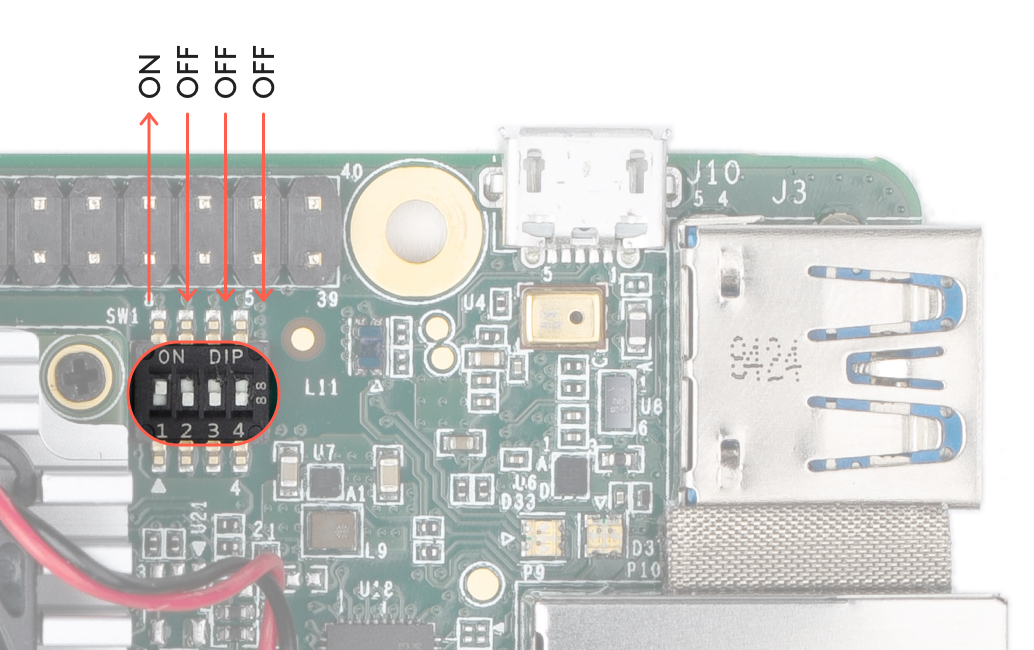
Before proceeding to the flash of the board, first verify the following:
- The board is unplugged from the power and your computer.
- The boot mode switches are set to eMMC mode.

Initiate fastboot mode
If your dev board was manufactured after April 10, 2019; you can skip the fastboot initiate. For more details about how to verify the manufacturing date, see this guide.
1. Install the udev rule or driver on your host computer.
sudo sh -c "echo 'SUBSYSTEM==\"usb\", ATTR{idVendor}==\"0525\", MODE=\"0664\", \
GROUP=\"plugdev\", TAG+=\"uaccess\"' >> /etc/udev/rules.d/65-edgetpu-board.rules"

sudo udevadm control --reload-rules && sudo udevadm trigger
2. Connect to the serial console.
3. Connect to the board via de serial program. In this case we will be using the screen program.
Determine the dive name for the serial connection:
dmesg | grep ttyUSB
Then, connect via serial:
screen /dev/ttyUSB0 115200
4. Power the board.
5. Start fastboot.
From your serial connection prompt, run the following:
fastboot 0
Now, fastboot is initiated int the board and is waiting for the host computer to start the flashing process.
6. Disconnect the serial console.
Execute the flash script
1. Connect the USB-C cable to the port labeled OTG.
2. Verify fastboot sees your board.
fastboot devices
You should see the number of your device printed.
3. Download and flash the system image.
cd ~/Downloads

curl -O https://dl.google.com/coral/mendel/enterprise/mendel-enterprise-day-13.zip

unzip mendel-enterprise-day-13.zip \
&& cd mendel-enterprise-day-13

bash flash.sh
It will take around 5 minutes to complete the flashing process and then, the board reboots.
Connect to the board's shell via MDT
In your terminal, make sure that MDT can see your board running the following command:
mdt devices
You should see your device name and ip address. Then run the following:
mdt shell
Now you should be connected to the board's prompt shell.
Connect the board to the internet
You can either connect an Ethernet cable to the board or configure the wifi connection with the following command:
nmtui
Select Activate a connection and select the corresponding network from the list.
